Configuration
Overview
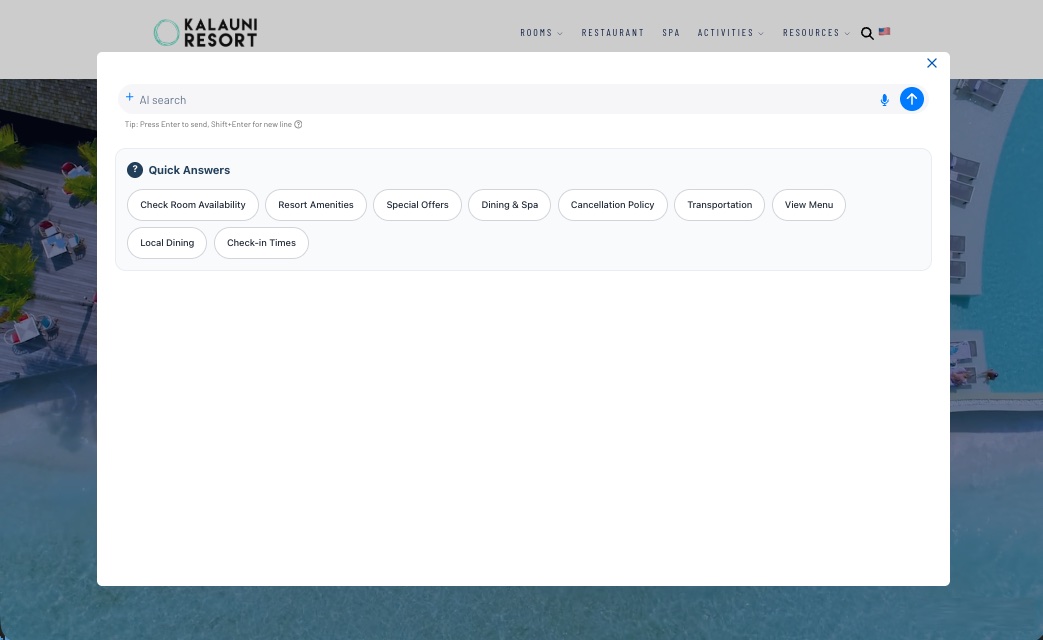
The ai12z CTA (Call-to-Action) Search is a powerful modal dialog component that provides AI-powered search capabilities with a rich, customizable interface. It can serve multiple purposes:
- AI Search Dialog: Full conversational AI search with natural language understanding
- Quick Answer Interface: Display commonly asked questions as quick-action buttons
- Welcome Screen: Present navigation shortcuts or featured content
- Multi-panel Experience: Create custom layouts with multiple information panels
Key Features
- Flexible Input Options: Audio input, image upload, and text search
- Customizable Layout: Position input field at top or bottom, control dialog dimensions
- Complete Control: Custom CSS and JavaScript for full design control
- Quick Answers: Pre-configured question buttons for common queries
- Mobile Optimized: Responsive design that adapts to any screen size
Why Use a Modal Dialog Search?
The modal dialog approach offers significant advantages over embedded search interfaces:
1. Clean Page Design with On-Demand Access
Add a simple magnifying glass icon or search button anywhere on your page. When clicked, the full-featured AI search interface appears as a modal dialog, keeping your page layout clean and uncluttered while providing powerful search capabilities when needed.
Example: A header navigation bar with a search icon that opens the complete AI search experience.
2. Wizard-Based Query Generation
Create interactive wizards or forms that collect user inputs, then programmatically construct an AI query from those selections. The modal dialog displays the AI-generated answer based on the wizard's output.
Example: A product finder wizard where users select preferences (price range, features, use case), and when they click "Find Products," the CTA dialog opens with an AI-generated recommendation based on their selections.
// Collect wizard inputs
const preferences = {
  priceRange: "$500-$1000",
  skill: "intermediate",
  terrain: "all-mountain",
}

// Generate query and open dialog with AI answer
const query = `Recommend ski boots for ${preferences.skill} skier, ${preferences.terrain} terrain, budget ${preferences.priceRange}`
ctaDialog.setAttribute("question", query)
ctaDialog.action() // Opens dialog with AI answer
3. Context-Specific Help Dialogs
Trigger the search dialog from anywhere on your page with pre-populated questions or context. Different buttons or links can open the same dialog with different initial queries.
Example: Multiple "Learn More" links throughout a product page, each opening the dialog with a specific question relevant to that section.
4. Space-Efficient Mobile Experience
On mobile devices, the modal takes over the full screen, providing an optimal user experience without compromising functionality or requiring dedicated page real estate.
5. Focused User Attention
The modal overlay focuses user attention on the search interaction, reducing distractions and improving engagement with AI-generated answers.
Common Use Cases:
- Global site search: Magnifying glass icon in navigation
- Product recommendations: Wizard-based product finders
- Customer support: Context-sensitive help buttons
- Documentation search: Quick access to knowledge base
- Lead generation: Interactive quizzes that provide AI-powered recommendations
The CTA Search provides an elegant way to offer AI-powered assistance without cluttering your page. Users can access comprehensive search functionality on-demand through a modal dialog, maintaining clean page layouts while providing powerful search capabilities.
Managing Configurations
Creating a New Configuration
To create a new CTA Search configuration:
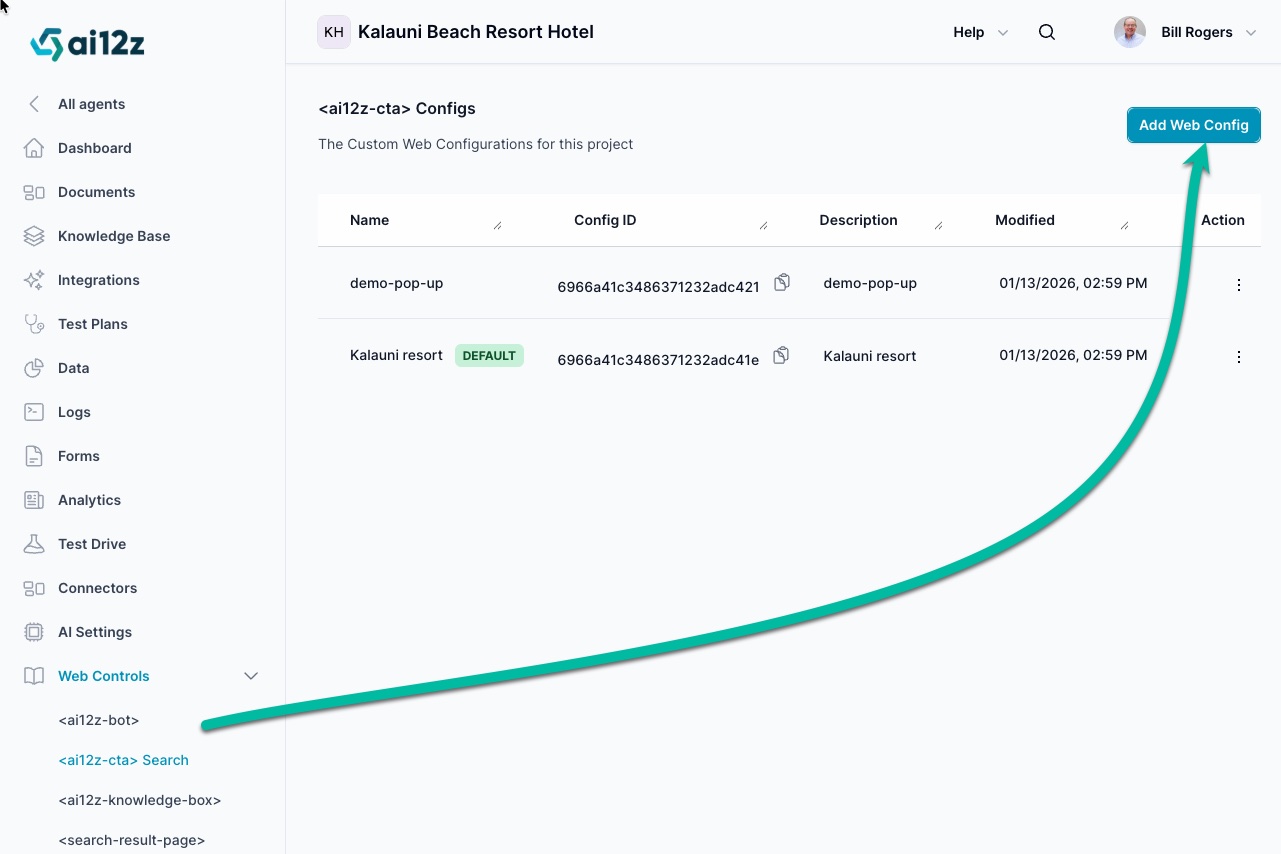
- Navigate to your Agent dashboard
- Select Web Controls from the left navigation panel
- Click on
<ai12z-cta>Search - Click the Add Web Config button in the top right
List of Configurations
The configuration list displays all your CTA Search configurations. Each entry shows:
| Field | Description |
|---|---|
| Name | A descriptive identifier for the configuration |
| Config ID | Unique identifier used to reference this configuration in your code with the config-id attribute |
| Description | Brief explanation of the configuration's purpose |
| Modified | Last update date and time |
| Default | Badge indicating which configuration is the default |
| Action | Menu with options to edit, preview, or delete the configuration |
Using a Configuration
When you have multiple configurations, specify which one to use by adding the config-id attribute:
<!-- Using a specific configuration -->
<ai12z-cta data-key="<API_KEY>" config-id="6966a41c3486371232adc421">
</ai12z-cta>

<!-- Using the default configuration -->
<ai12z-cta data-key="<API_KEY>"></ai12z-cta>
Configuration Tabs
Each configuration consists of five main tabs: Display, Settings, Welcome, Style, and Script. These tabs allow you to control different aspects of the CTA Search behavior and appearance.
Display Tab
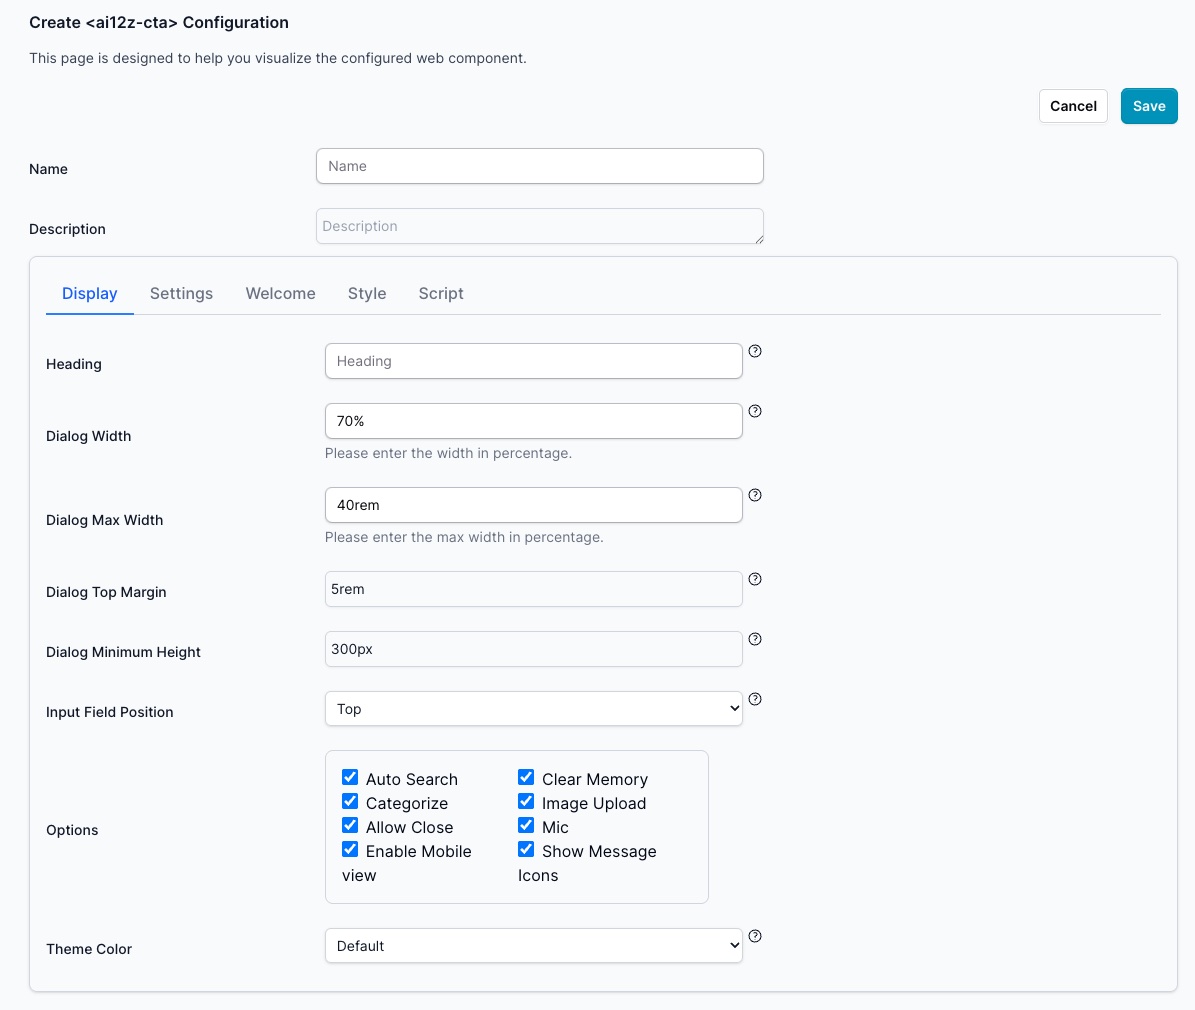
The Display tab controls the visual appearance and layout of your CTA Search dialog.
Basic Information
| Setting | Description | Example |
|---|---|---|
| Name | Configuration identifier (used only in admin list view) | "Default", "Mobile Search", "Help Dialog" |
| Description | Brief explanation of configuration purpose (admin only) | "Main search for homepage", "Kalauni resort" |
Dialog Layout
| Setting | Description | Default/Example |
|---|---|---|
| Heading | Text displayed at the top of the dialog | Leave blank or "How can we help you today?" |
| Dialog Width | Width of the dialog box | "70%" |
| Dialog Max Width | Maximum width constraint | "40rem" |
| Dialog Top Margin | Space from top of viewport to dialog | "5rem" |
| Dialog Minimum Height | Minimum height of the dialog | "300px" |
| Input Field Position | Where to place the search input | "Top" or "Bottom" |
Options

The Options section provides checkboxes to control various features:
| Option | Description |
|---|---|
| Auto Search | When enabled, automatically executes search when text is sent via JavaScript. When disabled, only populates the search box |
| Categorize | When enabled, shows search results grouped by category as you type |
| Allow Close | When enabled, displays a close icon (X) in the dialog |
| Enable Mobile view | When enabled (default), dialog takes over entire screen on small devices for optimal mobile experience |
| Clear Memory | When enabled, provides option in the + menu to clear conversation history |
| Image Upload | When enabled, allows users to upload images via the + menu for visual analysis with their query |
| Mic | When enabled, provides voice input capability for hands-free search |
| Show Message Icons | When enabled, displays icons alongside messages (uses default icons if custom ones aren't uploaded) |
Theme Color
The Theme Color dropdown allows you to choose a visual theme for your CTA Search dialog. The theme controls colors, styling, and overall appearance.
Available Options:
- Preset Themes: Pre-configured color schemes including Default, Cyan, Amber, Orange, Purple, Red, Pink, Brown, Slate, Sky, Lime, Yellow, and Indigo
- Custom: Create a personalized theme using your brand colors and CSS variables
Custom Theme Creation
When you select "Custom" from the theme dropdown, ai12z will automatically begin the theme creation process.
Important: Before creating a custom theme, we strongly recommend completing the AI Brand Creation process first. This will analyze your brand assets and automatically generate appropriate colors, fonts, and styling guidelines that will be used in your custom theme.
To create a custom theme:
-
Complete Brand Guidelines First (Recommended)
- Navigate to AI Settings → Brand Guidelines
- Follow the AI Brand Creation guide to upload your brand images
- Generate and save your brand guidelines
-
Select Custom Theme
- Return to your CTA configuration
- Choose "Custom" from the Theme dropdown
- The system will automatically create a theme based on your saved brand guidelines
-
Theme Auto-Generation
- If you have completed brand guidelines, the custom theme will automatically inherit:
- Primary and secondary brand colors
- Accent colors for highlights and interactions
- Typography preferences
- Overall visual style consistency
- If no brand guidelines exist, a default custom theme template will be created that you can manually customize
- If you have completed brand guidelines, the custom theme will automatically inherit:
Benefits of Custom Theme with Brand Guidelines:
- Brand Consistency: Automatically matches your website's visual identity
- Professional Appearance: Cohesive design that reflects your brand personality
- Time Saving: No manual color picking or style configuration needed
- Responsive Design: Optimized for all device sizes while maintaining brand integrity
Settings Tab
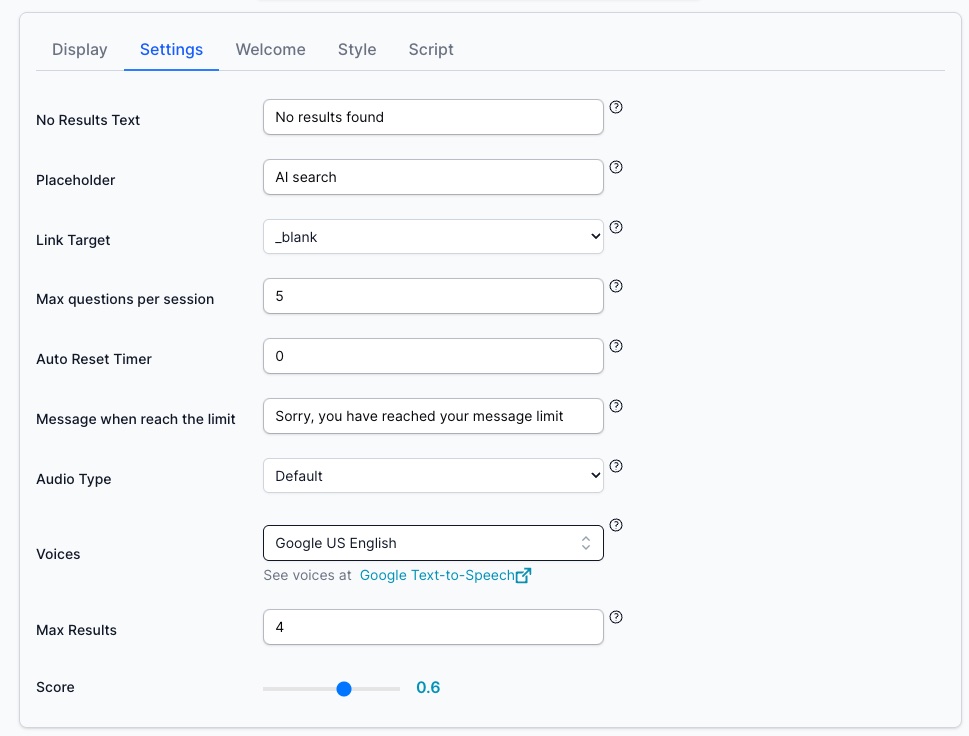
The Settings tab controls behavior, limits, voice settings, and search parameters.
Configuration Settings
| Setting | Description | Default/Example |
|---|---|---|
| No Results Text | Message shown when no search results are found | "No results found" |
| Placeholder | Placeholder text in the search input field | "AI search" |
| Link Target | How search result links open | _blank (new tab) |
| Max questions per session | Maximum number of questions allowed per session (prevents abuse) | 5 |
| Auto Reset Timer | Minutes of inactivity before resetting the session | 0 (disabled) |
| Message when reach the limit | Text shown when question limit is reached | "Sorry, you have reached your message limit" |
| Audio Type | Audio feedback style | "Default" |
| Voices | Text-to-speech voice selection | "Google US English" |
| Max Results | Maximum number of search results to display | 4 |
| Score | Minimum relevance score threshold (0-1 slider) | 0.6 |
Preventing Chatbot Abuse and Token Drain
Overview
If a public-facing CTA Search is targeted by automated spam (bots/scripts), it can generate excessive AI requests and consume tokens. ai12z provides controls to mitigate this:
- Max Questions per Session - Hard usage cap per session
- Auto Reset Timer - Automatically reset sessions after inactivity
- reCAPTCHA v3 - Bot detection (can be configured separately)
Max Questions per Session
What it does:
Max Questions per Session sets a hard ceiling on how many questions a single chat session can send to the AI. Once the limit is reached, the bot stops issuing additional AI requests, preventing further token spend from that session.
Why it prevents token drain
Even if a bot attempts to spam the chat UI, it cannot generate unlimited AI calls within the same session—usage is capped.
Note: See Directives [directive=badActor] for one of the best ways to eliminate a bad actor.
Where to configure
In your <ai12z-cta> configuration:
- Go to Settings
- Set Max questions per session
- (Optional) Set Message when reach the limit (recommended for clear UX)
- (Optional) Configure Auto Reset Timer to reset the session after a defined period of inactivity (or leave at
0if you want the cap to effectively require a new session)
Recommended settings (baseline)
- Max questions per session:
10–25(start at 20 for most sites) - Message when reach the limit: “You’ve reached the question limit for this session. Please try again later.”
- Auto Reset Timer:
30–60 minutes(or0if you prefer stricter behavior)
Welcome Tab
The Welcome tab allows you to create custom welcome screens with Quick Answer buttons, FAQs, or multi-panel layouts.
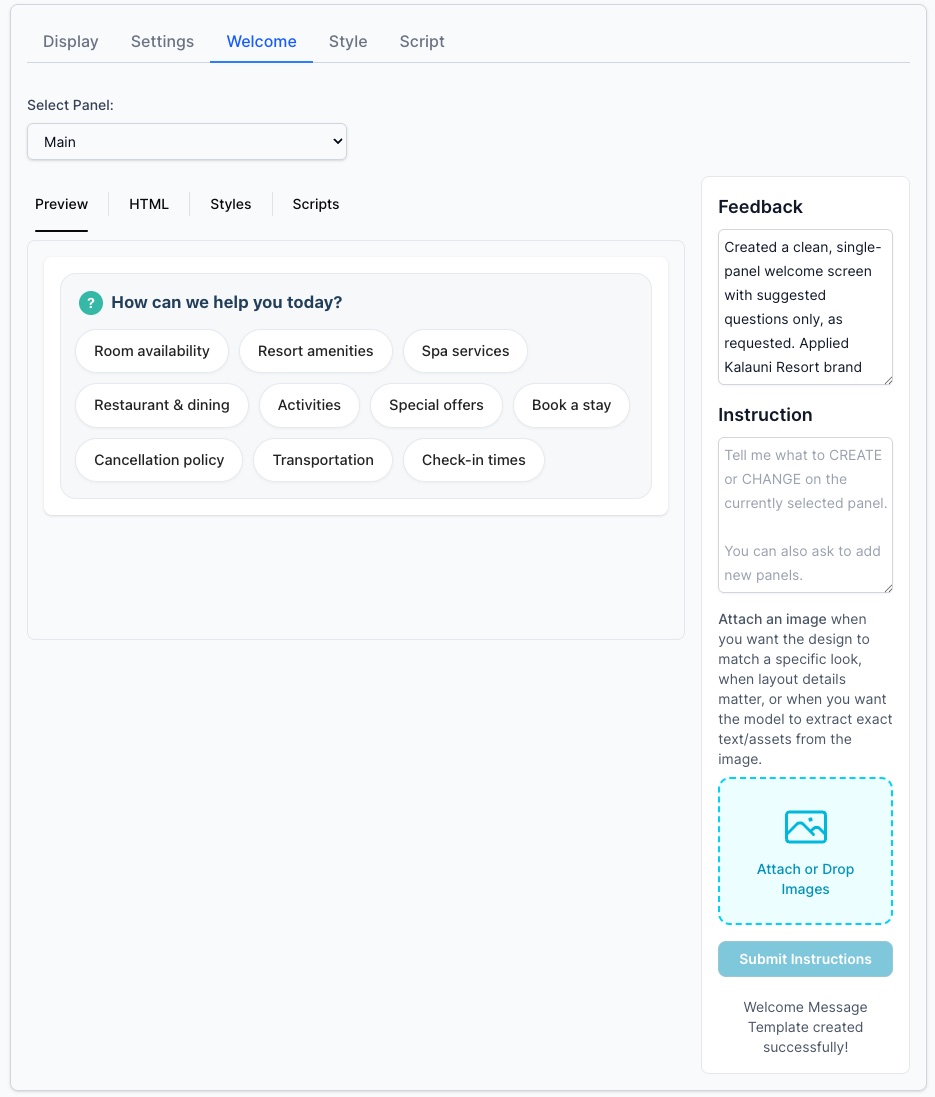
Features
- Custom HTML: Insert any HTML content in the welcome screen
- Quick Answer Buttons: Create pre-configured question buttons that users can click
- Multi-panel Support: Build complex layouts with multiple information panels
- Interactive Elements: Use
sendMessage()andsendJSON()for dynamic interactions - Dedicated Styling: Welcome panel has its own Styles and Scripts tabs for customization
Select Panel
Choose which panel to edit from the dropdown (e.g., "Main" panel).
Preview Tabs
- Preview: See how your welcome screen looks
- HTML: Edit the HTML content
- Styles: Add custom CSS for the welcome panel
- Scripts: Add custom JavaScript for welcome panel interactions
Feedback Panel
Displays real-time feedback as you make changes to help you understand the results of your customizations.
Instruction Panel
Use AI to generate or modify your welcome panels:
- Describe what you want to create or change
- Optionally attach an image for design reference
- Click Submit Instructions
- The AI will generate the panel layout based on your description
Example: Kalauni Resort Welcome Screen
The screenshot shows a hospitality-focused welcome screen with:
- Heading: "How can we help you today?"
- Quick Answer Buttons: Common questions organized in three rows:
- Row 1: Room availability, Resort amenities, Spa services
- Row 2: Restaurant & dining, Activities, Special offers
- Row 3: Cancellation policy, Transportation, Check-in times
- Action: Each button triggers an instant AI response
This provides guests with immediate access to frequently requested information.
Style Tab
The Style tab allows you to add custom CSS to further customize the appearance of your CTA Search beyond the theme settings.
Note: The Welcome tab has its own dedicated Styles sub-tab for welcome panel-specific styling.
Custom CSS
Use the Custom CSS editor to:
- Override default styles
- Add responsive design rules
- Customize specific elements within the dialog
- Match your site's design system
Script Tab
The Script tab enables you to add custom JavaScript to enhance or modify the CTA Search behavior.
Note: The Welcome tab has its own dedicated Scripts sub-tab for welcome panel-specific functionality.
Custom JavaScript
Use the Custom JS editor to:
- Add event listeners for user interactions
- Integrate with analytics or tracking tools
- Implement custom business logic
- Extend functionality beyond default capabilities
Best Practices
Configuration Management
- Use Descriptive Names: Name configurations based on their use case (e.g., "Homepage Search", "Support Dialog", "Mobile CTA")
- Set a Default: Always designate one configuration as default for fallback behavior
- Test Responsive Design: Verify dialog appearance on desktop, tablet, and mobile devices
Welcome Screen Design
- Limit Quick Answers: Use 6-12 buttons maximum to avoid overwhelming users
- Organize by Topic: Group related questions together
- Use Clear Labels: Make button text concise and action-oriented
- Consider Context: Tailor quick answers to the page or section where the CTA appears
Performance Optimization
- Set Question Limits: Protect against abuse with reasonable session limits
- Enable Auto Reset: Use Auto Reset Timer for better user experience
- Optimize Welcome HTML: Keep welcome screen HTML lightweight
- Test Load Times: Ensure dialog opens quickly on slower connections
Voice and Audio
- Choose Appropriate Voice: Select a voice that matches your brand personality
- Test Audio Type: Verify audio feedback works across different browsers
- Consider Accessibility: Voice features help users with visual impairments
Related Documentation
- CTA Search Component - Main component documentation
- Agent Settings - Managing your agent and API keys
- AI Brand Creation - Customizing theme with brand guidelines