Connecting CDP to ai12z
Certainly! Here’s a full documentation section that combines how to connect a CDP to ai12z, all three data-passing approaches, integration with Custom Integrations, and how to make user attributes available to the LLM using attributes in the ReAct System prompt. This is formatted to drop directly into your docs or wiki, with clear code, block diagrams, and best practices.
Connecting a CDP to ai12z for Personalization and Dynamic Integrations
ai12z enables rich, real-time personalization by integrating with your Customer Data Platform (CDP) or e-commerce platform. By passing user data to the ai12z Reasoning Engine—either as direct attributes, secure tokens, or in-session prompts—you unlock dynamic, context-driven experiences for every user.
This guide explains the three main approaches for connecting your CDP, how to configure Custom Integrations, and how to surface these user attributes to the LLM for advanced personalization.
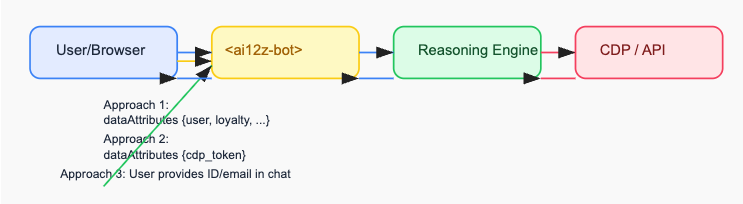
1. Integration Patterns: Passing User Data to ai12z
ai12z supports several methods for providing user context to the LLM Reasoning Engine, depending on your security, architecture, and personalization requirements.
Approach 1: Pass Full User Attributes to the Bot (Client-Side)
Best for: Immediate personalization, non-sensitive attributes, front-end JS SDKs.
document.addEventListener("DOMContentLoaded", function () {
  const bot = document.querySelector("ai12z-bot")
  if (bot) {
    // Example: fetched from your CDP or e-commerce SDK
    bot.dataAttributes = {
      user: {
        email: "jane@example.com",
        name: "Jane Example",
        loyalty_level: "platinum",
        cdp_id: "cdp-1234-5678",
      },
    }
    // Optionally control content shown by tags:
    bot.includeTags = ["platinum"]
    bot.excludeTags = ["internal"]
  }
})
Result: These attributes are available to the Reasoning Engine for prompt personalization, logic, and downstream integrations.
Approach 2: Pass a CDP Token/Identifier (Backend Integration)
Best for: Sensitive data, server-to-server lookups, always-fresh context.
document.addEventListener("DOMContentLoaded", function () {
  const bot = document.querySelector("ai12z-bot")
  if (bot) {
    bot.dataAttributes = {
      cdp_token: "secure-user-token-from-cdp",
    }
  }
})
How it works:
- The LLM agent or a backend integration receives the token.
- A Custom Integration (REST, GraphQL, or MCP) queries your CDP or CRM for user context.
- Results are mapped and returned for personalized responses.
Approach 3: Ask for User Info During Chat (Dynamic Data Prompting)
Best for: Use cases where an identifier (email, phone) is requested at runtime—for account lookups, support, rewards, etc.
Example conversation:
- User: “Can I see my points balance?”
- Bot: “Sure! What’s your email?”
- User: “jane@example.com”
- Agent calls a Custom Integration with that value; CDP returns profile.
- Bot: “You have 1,420 points and are a Platinum member!”
2. ai12z Custom Integrations: Dynamic Data for the LLM
ai12z’s Custom Integrations make it easy to connect the Reasoning Engine to external data sources in real time—REST APIs, GraphQL, and MCP—all directly configurable in the platform UI.
Block Diagram
Why connect to REST, GraphQL, or MCP?
- REST: Best for standard APIs—weather, inventory, loyalty, etc.
- GraphQL: Efficient for complex, tailored queries (e.g., profile + preferences).
- MCP: For secure, AI-friendly data exchange.
Once data is retrieved, it is passed to the LLM to interpret, summarize, and integrate into the user conversation, creating highly relevant, up-to-date responses.
Common Use Cases
- Personalizing offers, recommendations, or content
- Checking inventory, status, or loyalty points
- Generating single-use coupons
- Fulfilling user requests with fresh data
How to Configure a Custom Integration
The ai12z portal allows you to visually define integrations:
- Method: GET, POST, etc.
- URL: Target endpoint (CDP, e-commerce, or service)
- Headers: Auth, content-type, etc.
- Parameters: Map LLM-supplied fields (email, cdp_token, etc.)
- JSONata Request/Response: Transform request and response bodies as needed
- Testing: Try live before publishing
Example: See screenshots and detailed field guides in your platform UI.
3. Making Attributes Available in the LLM System Prompt
To make user attributes available for personalization and reasoning, simply include {attributes} in your agent’s ReAct System Prompt.
How It Works
- All fields set in the
dataAttributesobject on<ai12z-bot>—whether populated directly, by token lookup, or from a runtime prompt—are passed to the LLM as the{attributes}object. - Add
{attributes}anywhere in your system prompt to surface these for the agent’s use.
Example System Prompt:
You are an AI shopping assistant.
Always personalize your replies using the following user attributes: `{attributes}`
If the user is a platinum loyalty member, mention exclusive offers.
Example Replacement:
If bot.dataAttributes = { user: { name: "Jane", loyalty_level: "platinum" } }
then {attributes} becomes:
{
  "user": {
    "name": "Jane",
    "loyalty_level": "platinum"
  }
}
Result: The LLM reasons over all provided attributes—name, loyalty status, purchase history, etc.—for every message.
4. Summary Table
| Approach | Data Flow | Use When |
|---|---|---|
| Full Attributes | Browser → Bot | Fast, non-sensitive, on-page data |
| CDP Token | Browser → Backend → Bot | Fresh, sensitive, secure |
| In-Session | User prompt → Agent → CDP | ID collected in conversation |
5. Best Practices
- Security: Only expose data client-side that is safe for the browser. Use token/server lookups for PII or regulated data.
- Flexibility: Mix approaches as needed—use attributes for some flows, tokens for others.
- Transformation: Use JSONata to customize API requests and responses for optimal LLM performance.
- Testing: Use the “Test” feature in Custom Integrations to validate your config before going live.
6. End-to-End Example: Personalized Coupon After Return
-
User submits a return in chat.
-
Bot passes user email (from attributes, token, or prompt) to a Custom Integration.
-
Integration generates a single-use coupon from your e-commerce platform.
-
Bot displays:
“Thank you! Here’s your exclusive coupon for your next purchase: 8JH4-WXYZ”
7. FAQ
Q: How do I see what attributes are available?
A: All fields in bot.dataAttributes are available as {attributes} in the agent’s system prompt.
Q: Can I update attributes during a session?
A: Yes—update the dataAttributes property at any time; the next message will use the updated context.
Q: What platforms can I integrate? A: Any CDP, CRM, or e-commerce platform with a REST or GraphQL API.
Perfect! Here’s a ready-made code template for all three approaches, plus a block diagram illustrating the integration flow from CDP/e-commerce to ai12z and the LLM. You can copy this directly into your docs, training decks, or engineering guides.
Ready-Made Code Templates
Approach 1: Pass Full User Attributes (Client-Side JS)
// ai12z-bot personalization: Passing full user attributes
document.addEventListener("DOMContentLoaded", function () {
  const bot = document.querySelector("ai12z-bot")
  if (bot) {
    // Fetch or receive this from your CDP/e-commerce platform
    bot.dataAttributes = {
      user: {
        email: "jane.doe@example.com",
        name: "Jane Doe",
        loyalty_level: "gold",
        cdp_id: "abcd1234",
      },
    }
    // Optionally, filter content shown by tags
    bot.includeTags = ["gold"]
    bot.excludeTags = ["internal"]
  }
})
Approach 2: Pass CDP Token (Backend Integration, Secure Lookup)
// ai12z-bot personalization: Passing a CDP token or identifier
document.addEventListener("DOMContentLoaded", function () {
  const bot = document.querySelector("ai12z-bot")
  if (bot) {
    // This token is generated by your CDP/session backend for the logged-in user
    bot.dataAttributes = {
      cdp_token: "secure-user-token-123456",
    }
  }
})
Example Custom Integration agent logic (Python-style pseudocode):
def get_user_context_from_cdp(cdp_token):
    # Call your CDP's API with the provided token
    user_profile = requests.get(
        "https://api.cdp.com/v1/profile",
        headers={"Authorization": f"Bearer {cdp_token}"}
    ).json()
    return user_profile
Approach 3: Prompt User for Identifier in Chat
Agent prompt configuration:
- type: system
  content: |
    Ask the user for their email address if not already known.
    When provided, call the "CDP Lookup" integration with their email and use the response as `{attributes}`.
User flow:
- User: "Can I see my rewards points?"
- Bot: "Sure! What’s your email address?"
- User: "jane.doe@example.com"
- Agent: (Calls CDP integration with provided email. Receives full profile for
{attributes}.)
ReAct System Prompt Example
You are an AI assistant. Personalize your responses using the following user attributes: `{attributes}`
Always greet the user by name if available, and mention any special loyalty offers for their loyalty_level.