Integration
Overview
The <ai12z-bot> ChatBot Control is a web component designed to provide a conversational AI experience on your website, similar to chatbots. This feature offers users an interactive, AI-powered chatbot that can answer queries, guide users, and provide relevant information seamlessly.

Setup
To integrate the Bot Control (ChatBot):
Include the following script tag in the <head> section of your HTML.
<script
  type="module"
  src="https://cdn.ai12z.net/pkg/ai12z@latest/dist/esm/library.js"
></script>
<link
  rel="stylesheet"
  href="https://cdn.ai12z.net/pkg/ai12z@latest/dist/library/library.css"
/>
Add the Component
You can insert the <ai12z-bot> tag anywhere in the body of the HTML to display the ChatBot. It is customizable from the agent->controls->ai12z-bot
Default Template
<ai12z-bot data-key="<API_KEY>"></ai12z-bot>
Example HTML Page
<html>
  <head>
    <script
      type="module"
      src="https://cdn.ai12z.net/pkg/ai12z@latest/dist/esm/library.js"
    ></script>
    <link
      rel="stylesheet"
      href="https://cdn.ai12z.net/pkg/ai12z@latest/dist/library/library.css"
    />
  </head>
  <body>
    <div>
      <ai12z-bot data-key="your_api_key_here"></ai12z-bot>
    </div>
  </body>
</html>
data-key
Locate the data-key in agent->agent settings , It's the API key

Add config-id, if you have more than one config for ai12z-bot, under agent->controls->ai12z-bot. You can have more than one config, if no config-id it picks the default config
Control Attributes
| Property | Description | Example | Default |
|---|---|---|---|
| data-key (Required) | API key from your ai12z Agent settings | data-key="Add your Key here" | |
| config-id (Optional) | Configure the particular bot otherwise the default bot config will load | config-id="123455" |
Configure the data-key, data-mode and config-id via Javascript
<script>
  document.addEventListener("DOMContentLoaded", function () {
    const bot = document.querySelector("ai12z-bot")
    bot.setAttribute("data-key", "XYZ")
    bot.setAttribute("data-mode", "dev")
    bot.setAttribute("config-id", "1234")
  })
</script>
Custom bot (Optional)
If bot tag exists the standard bot control will be replaced with the html in the bot tag
<ai12z-bot data-key="your_api_key_here">
  <div slot="bot">
    <img
      style="width: 20px; cursor: pointer"
      src="https://cdn.ai12z.net/assets/web/magnifying-glass-solid.svg"
      alt="chat"
    />
  </div>
</ai12z-bot>
Custom Launch Template
<ai12z-bot data-key="<API_KEY>">
  <div slot="bot"><button>Open Bot</button></div>
</ai12z-bot>
In the example above, we are using a simple button to open the bot instead of using the search bar or default button.
Subject: Dynamic tokens + page context + welcome message configs
Personalization of the bot
How to make the bot context-aware and tailor the experience by section.
Dynamic tokens (AnswerAI) or React System Prompts
Each system prompt supports dynamic tokens, so you can inject page-specific context and have the bot behave differently depending on where it’s running: https://docs.ai12z.net/docs/ai-settings/answer-ai
Two especially useful tokens:
-
{attributes}Lets you insert additional information at runtime. You’d use JavaScript to pass whatever you want (e.g., page type, product category, logged-in state, language, etc.), and then reference it in your system prompt to guide behavior. -
{origin}Inserts the URL of the page the chatbot is on.
For the implementation details, see the “Passing attributes and tags” section here: https://docs.ai12z.net/docs/web-controls-api/web-controls/bot-control/chatbot-integration
Recommendation: multiple welcome messages via Bot Configs
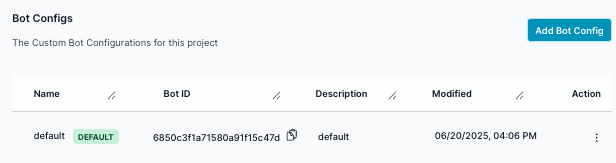
I also recommend creating two separate welcome messages (e.g., one for Support and one for the broader site experience) by using different Bot Configs:
Web Controls → <ai12z-bot> → “Add Bot Config”
Then embed the bot like this:
<ai12z-bot data-key="your_api_key_here" config-id="your_config_id"></ai12z-bot>
For example, your Support section can have a very specific support-oriented welcome message, while other sections can use a different tone and set of suggested actions.
How to debug
Within an agent, navigate to the agent settings, turn on debugging, then ask a question, navigate the Data view where you can see the question asked, if you open the metadata you can see what is being injected into the system prompt, for attributes or origin.
Passing attributes and tags
Attributes
Developer can pass a dictionary of additional data that can be used in prompts if you include the attribute tag in Answer AI.
IncludeTags
Array of tags, only content with one of these tags will be returned.
ExcludeTags
Array of tags,content will be excluded if it has one of these tags.
Example for passing the attributes,excludeTags and includeTags
document.addEventListener("DOMContentLoaded", function () {
  const ele = document.querySelector("ai12z-bot")
  if (ele) {
    ele.excludeTags = ["blog"]
    ele.includeTags = []
    ele.dataAttributes = {
      content: {
        newlist: [
          {
            _uid: "BUY6Drn9e1",
            component: "foo",
            headline: "Foo",
          },
          {
            _uid: "gJZoSLkfZV",
            component: "bar",
            title: "Bar",
          },
          {
            _uid: "X1JAfdsZxy",
            component: "foo",
            headline: "Another headline",
          },
        ],
      },
    }
  }
})
Custom Events
| Event Name | Description | How to use it |
|---|---|---|
| messageSent | This event will trigger when user sent an message to server | See example below. |
| messageReceived | This event will trigger when user received a response from server | See example below. |
| close | This event will trigger when user close the bot from client side | See example below. |
| open | This event will trigger when user open the bot from client side | See example below. |
| minimize | This event will trigger when user minimize the bot from client side | See example below. |
| errored | This event will trigger when any error thrown from server side | See example below. |
Custom Events Examples
Listen for message sent event
const botElement = document.querySelector("ai12z-bot")
botElement.addEventListener("messageSent", async (event) => {
  console.log(event.detail)
})
Listen for message received event
botElement.addEventListener("messageReceived", async (event) => {
  console.log(event.detail)
})
Listen for close event
botElement.addEventListener("close", async (event) => {
  console.log(event.detail)
})
Listen for open event
botElement.addEventListener("open", async (event) => {
  console.log(event.detail)
})
Listen for minimize event
botElement.addEventListener("minimize", async (event) => {
  console.log(event.detail)
})
Listen for errored event
botElement.addEventListener("errored", async (event) => {
  console.log(event.detail)
})
Custom Methods
| Method Name | Description |
|---|---|
| action | Action allows us to do open, close and minimize the bot from client side. See code example below. |
| sendMessage | This method allows us to send a message programmatically. It accepts two parameters. Message (Required) – The first parameter must be a string containing the message to be sent. Display Text (Optional) – The second parameter is optional and should be a string that specifies the display text for the message. If the second parameter is not provided, the default behavior will be used. See code example below. |
| sendJSON | This method allows us to send a JSON programmatically. It accepts two parameters. jsonData (Required) – The first parameter must be an object which will be sent. DisplayText (Required) – The second parameter should be a string that specifies the display text for the message. See code example below. |
| setProcessDataOverride | This method allows developers to override and process the payload before execution. It accepts one parameter: overrideFn (Required) – An async function that receives the data object, performs custom validation or transformation, and returns the processed data. Returning null will stop execution. See code example below. |
| configureSettings | Dynamically overrides bot configuration settings at runtime. Accepts a settings object (e.g., { maxQuestion: 5 }) to update values without modifying the original bot config. See code example below. |
Examples
Using the action method
async function openBot() {
  try {
    await customElements.whenDefined("ai12z-bot")
    const botElement = document.querySelector("ai12z-bot")
    await botElement.action("open", { expanded: false })
  } catch (error) {
    console.error("Error fetching data:", error)
  }
}

async function minimizeBot() {
  try {
    const botElement = document.querySelector("ai12z-bot")
    await botElement.action("minimize")
  } catch (error) {
    console.error("Error fetching data:", error)
  }
}
Using the sendMessage method
async function sendMessageToBot() {
  try {
    await customElements.whenDefined("ai12z-bot")
    const botElement = document.querySelector("ai12z-bot")
    await botElement.sendMessage(
      "what are the activities available?",
      "List all activities"
    )
  } catch (error) {
    console.error("Error fetching data:", error)
  }
}
Using the sendJSON method
const botElement = document.querySelector("ai12z-bot")
botElement.sendJSON(
  { firstname: "xxxx", lastname: "yyyy", dob: "zzzz" },
  "Info submitted"
)
Using the setProcessDataOverride method
botElement.setProcessDataOverride(async function (data) {
  console.log("Original data:", data)
  if (!data.query || data.query.trim() === "") {
    console.log("Empty query, stopping execution")
    return null // Stop the execution
  }
  const processedData = {
    ...data,
    customField: "developer added this",
    timestamp: new Date().toISOString(),
  }
  console.log("Processed data:", processedData)
  return processedData
})
Using the ConfigureSettings method
botElement.configureSettings({ maxQuestion: 5 })
Hide Default UI and Use External Element to Open the Bot
To hide the default bot UI and use your own button or element to open the bot, provide an empty <div slot="bot"></div> inside the <ai12z-bot> tag. Then, use an external button and call the openBot function to open the bot programmatically.
<ai12z-bot>
  <div slot="bot"></div>
</ai12z-bot>
<button id="open-bot" onclick="openBot()">Open Bot</button>
async function openBot() {
  try {
    await customElements.whenDefined("ai12z-bot")
    const botElement = document.querySelector("ai12z-bot")
    await botElement.action("open", { expanded: false })
  } catch (error) {
    console.error("Error fetching data:", error)
  }
}