Custom Agent Edit
User Documentation for Edit Agent Screen
Overview
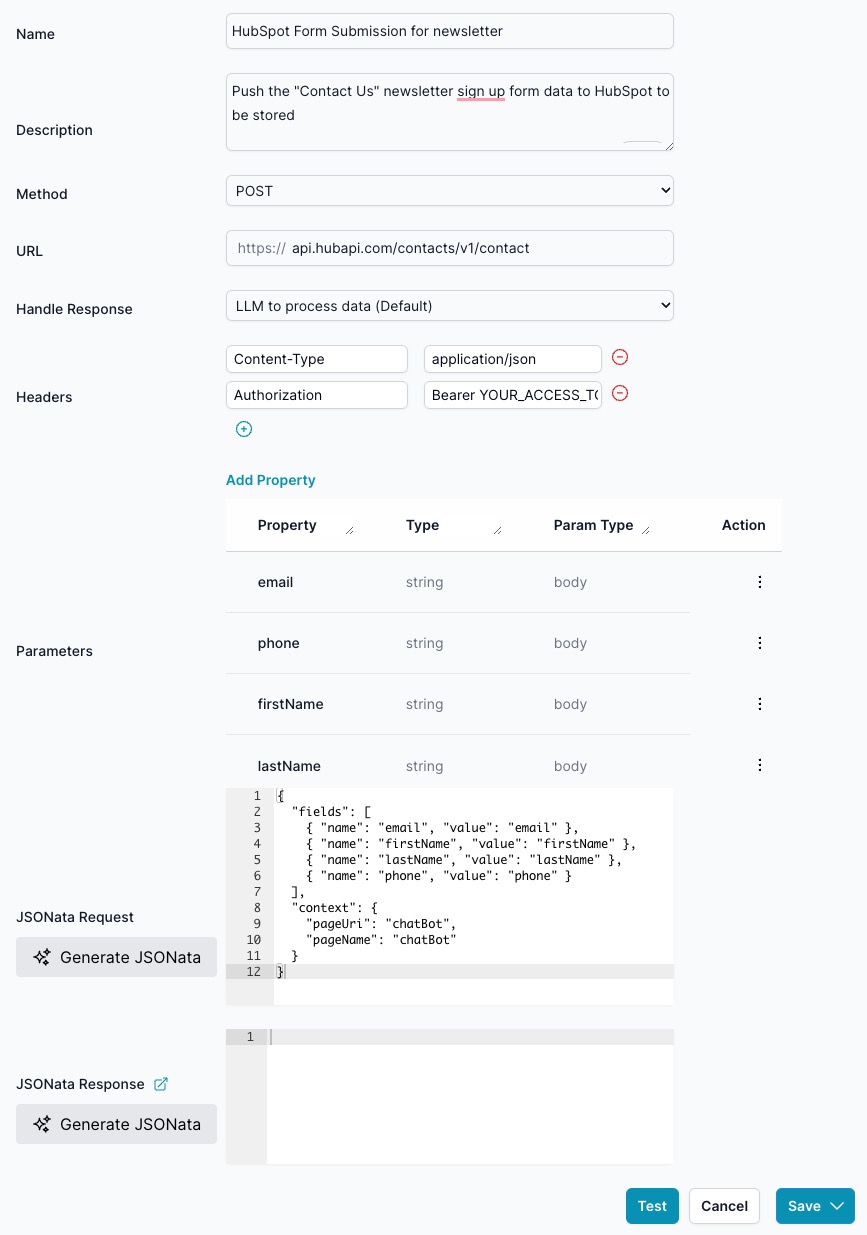
The Edit Agent screen allows you to modify the settings and configuration of an existing custom agent. This includes updating the agent's name, description, method, URL, headers, parameters, and JSONata expressions for requests and responses.
Screen Elements
-
Fields:
- Name:
- Description: The name of the agent.
- Input: Text field.
- Description:
- Description: A brief description of the agent’s purpose.
- Input: Text area.
- Method:
- Description: The HTTP method used for the agent’s request (e.g., GET, POST).
- Input: Dropdown menu.
- URL:
- Description: The endpoint URL that the agent will call.
- Input: Text field.
- Handle Response:
- Description: The response from the Agent is JSON. Should it be returned to the Reasoning Engine for processing, or should it be passed directly to the client to process the JSON and skip the LLM?
- Input: The default is for the LLM to process the data. If using an external microservice to create a dynamic form, set it to "Form.", where the client will use the form model to render the form. As more client controls are developed, such as a carousel, this dropdown will expand to include those options.
- Headers:
- Description: Any headers required for the API call.
- Input: Expandable section to add key-value pairs.
- Name:
-
Parameters:
- Description: Query parameters for the API request.
- Table Columns:
- Parameter: The name of the parameter.
- Type: The data type of the parameter (e.g., string).
- Parameter (mapping): How the parameter is used in the query (e.g., as a query parameter).
- Action: Options to add, edit, or delete parameters.
-
JSONata Request:
- Description: JSONata expression for modifying the request payload.
- Input: Text area.
-
JSONata Response:
- Description: JSONata expression for transforming the response data.
- Input: Text area.
-
Action Buttons:
- Test:
- Function: Allows you to test the agent with the current configuration.
- Cancel:
- Function: Discards changes and returns to the previous screen.
- Save:
- Function: Saves the changes made to the agent.
- Test:
How to Use
-
Editing Agent Details:
- Name: Enter the desired name for the agent in the Name field.
- Description: Provide a brief description of what the agent does in the Description field.
-
Setting the Request Method and URL:
- Select the appropriate HTTP method from the Method dropdown.
- Enter the API endpoint URL in the URL field.
-
Adding Headers:
- Click on the "+" icon next to Headers to add a new header.
- Enter the header name and value.
-
Configuring Parameters:
- Under Parameters, click "Add Parameter" to include a new parameter.
- Fill in the Parameter name, Type, and how it should be used in the query.
-
Using JSONata:
- JSONata Request: Input the JSONata expression for the request transformation. Note Generate JSONata button will only appear if you have body Param Type fiels, that you are doing a POST
- JSONata Response: Input the JSONata expression for the response transformation.
-
Testing the Agent:
- Click the "Test" button to test the agent with the current settings.
-
Saving Changes:
- Click the "Save" button to save the changes.
- If you wish to discard the changes, click the "Cancel" button.
Notes
- Ensure all required fields are filled out correctly before saving.
- Test the agent after making changes to verify the configuration is correct.
- Use JSONata expressions to customize the request and response data formats as needed.
This documentation should help you effectively use the Edit Agent screen to update and configure your custom agents. If you have any further questions or need assistance, please refer to the help section or contact support.