Template (HTML Widget)
Overview
The Template (HTML Widget) response handling method enables you to create dynamic, interactive HTML widgets that enrich the chat experience by presenting information or functionality directly within the conversation. This flexible approach supports a wide range of client-side UI elements, with or without external data sources.
Examples include:
- Mortgage calculator for banking chatbots
- Google Charts displaying analytics from REST or GraphQL endpoints
- Embedded iframes for external web content
- Custom interactive forms and calculators
The possibilities are virtually limitless.
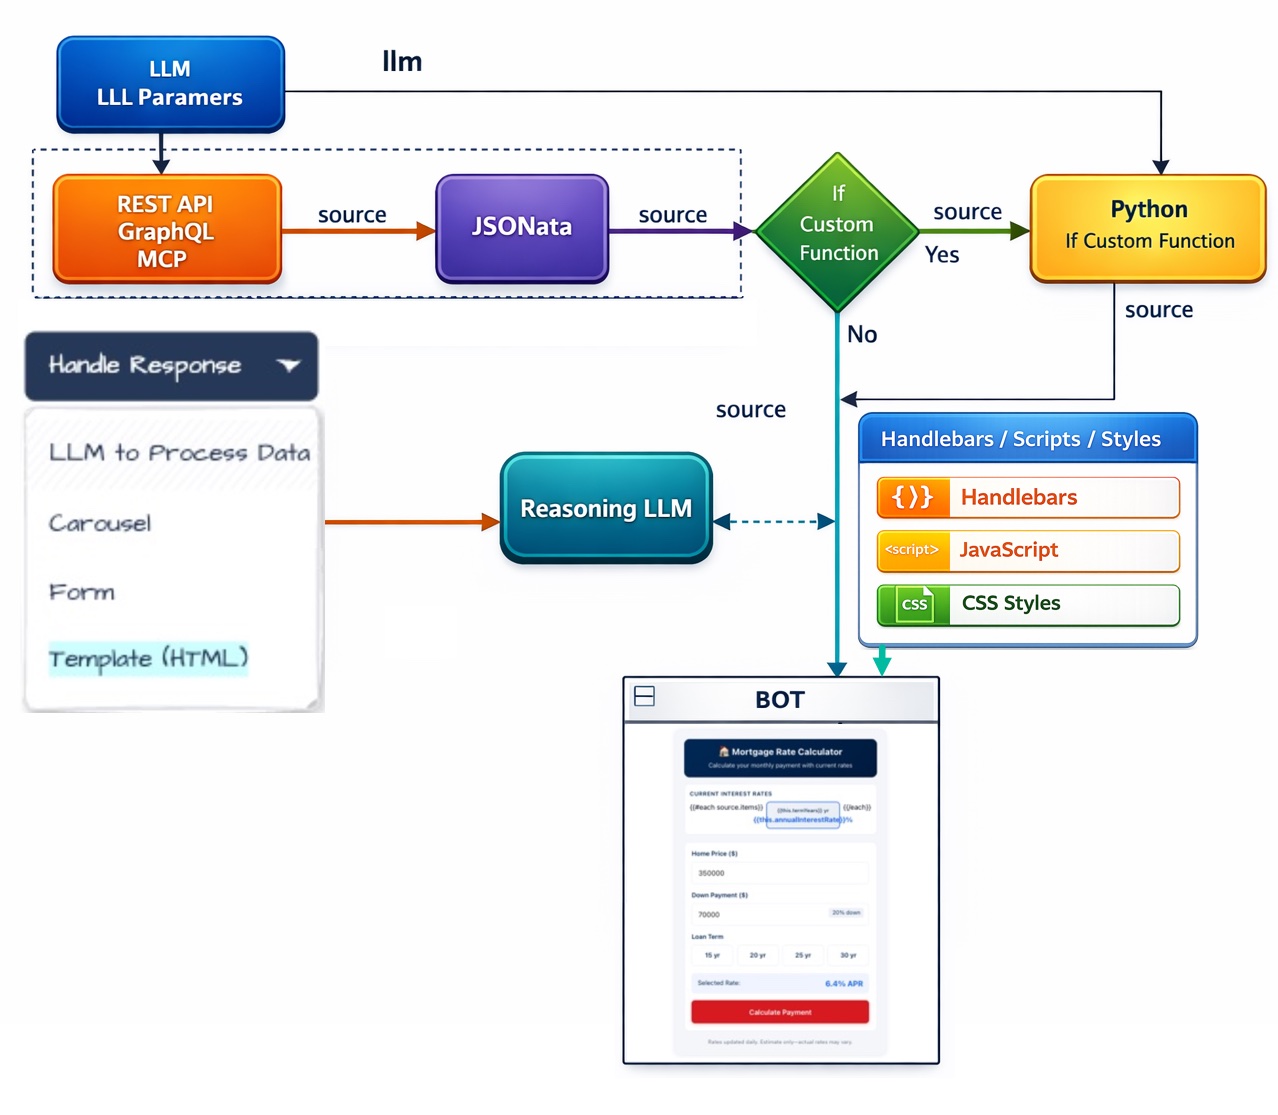
Data Flow Diagram
When Handle Response is set to Template (HTML Widget), the following data flow occurs:
Example 1: Mortgage Rate Calculator
This example demonstrates how to build an interactive mortgage rate calculator widget that pulls real-time interest rates from a REST API and allows users to calculate monthly payments.
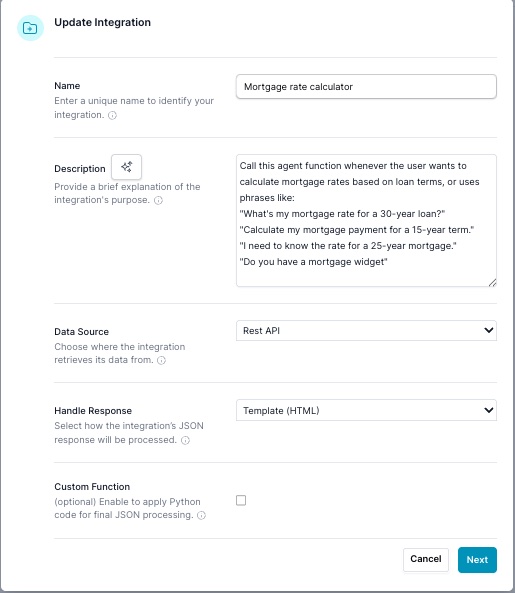
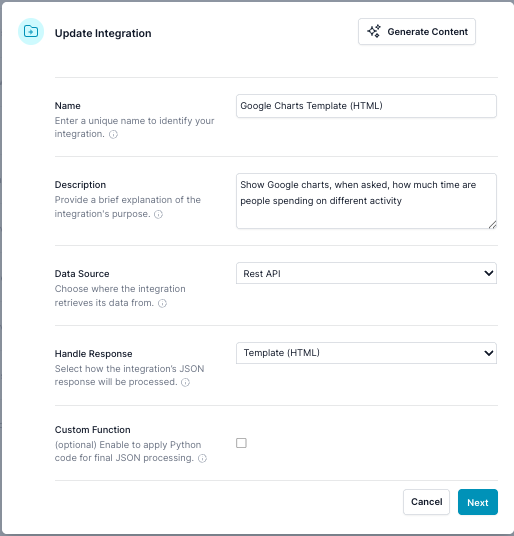
Step 1: Configure Integration Properties
Set up the integration with a descriptive name and description that helps identify when this widget should be used:
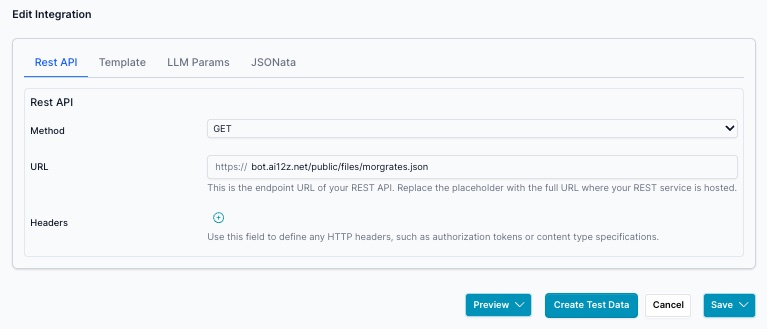
Step 2: Configure REST API
Configure the REST API endpoint to retrieve mortgage rate data:
The API returns mortgage rate data in JSON format:

Step 3: Define LLM Parameters
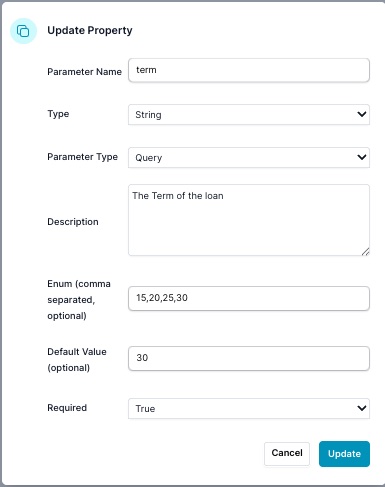
Add a term parameter to allow users to specify the loan term when invoking the widget:
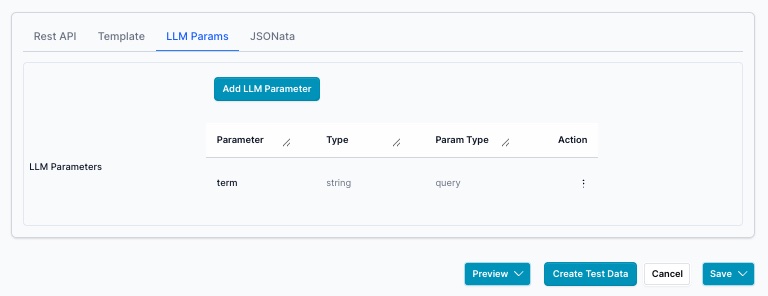
Configure the parameter as a query parameter (since this is a GET request) with the loan term options:
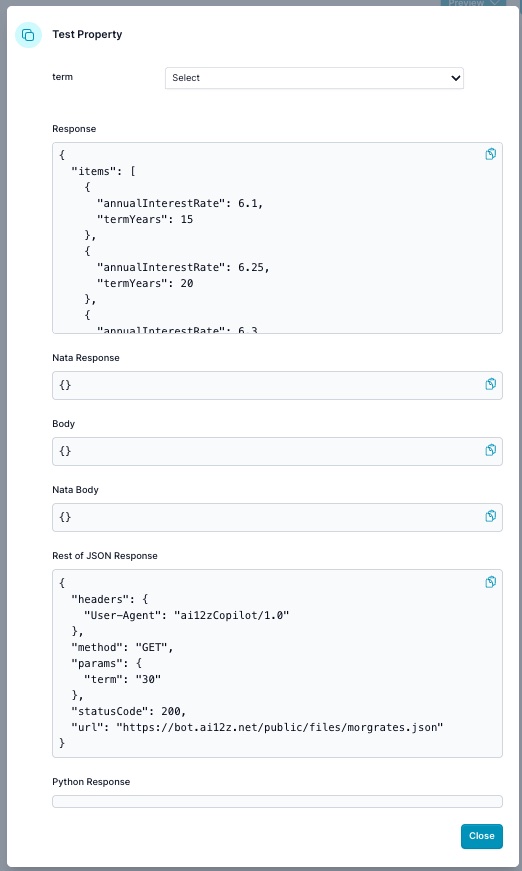
Step 4: Generate Test Data
Click the Create Test Data button to call the API with your configured parameters. This generates sample data needed for creating the HTML template using AI-powered vibe coding:

The API returns the mortgage rate data that will be used in your template:
Step 5: JSONata Transformation (Optional)
For this example, no JSONata transformation is needed. However, if your API returns excessive data or requires reformatting, you can use JSONata to transform the response before passing it to the template.
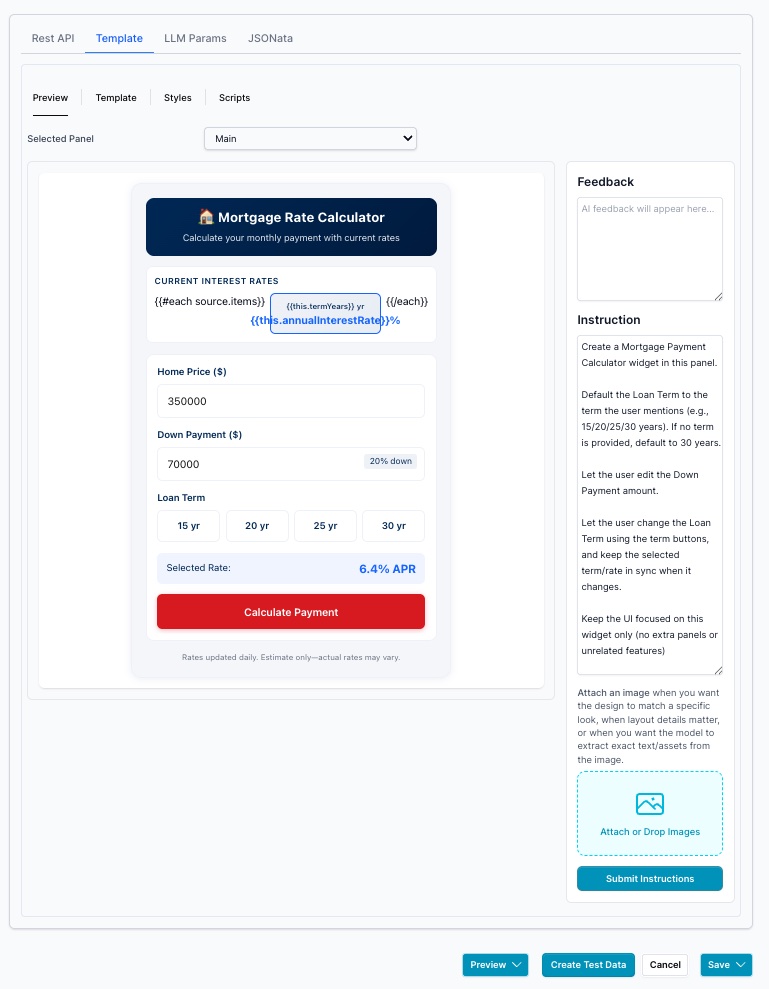
Step 6: Create Template with Vibe Coding
Use AI-powered Vibe Coding to generate the mortgage calculator widget. Simply provide instructions in the instruction panel:
Template Instructions
Create a Mortgage Payment Calculator widget in this panel.

Default the Loan Term to the term the user mentions (e.g., 15/20/25/30 years).
If no term is provided, default to 30 years.

Let the user edit the Down Payment amount.

Let the user change the Loan Term using the term buttons, and keep the
selected term/rate in sync when it changes.

Keep the UI focused on this widget only (no extra panels or unrelated features).
The AI generates a complete, interactive mortgage calculator widget:
Example 2
In this example we do have a Rest API, the Data Source is not required to create a Template (HTML widget)
The Rest API
Returns:
[
[
"Task",
"Hours per Day"
],
[
"Work",
11
],
[
"Eat",
2
],
[
"Commute",
2
],
[
"Watch TV",
2
],
[
"Sleep",
7
]
]
- An interactive currency converter fetching live exchange rates from a REST API.
- A product recommendation carousel, integrated with a CRM or e-commerce system, to show personalized items.
- A data-driven timeline of events or milestones, pulling structured historical data via GraphQL.
- A polling or voting widget that updates results in real-time, drawing data from a dynamic backend.
- A simple guestbook or Q&A form that requires no external data, allowing users to submit feedback or questions within the chat window.
By leveraging Template (HTML widget), developers and businesses can effortlessly blend data retrieval, processing, and presentation into a cohesive, visually appealing, and highly interactive chat-based user experience.
In the Edit Parameter dialog it will define what will show up in this Edit Integration dialog.
For this example, we set the Handle Response -> Template (HTML widget), and Data Source -> Rest API
See the Edit Parameter dialog below:
Google Charts, displayed in Chat

When using Template (HTML widget):
-
The template receives two main objects:
llm: Contains LLM parameters, includingllm.llm_query, it is always passed to the Integration.source: Contains the processed data from your chosen data source (if any), potentially post processed by JSONata, and potentially processed by Python.
-
Insert handlebar tags like
{{llm.llm_query}}or{{source.<fieldName>}}into the HTML to dynamically populate the UI. -
msgIdis unique id for this bubble. This Way you can call the widget more than one time and not have a conflict with ids -
For example, if
sourcecontains an array of data representing chart values, you can use JavaScript (within your HTML template) to load a Google Chart library and passsourceas the data array to render a visual chart. -
ai12z uses
shadowRootso not to conflict with the clients javascript or CSS. Note how to access the ai12z-cta and html tags in the bubble -
Note:
processArray sourcewhen source is an array include processArray in Handlebars -
msgIdthis is a unique ID for the bubble that the html template HTML widget is in -
ai12zChat[
{{msgId}}].onLoadCallback Executes after the bubble template HTML widget is finished loading into the bot. Note this is important, you are waiting for the bubble to render so javascript is valid. - Referemce Handlebars
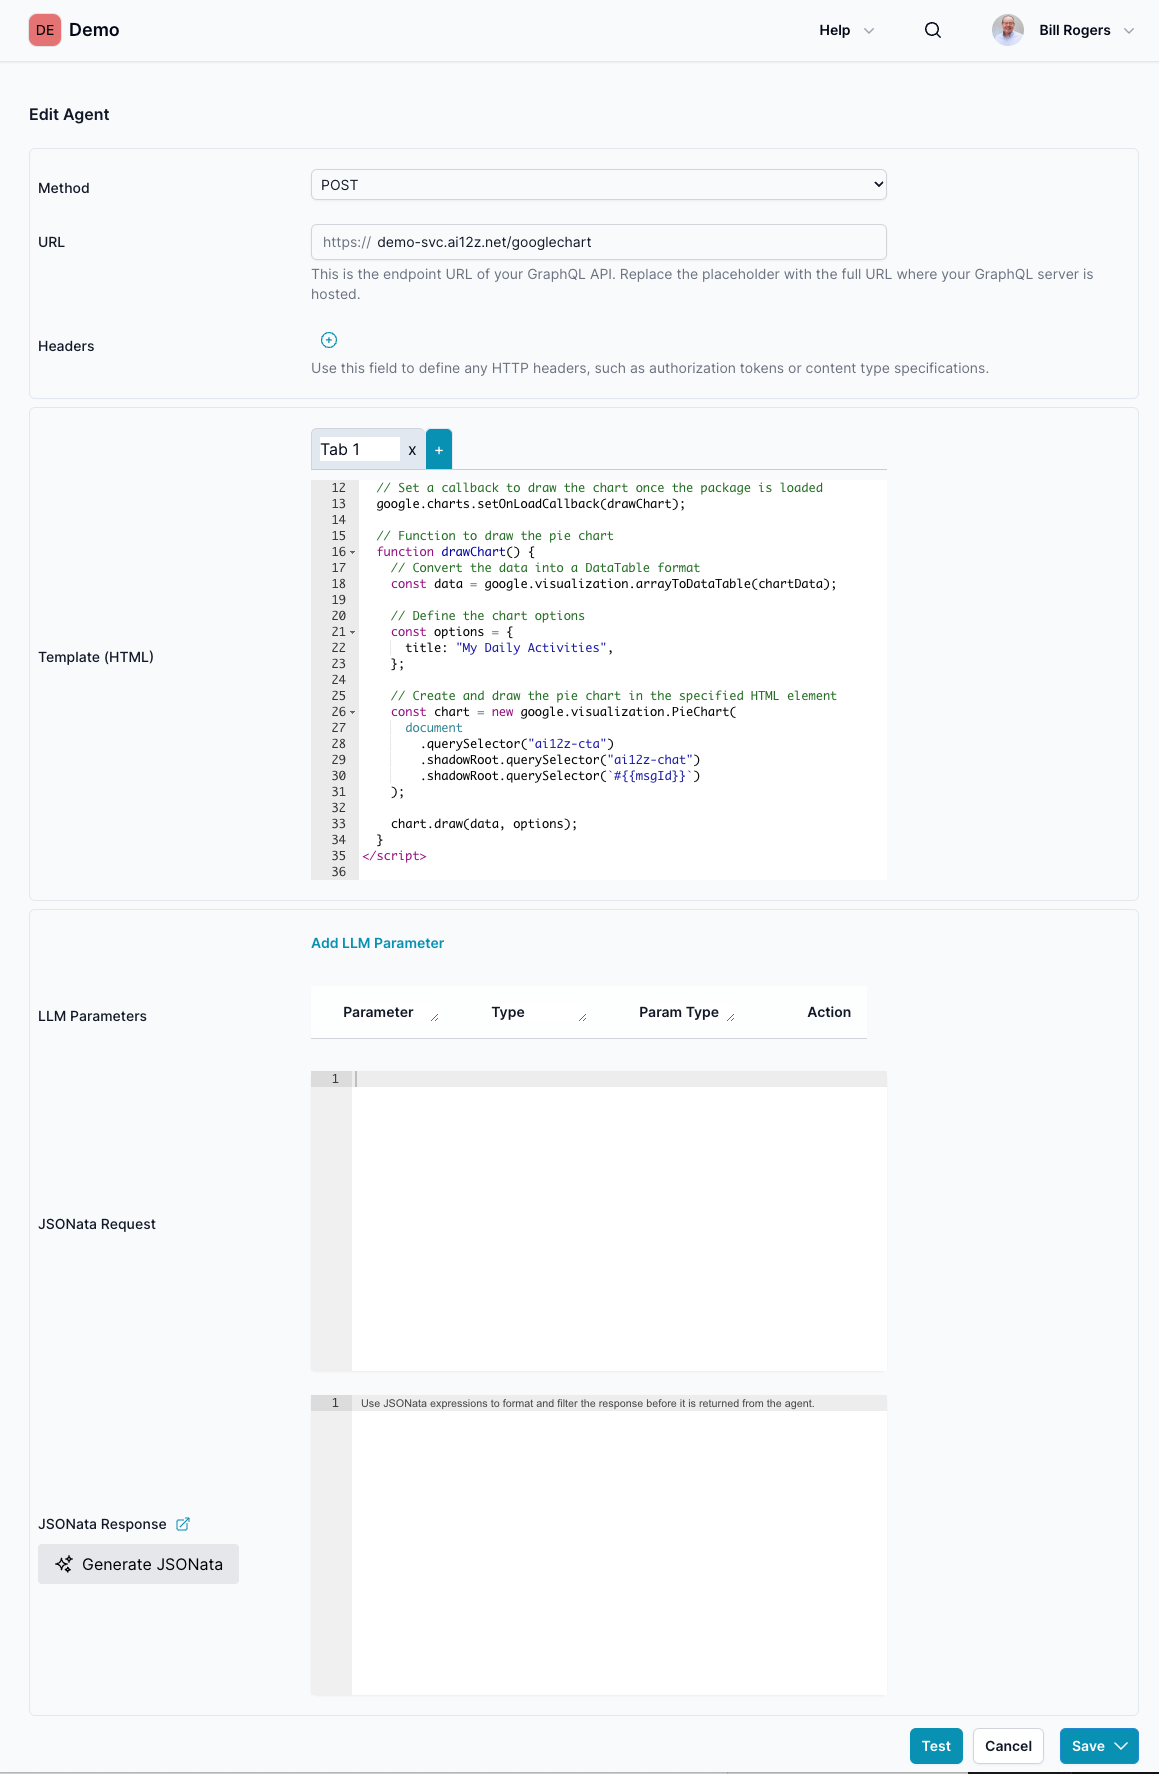
HTML code:
<div id="{{msgId}}" style="width: 500px; height: 500px"></div>

<script
  async
  type="text/javascript"
  src="https://www.gstatic.com/charts/loader.js"
></script>
<script type="text/javascript">
  // Define the data for the pie chart from the REST API endpoint
  // If `source` is an array using Handlebars, it needs to be processed
  var chartData = {{processArray source}};

  // Function to draw the pie chart
  function loaddata() {
    // Convert the data into a DataTable format
    const data = google.visualization.arrayToDataTable(chartData);

    // Define the chart options
    const options = {
      title: "{{llm.bot_query}}",
    };

    // Check for `ai12z-cta` elements in the DOM and process them
    if (document.querySelector("ai12z-cta")) {
      const listElements = document.querySelectorAll("ai12z-cta");

      listElements.forEach((ctaElement, index) => {
        // Access the shadow DOM of each `ai12z-cta` element
        const chatElement = ctaElement.shadowRoot?.querySelector("ai12z-chat");
        if (chatElement) {
          const chartContainer = chatElement.shadowRoot?.querySelector(`#{{msgId}}`);
          if (chartContainer) {
            // Initialize and draw the chart
            const chart = new google.visualization.PieChart(chartContainer);
            chart.draw(data, options);
          } else {
            console.log(`Chart container not found for element at index ${index}`);
          }
        } else {
          console.log(`ai12z-chat not found in shadow DOM of element at index ${index}`);
        }
      });
    } else {
      console.log("No ai12z-cta elements found in the DOM");
    }
  }

  // Wait for the bubble to load with code
  ai12zChat[`{{msgId}}`].onLoadCallback = () => {
    // Load the Google Charts package
    google.charts.load("current", { packages: ["corechart"] });

    // Set a callback to draw the chart once the package is loaded
    google.charts.setOnLoadCallback(loaddata);
  };
</script>
Integration dialog
Example 2: Ski Selector HTML Widget
This example demonstrates an interactive ski matching quiz widget that recommends the best skis based on user-selected preferences. The widget collects answers from a multiple-choice form and, upon clicking Show My Match, displays a recommended ski model with a "Show More" button for additional details.
Widget Screenshots (Newest First)
1. Quiz Start (Step 1)
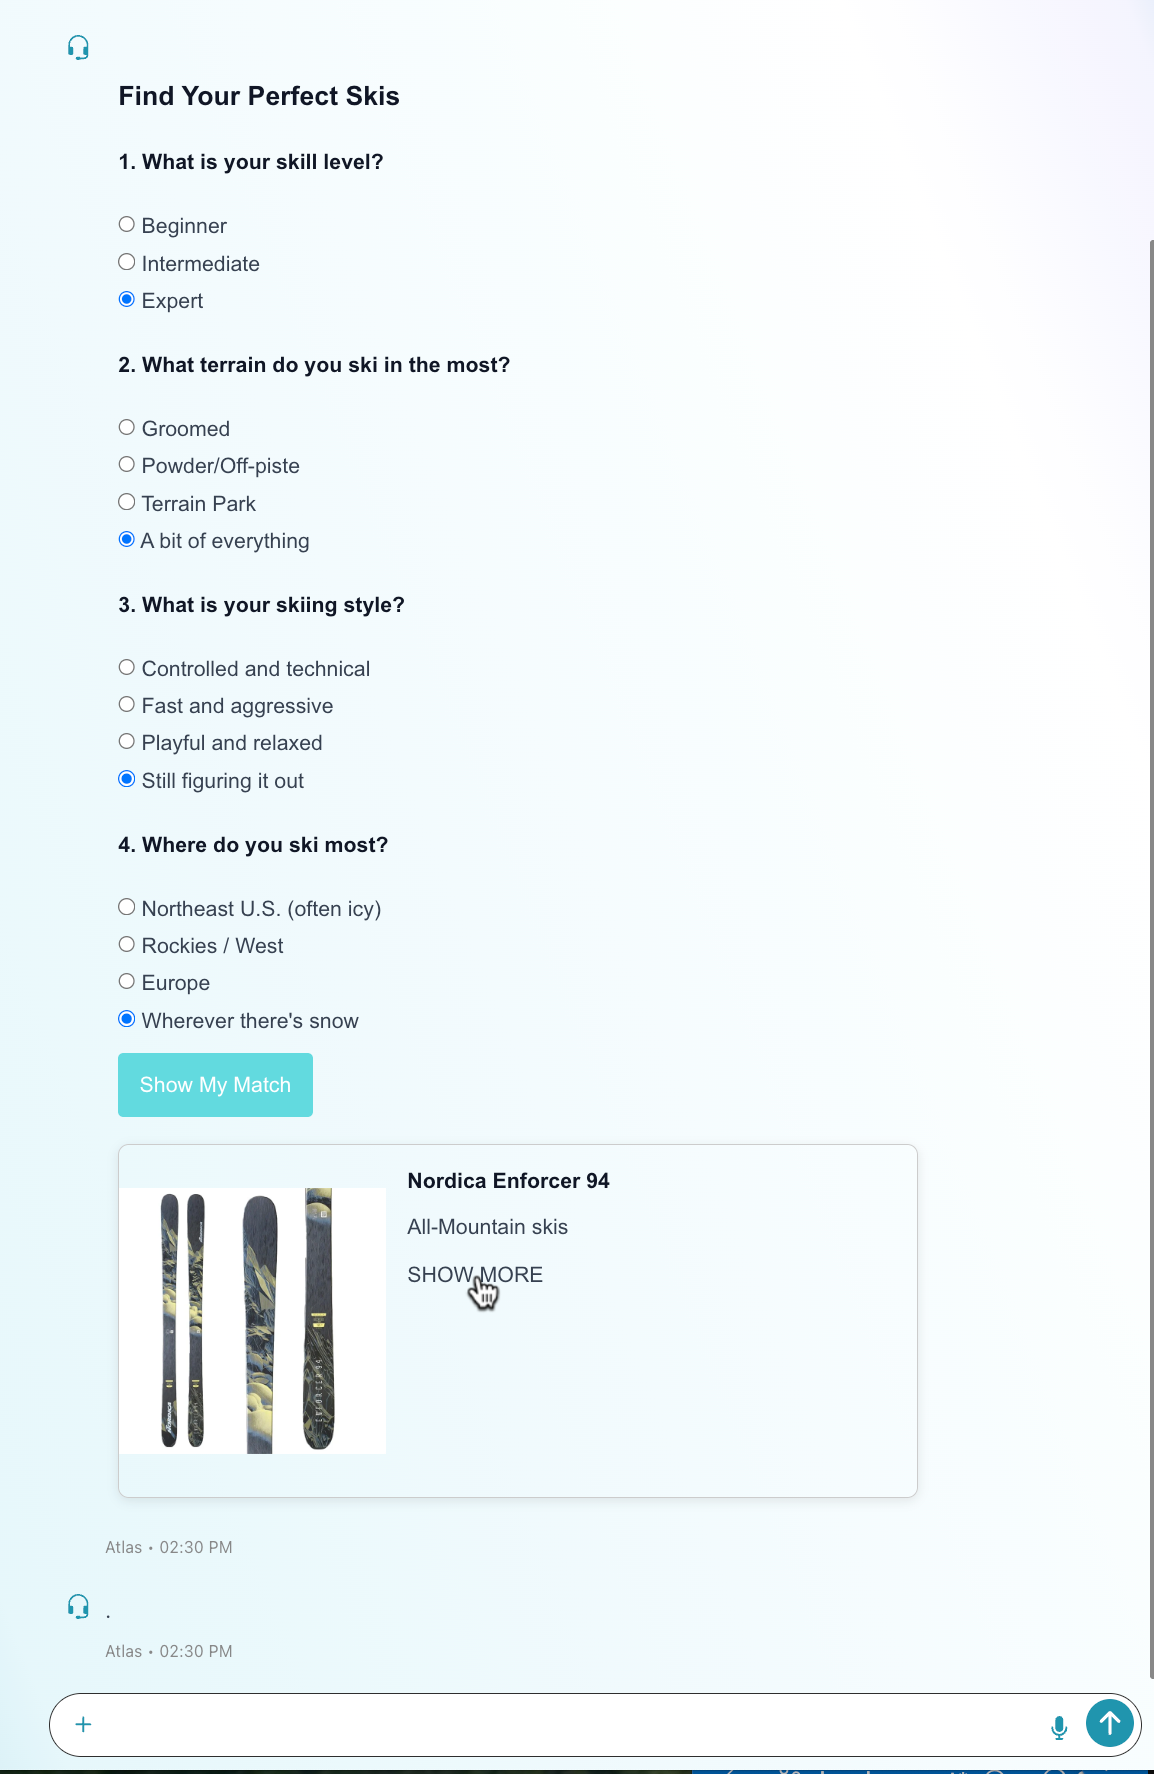
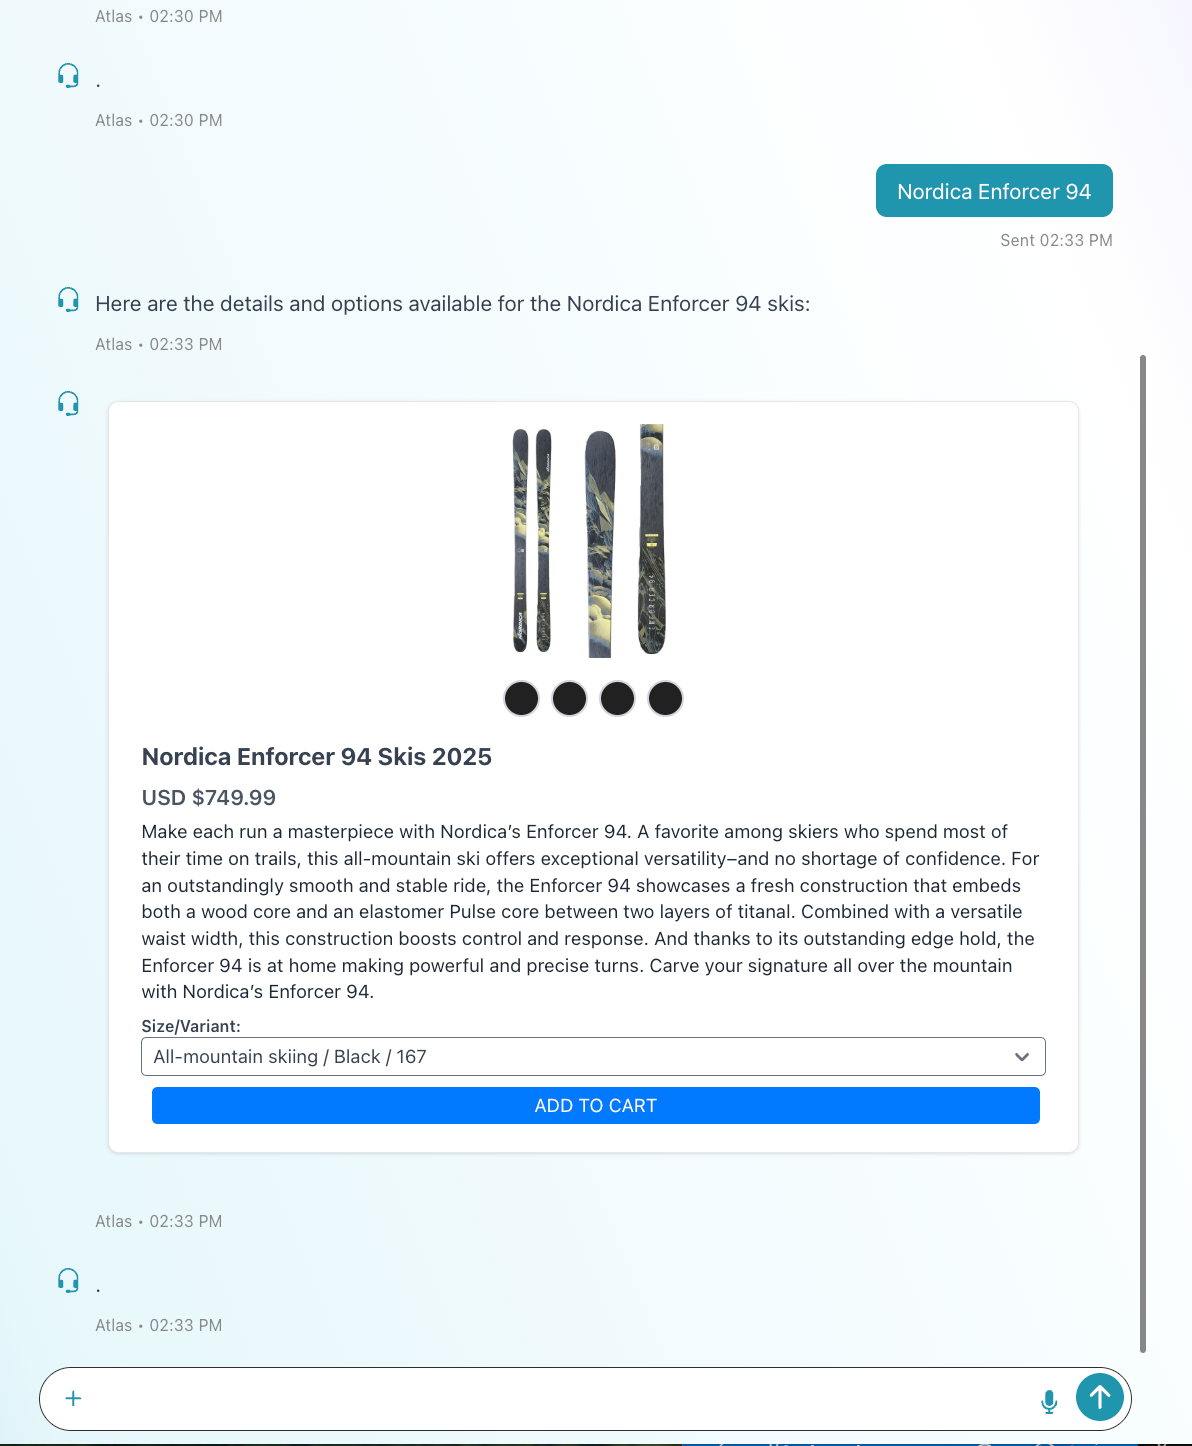
2. Show More Button (Card View)
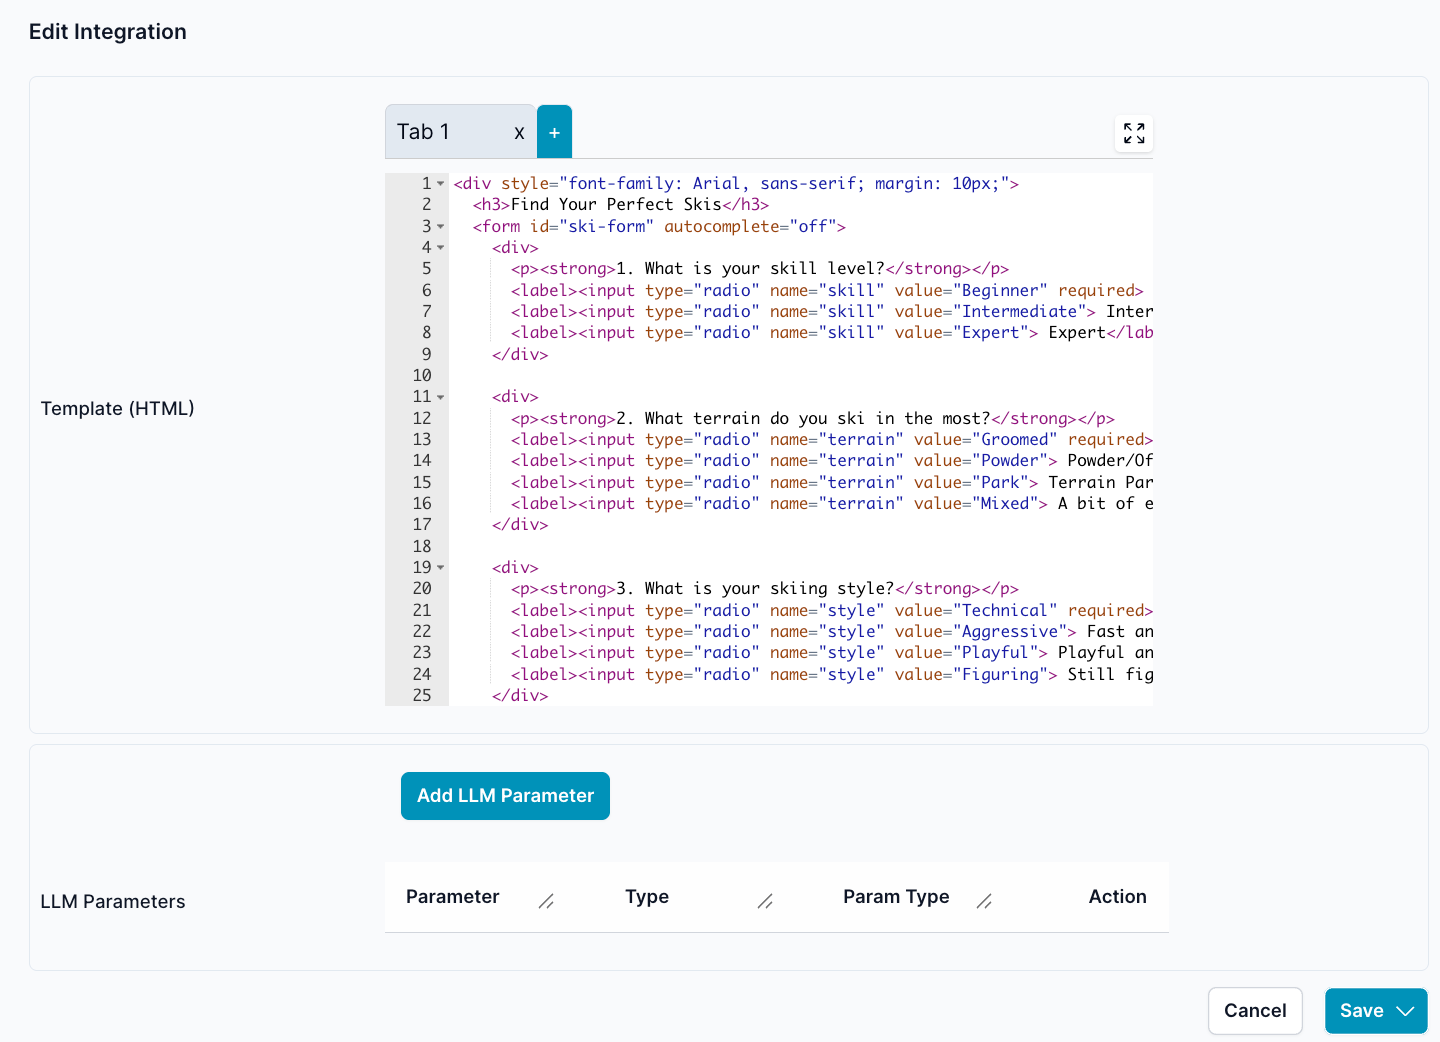
3. Widget Properties (Integration Settings)

4. Widget Edit (HTML Editor)
Features
- Dynamic Quiz: Users answer questions about skill level, terrain, style, and location.
- Smart Recommendation: The widget matches the best ski based on input using a simple rule engine.
- Show More Button: The result card includes a "Show More" button, which can trigger additional info (e.g., detailed product info, cart integration).
- Shadow DOM Support: All form and result elements are rendered inside the widget’s Shadow Root. JavaScript should be placed in the Web Controls → <ai12z-bot> → Javascript tab to work correctly.
- Easy Customization: HTML and JavaScript can be edited directly in the integration’s Template (HTML) editor.
How it Works
HTML Template
Paste this into the integration’s HTML template:
<div style="font-family: Arial, sans-serif; margin: 10px;">
  <h3>Find Your Perfect Skis</h3>
  <form id="ski-form" autocomplete="off">
    <div>
      <p><strong>1. What is your skill level?</strong></p>
      <label
        ><input type="radio" name="skill" value="Beginner" required />
        Beginner</label
      ><br />
      <label
        ><input type="radio" name="skill" value="Intermediate" />
        Intermediate</label
      ><br />
      <label><input type="radio" name="skill" value="Expert" /> Expert</label>
    </div>

    <div>
      <p><strong>2. What terrain do you ski in the most?</strong></p>
      <label
        ><input type="radio" name="terrain" value="Groomed" required />
        Groomed</label
      ><br />
      <label
        ><input type="radio" name="terrain" value="Powder" />
        Powder/Off-piste</label
      ><br />
      <label
        ><input type="radio" name="terrain" value="Park" /> Terrain Park</label
      ><br />
      <label
        ><input type="radio" name="terrain" value="Mixed" /> A bit of
        everything</label
      >
    </div>

    <div>
      <p><strong>3. What is your skiing style?</strong></p>
      <label
        ><input type="radio" name="style" value="Technical" required />
        Controlled and technical</label
      ><br />
      <label
        ><input type="radio" name="style" value="Aggressive" /> Fast and
        aggressive</label
      ><br />
      <label
        ><input type="radio" name="style" value="Playful" /> Playful and
        relaxed</label
      ><br />
      <label
        ><input type="radio" name="style" value="Figuring" /> Still figuring it
        out</label
      >
    </div>

    <div>
      <p><strong>4. Where do you ski most?</strong></p>
      <label
        ><input type="radio" name="location" value="Northeast" required />
        Northeast U.S. (often icy)</label
      ><br />
      <label
        ><input type="radio" name="location" value="West" /> Rockies /
        West</label
      ><br />
      <label><input type="radio" name="location" value="Europe" /> Europe</label
      ><br />
      <label
        ><input type="radio" name="location" value="Wherever" /> Wherever
        there's snow</label
      >
    </div>

    <button
      type="button"
      onclick="handleSkiFormSubmitFromButton(this)"
      style="margin-top: 10px; background-color: #63dadf; border: none; padding: 10px 16px; color: white; border-radius: 4px; cursor: pointer;"
    >
      Show My Match
    </button>
  </form>
  <div id="ski-result" style="margin-top: 20px;"></div>
</div>
JavaScript Logic
Place this in the Web Controls → <ai12z-bot> → Javascript tab. Note: The widget runs inside a Shadow Root. Access elements via the event’s scope or use relative selectors.
function handleSkiFormSubmitFromButton(button) {
  // Find the nearest form
  const form = button.closest("form")
  if (!form) return

  const skill = form.querySelector('input[name="skill"]:checked')?.value
  const terrain = form.querySelector('input[name="terrain"]:checked')?.value
  const style = form.querySelector('input[name="style"]:checked')?.value

  const match = findSkiMatch(skill, terrain, style)

  const resultDiv = form.parentNode.querySelector("#ski-result")
  if (resultDiv) {
    resultDiv.innerHTML = `
      <div style="display: flex; flex-wrap: wrap; border: 1px solid #ccc; border-radius: 8px; overflow: hidden; box-shadow: 0 2px 8px rgba(0,0,0,0.1); max-width: 600px;">
        <img src="${match.image}" alt="${match.name}" style="width: 200px; object-fit: cover;" />
        <div style="padding: 16px; flex: 1;">
          <h4 style="margin-top: 0;">${match.name}</h4>
          <p style="margin: 8px 0;">${match.type}</p>

          <button type="button" class="card-button list-btn uppercase flex-grow hover:bg-gradient-to-t md:flex-none" onclick='ai12zBot.sendMessage("${match.name}","${match.name}")'>Show More</button>
        </div>
      </div>
    `
  }
}

// Simple logic for demo. Expand this function to add more rules!
function findSkiMatch(skill, terrain, style) {
  // Default match
  let match = {
    name: "Nordica Enforcer 94",
    type: "All-Mountain skis",
    image:
      "https://cdn.shopify.com/s/files/1/0920/9112/1967/files/700_253125_1081575.webp?v=1751427036",
    link: "https://ecom.ai12z.com/nordica-enforcer-94-all-mountain-skis-2025/",
  }

  if (skill === "Expert" && terrain === "Powder") {
    match = {
      name: "Faction La Machine 5",
      type: "Powder skis",
      image:
        "https://cdn.shopify.com/s/files/1/0920/9112/1967/files/Faction-Skis-2526-La-Machine-5-Base-1x1.webp?v=1751438691",
      link: "https://ecom.ai12z.com/faction-skis-la-machine-5-powder/",
    }
  } else if (terrain === "Park" || style === "Playful") {
    match = {
      name: "Völkl Revolt 84",
      type: "Freestyle skis",
      image:
        "https://cdn.shopify.com/s/files/1/0920/9112/1967/files/volkl_2425_revolt-84_V2410156_1.webp?v=1751439056",
      link: "https://ecom.ai12z.com/volkl-revolt-84-skis-2025/",
    }
  } else if (terrain === "Groomed" && style === "Technical") {
    match = {
      name: "Salomon S/Max 8",
      type: "Carving skis",
      image:
        "https://cdn.shopify.com/s/files/1/0920/9112/1967/files/L47652900_0_SKE_ES_MAX8_M11GW.png.cq5dam.web.1200.1200_2048x2048_cf50fb8e-9cf2-4e63-bd57-9ef359dbea60.webp?v=1751428016",
      link: "https://ecom.ai12z.com/2026-s-max-8-carving-ski-w-binding/",
    }
  }
  return match
}
The "Show More" Button
- Purpose: Triggers a message to the copilot with the matched ski’s name. This can be hooked to display product detail, start a cart, or provide more information in the chat.
- Placement: Appears on the recommendation card beneath the matched ski info.
- Behavior: Calls
ai12zBot.sendMessagewith the ski name, leveraging the AI12Z copilot for contextual response.
Notes
-
Shadow Root/Encapsulation: All widgets are rendered in a Shadow DOM for style and behavior isolation. To interact with elements, use local selectors relative to the event, not
document.querySelector. -
Where to Put JS: Paste your JavaScript in the Web Controls → <ai12z-bot> → Javascript tab for it to work within the widget's shadow root.