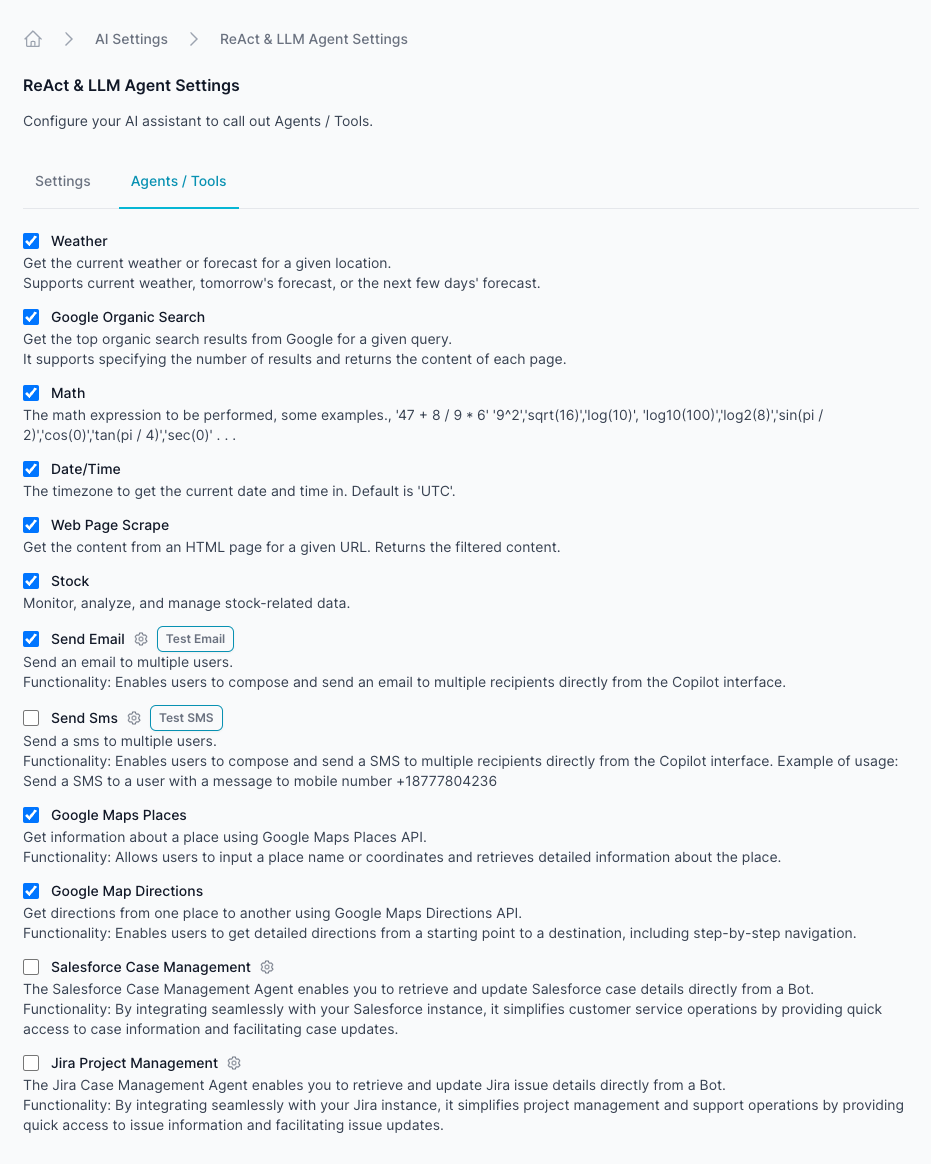
Agents / Tools
Introduction
The ReAct & LLM agent settings allow you to configure various tools that the AI assistant can call upon to provide enhanced functionality and support for user queries. This documentation details each agent/tool available in the system and how to enable them.
Available Agents/Tools and Their Functions
-
Weather
- Description: Get the current weather or forecast for a given location.
- Functionality: Supports current weather, tomorrow's forecast, or the next few days' forecast.
- How to Enable: Check the box labeled "Weather."
-
Google Organic Search
- Description: Get the top organic search results from Google for a given query. Web Scrape the web page found.
- Functionality: Supports specifying the number of results and returns the content of each page.
- How to Enable: Check the box labeled "Google Organic Search."
-
Math
- Description: Perform mathematical expressions.
- Functionality: Supports a variety of math expressions, such as addition, subtraction, multiplication, division, and more complex functions like square roots and trigonometric operations.
- Examples:
- '47 + 8 / 9 * 6'
- '9^2'
- 'sqrt(16)'
- 'log(10)'
- 'log10(100)'
- 'log2(8)'
- 'sin(pi / 2)'
- 'cos(0)'
- 'tan(pi / 4)'
- 'sec(0)'
- How to Enable: Check the box labeled "Math."
-
Date/Time
- Description: Get the current date and time.
- Functionality: The default time zone is 'UTC'.
- How to Enable: Check the box labeled "Date/Time."
-
Web Page Scrape
- Description: Get content from an HTML page for a given URL.
- Functionality: Returns the filtered content of the specified URL.
- How to Enable: Check the box labeled "Web Page Scrape."
-
Stock
- Description: Monitor, analyze, and manage stock-related data, and plot the results.
- How to Enable: Check the box labeled "Stock."
-
SMS
- Description: Send SMS to multiple users
- Functionality: Enables the LLM to compose and send an SMS to multiple recipients directly
- How to Enable: Check the box labeled "SMS" Integrates with your Twilio account. There is a Test SMS button to verify you set up the service correctly
-
Send Email
- Description: Send an email to multiple users.
- Functionality: Enables the LLM to compose and send an email to multiple recipients directly
- How to Enable: Check the box labeled "Send Email." Select settings to configure your email server. There is a Test Email button to verify you set up the service correctly
-
Google Maps Places
- Description: Get information about a place using Google Maps Places API.
- Functionality: Allows users to input a place name or coordinates and retrieves detailed information about the place.
- How to Enable: Check the box labeled "Google Maps Places."
-
Google Maps Directions
- Description: Get directions from one place to another using Google Maps Directions API.
- Functionality: Enables users to get detailed directions from a starting point to a destination, including step-by-step navigation. Note in the System Prompt set the location(s) to create directions to it.
- How to Enable: Check the box labeled "Google Maps Directions."
-
Salesforce Case Management Use the configuration icon to setup your salesforce integration
- Description: The Salesforce Case Management Agent enables you to retrieve and update Salesforce case details directly from a Bot.
- Functionality: By integrating seamlessly with your Salesforce instance, it simplifies customer service operations by providing quick access to case information and facilitating case updates.
-
Jira Project Management
- Description: The Jira Case Management Agent enables you to retrieve and update Jira issue details directly from a Bot.
- Functionality: By integrating seamlessly with your Jira instance, it simplifies project management and support operations by providing quick access to issue information and facilitating issue updates.
How to Configure the Agents/Tools
-
Accessing the Settings:
- Navigate to the "ReAct & LLM Agent Settings" section.
- Switch to the "Agents / Tools" tab.
-
Enabling Agents/Tools:
- Check the boxes next to the agents/tools you wish to enable.
- Make sure to review the description and functionality of each tool to understand its purpose and usage.
- Best Practice, only enable the Agent / Tools you are going to use in your copilot. If for Example you don't have Salesforce do not enable it, or it will confuse the copilot.
-
Saving the Configuration:
- After selecting the desired agents/tools, click the "Save" button to apply the settings.
Example Usage Scenarios
-
Using the Weather Agent:
- Query: "What is the weather forecast for tomorrow in New York?"
- The AI will call the Weather agent to retrieve and provide the forecast.
-
Using Google Flight Search:
- Query: "Find me flights from Boston to San Francisco next weekend."
- The AI will use the Google Flight Search agent to find relevant flight options.
-
Using the User Input Agent:
- Query: "I need a form to collect contact information."
- The AI will create a dynamic HTML form for the user to input their contact details.
By following this documentation, users can effectively configure and utilize the ReAct & LLM agent tools to enhance their AI assistant's capabilities and provide comprehensive support for various user queries.
