Custom Agent Property
User Documentation for Add/Edit Property Dialog
Overview
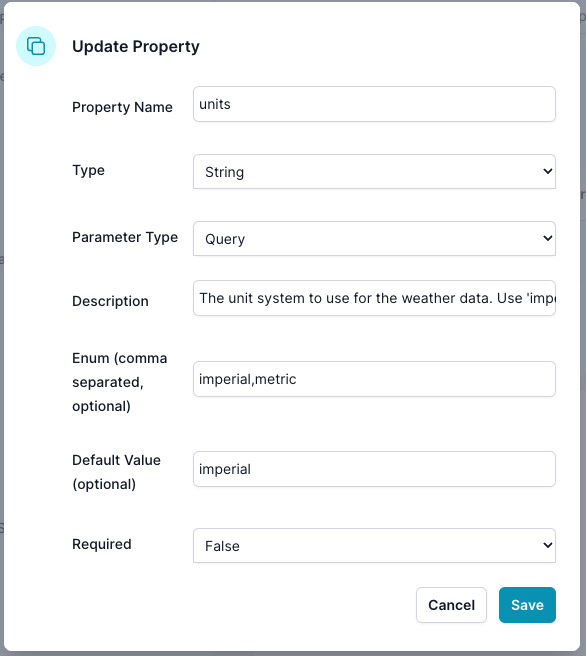
The Add/Edit Property dialog is used to configure properties for the parameters of a custom agent. This dialog allows you to specify details such as the property name, type, parameter type, description, enum values, default value, and whether the property is required.

Screen Elements
-
Header Section:
- Title: "Update Property" (or "Add Property" when adding a new property)
-
Fields:
- Property Name:
- Description: The name of the property.
- Input: Text field.
- Type:
- Description: The data type of the property (e.g., String, Number).
- Input: Dropdown menu.
- Parameter Type:
- Description: Indicates whether the property is a query parameter, header, etc.
- Input: Dropdown menu.
- Description:
- Description: A brief description of the property and its usage.
- Input: Text area.
- Enum (comma separated, optional):
- Description: A comma-separated list of acceptable values for the property.
- Input: Text field.
- Default Value (optional):
- Description: The default value for the property if none is provided.
- Input: Text field.
- Required:
- Description: Specifies whether the property is mandatory.
- Input: Dropdown menu (True/False).
- Property Name:
-
Action Buttons:
- Save:
- Function: Saves the property configuration.
- Cancel:
- Function: Discards changes and closes the dialog.
- Save:
How to Use
-
Adding a New Property:
- Click on "Add Property" from the Edit Agent screen.
- Fill in the details in the dialog:
- Enter the Property Name.
- Select the Type from the dropdown.
- Choose the Parameter Type from the dropdown.
- Provide a Description for the property.
- If applicable, enter acceptable values in the Enum field, separated by commas.
- Set a Default Value if needed.
- Indicate whether the property is Required by selecting True or False.
- Click "Save" to add the property.
-
Editing an Existing Property:
- Click on the three vertical dots in the Action column next to the property and select "Edit".
- Update the necessary details in the dialog:
- Modify the Property Name if required.
- Change the Type if necessary.
- Update the Parameter Type if applicable.
- Edit the Description to better explain the property’s purpose.
- Adjust the Enum values if needed.
- Change the Default Value if applicable.
- Update the Required field to True or False as necessary.
- Click "Save" to apply the changes.
-
Discarding Changes:
- If you do not wish to save the changes, click "Cancel" to close the dialog without saving.
Notes
- Ensure all required fields are filled out correctly before saving.
- Use the Description field to clearly explain the purpose and usage of the property.
- Enum values should be provided only if the property can take specific, predefined values.
This documentation should help you effectively use the Add/Edit Property dialog to configure parameters for your custom agents. If you have any further questions or need assistance, please refer to the help section or contact support.