Custom Agent - Template (HTML widget)
Overview
The purpose of using Template (HTML widget) as a response handling method is to create dynamic, interactive HTML widgets that enrich the chat experience and present information or functionality directly within the conversation. This approach provides a flexible canvas for integrating a vast range of client-side UI elements, whether they depend on external data sources or not. For instance, you could create a mortgage calculator for a banking chatbot that requires no external data, a Google Chart that fetches analytics from a REST or GraphQL endpoint, or even an embedded iframe to display external web content on-demand. Beyond these examples, the possibilities are virtually limitless:
Data flow for when Handle Response is Template (HTML Widget)
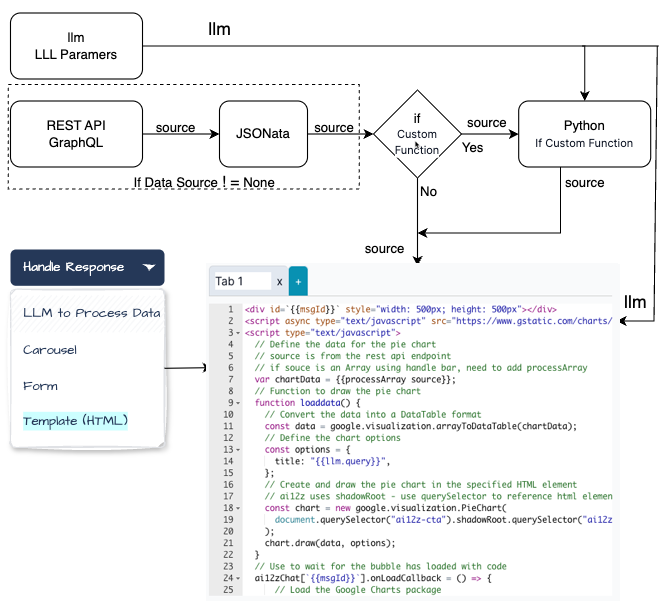
In this example we do have a Rest API, the Data Source is not required to create a Template (HTML widget)
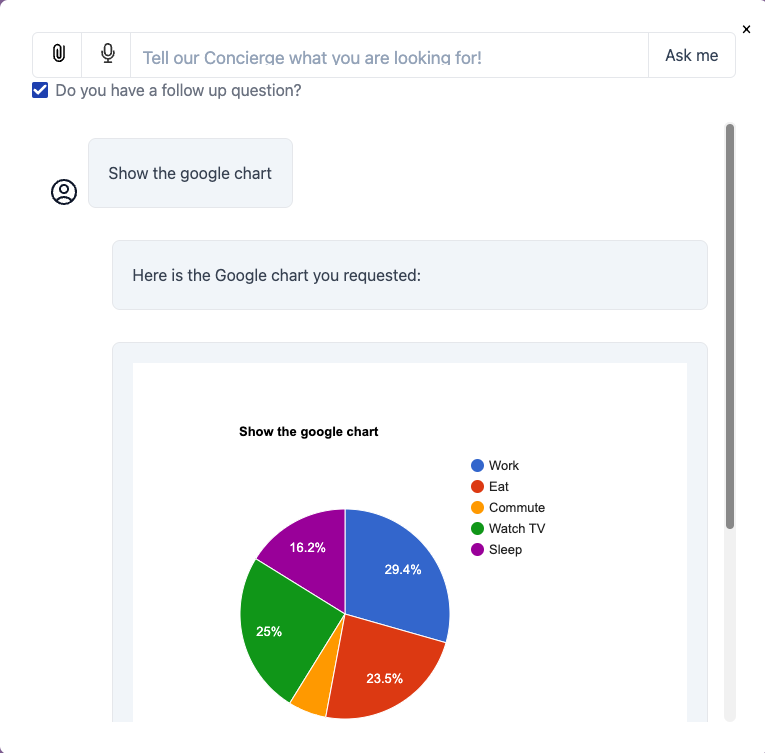
The Rest API
Returns:
[
[
"Task",
"Hours per Day"
],
[
"Work",
11
],
[
"Eat",
2
],
[
"Commute",
2
],
[
"Watch TV",
2
],
[
"Sleep",
7
]
]
- An interactive currency converter fetching live exchange rates from a REST API.
- A product recommendation carousel, integrated with a CRM or e-commerce system, to show personalized items.
- A data-driven timeline of events or milestones, pulling structured historical data via GraphQL.
- A polling or voting widget that updates results in real-time, drawing data from a dynamic backend.
- A simple guestbook or Q&A form that requires no external data, allowing users to submit feedback or questions within the chat window.
By leveraging Template (HTML widget), developers and businesses can effortlessly blend data retrieval, processing, and presentation into a cohesive, visually appealing, and highly interactive chat-based user experience.
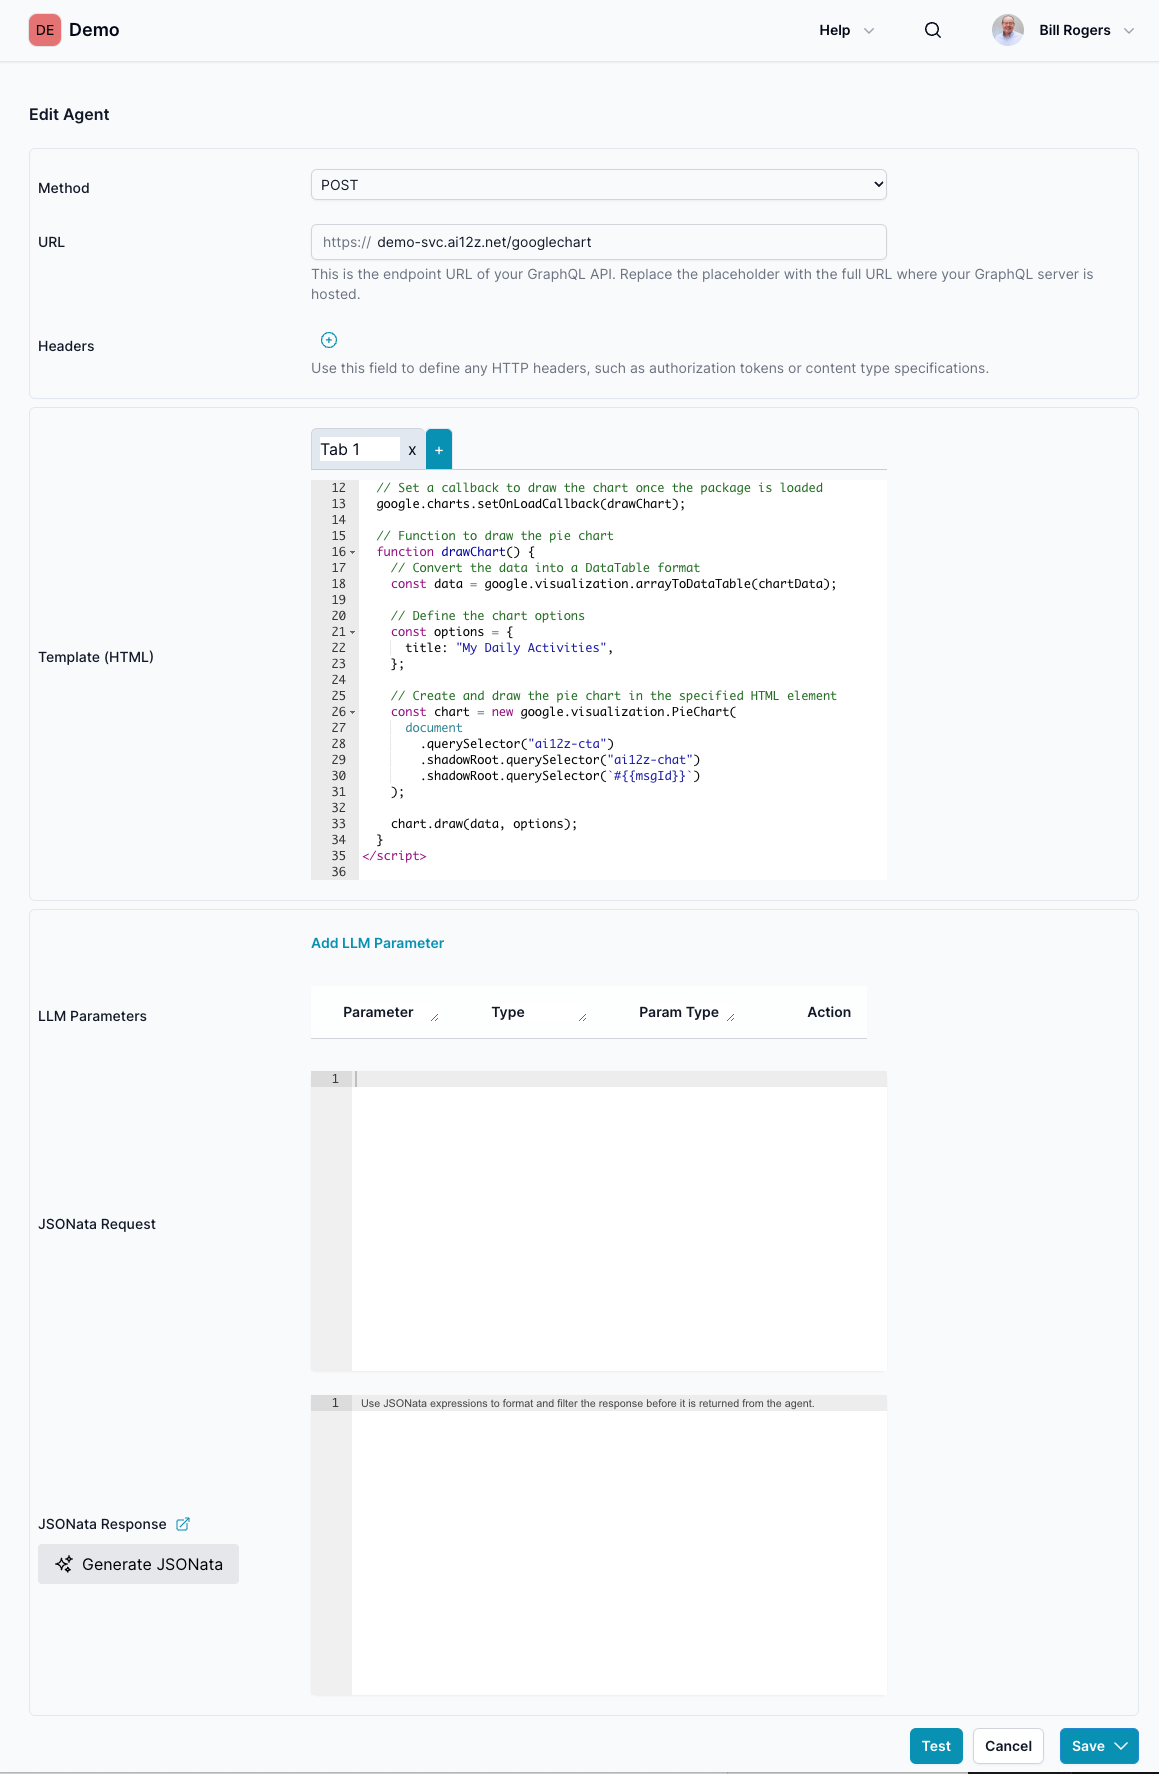
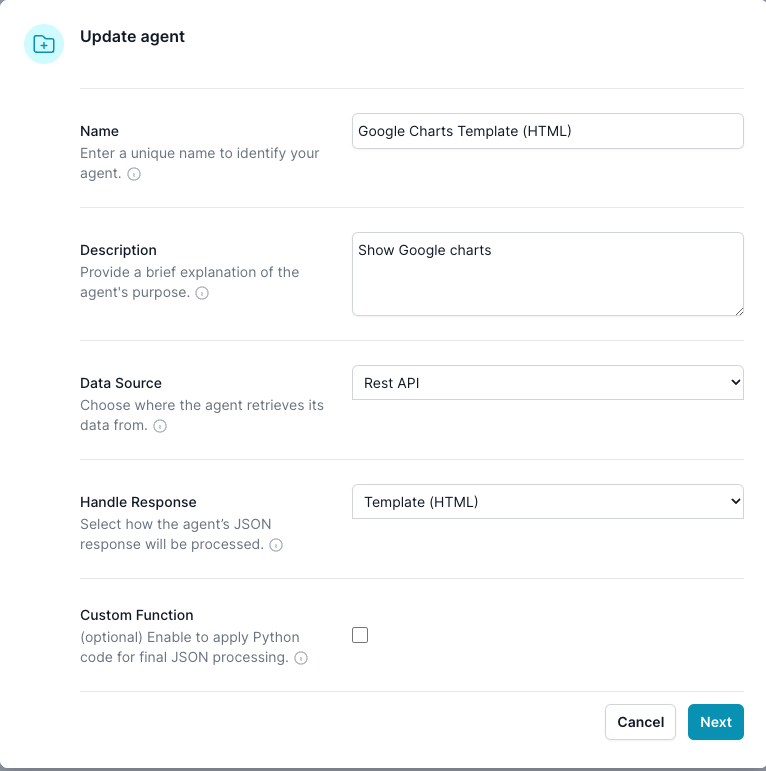
In the Edit Parameter dialog it will define what will show up in this Edit Agent dialog.
For this example, we set the Handle Response -> Template (HTML widget), and Data Source -> Rest API
See the Edit Parameter dialog below:
Google Charts, displayed in Chat
When using Template (HTML widget):
-
The template receives two main objects:
llm: Contains LLM parameters, includingllm.llm_query, it is always passed to the agent.source: Contains the processed data from your chosen data source (if any), potentially post processed by JSONata, and potentially processed by Python.
-
Insert handlebar tags like
{{llm.llm_query}}or{{source.<fieldName>}}into the HTML to dynamically populate the UI. -
msgIdis unique id for this bubble. This Way you can call the widget more than one time and not have a conflict with ids -
For example, if
sourcecontains an array of data representing chart values, you can use JavaScript (within your HTML template) to load a Google Chart library and passsourceas the data array to render a visual chart. -
ai12z uses
shadowRootso not to conflict with the clients javascript or CSS. Note how to access the ai12z-cta and html tags in the bubble -
Note:
processArray sourcewhen source is an array include processArray in Handlebars -
msgIdthis is a unique ID for the bubble that the html template HTML widget is in -
ai12zChat[
{{msgId}}].onLoadCallback Executes after the bubble template HTML widget is finished loading into the bot. Note this is important, you are waiting for the bubble to render so javascript is valid. - Referemce Handlebars
HTML code:
<div id="{{msgId}}" style="width: 500px; height: 500px"></div>

<script
  async
  type="text/javascript"
  src="https://www.gstatic.com/charts/loader.js"
></script>
<script type="text/javascript">
  // Define the data for the pie chart from the REST API endpoint
  // If `source` is an array using Handlebars, it needs to be processed
  var chartData = {{processArray source}};

  // Function to draw the pie chart
  function loaddata() {
    // Convert the data into a DataTable format
    const data = google.visualization.arrayToDataTable(chartData);

    // Define the chart options
    const options = {
      title: "{{llm.bot_query}}",
    };

    // Check for `ai12z-cta` elements in the DOM and process them
    if (document.querySelector("ai12z-cta")) {
      const listElements = document.querySelectorAll("ai12z-cta");

      listElements.forEach((ctaElement, index) => {
        // Access the shadow DOM of each `ai12z-cta` element
        const chatElement = ctaElement.shadowRoot?.querySelector("ai12z-chat");
        if (chatElement) {
          const chartContainer = chatElement.shadowRoot?.querySelector(`#{{msgId}}`);
          if (chartContainer) {
            // Initialize and draw the chart
            const chart = new google.visualization.PieChart(chartContainer);
            chart.draw(data, options);
          } else {
            console.log(`Chart container not found for element at index ${index}`);
          }
        } else {
          console.log(`ai12z-chat not found in shadow DOM of element at index ${index}`);
        }
      });
    } else {
      console.log("No ai12z-cta elements found in the DOM");
    }
  }

  // Wait for the bubble to load with code
  ai12zChat[`{{msgId}}`].onLoadCallback = () => {
    // Load the Google Charts package
    google.charts.load("current", { packages: ["corechart"] });

    // Set a callback to draw the chart once the package is loaded
    google.charts.setOnLoadCallback(loaddata);
  };
</script>
Agent dialog