AWS S3
AWS S3 Connector Setup Guide
The connector allows Ai12z to ingest content directly from a client’s AWS S3 storage. By connecting your S3 bucket, Ai12z can securely access, read, and process files stored in your AWS S3 account, enabling automated data integration and content updates from your cloud storage into the Ai12z platform.
Add Connector
- Log in to the ai12z portal.
- Open Connectors from the left navigation and click Add Connectors.
- Select AWS S3 and submit.
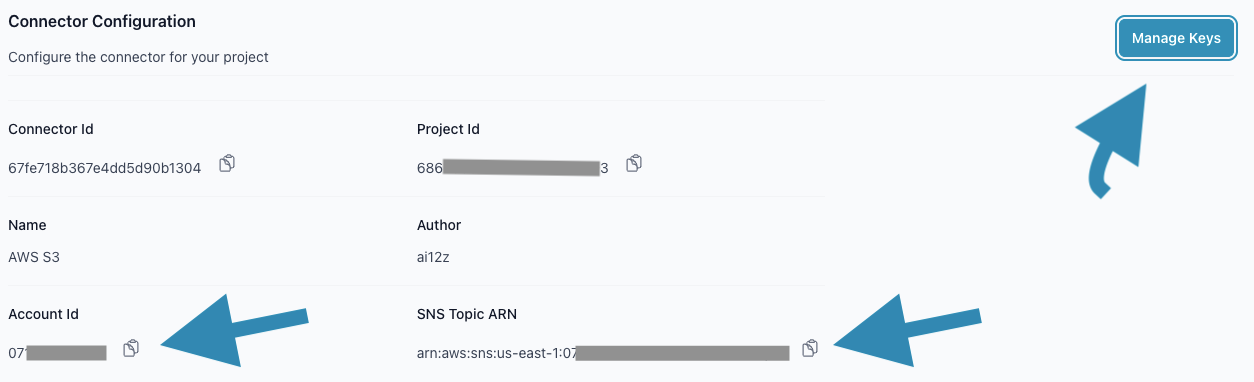
Step 1: Configure AWS S3 Connector
-
Open Connectors from the left navigation.
-
In the connector list, click AWS S3.
-
Copy the Account ID and SNS Topic ARN for Step 2.
-
Fill out the information
-
Name:
Enter a name for your connector (e.g.,AWS S3). This will appear in your document list. -
Description:
Provide a brief description of your connector (e.g.,Connector for AWS S3). -
Bucket ARN:
Enter the ARN of your S3 bucket (e.g.,arn:aws:s3:::example-bucket). -
Cloudfront URL:
If applicable, provide the URL for your CloudFront distribution. Otherwise, leave it blank. -
Private Bucket:
Check this box if your bucket is privately accessible. -
Click on Save button Refresh screen for the next step.
-
-
Click on the Create / Manage Keys button from top right
-
Generate Key 1 and copy it for Step 3 AWS IAM Role
Step 2: Configure S3 Event Notification with SNS Topic
Follow these steps to configure an event notification on your S3 bucket using the SNS Topic ARN copied from Step 1.3:
-
Go to the S3 Console
In the AWS Console, search for and select S3. -
Select Your Bucket
Click on the bucket you want Ai12z to ingest content from. -
Go to the Properties Tab
In the bucket details, select the Properties tab. -
Scroll to Event Notifications
Find the Event notifications section and click Create event notification. -
Configure Event Name
Enter a name for your event notification (e.g.,ai12z-ingest-event). -
Set Event Types
Choose the event typesAll object create eventsandAll object removal events. -
Specify Prefix/Suffix (Optional)
If you want to limit notifications to specific objects, set a prefix (folder path) or suffix (file extension). -
Select Destination
- For Destination, select SNS topic.
- In the SNS topic dropdown, choose Enter SNS topic ARN.
- Paste the SNS Topic ARN you copied from Step 1.3.
-
Save Notification
Click Save changes or Create event notification to finish.
Note: This configuration ensures that whenever the specified event occurs in your S3 bucket, a notification will be sent to the SNS topic, allowing Ai12z to process the new or updated content automatically.
Step 3: Create an AWS IAM Role for Ai12z Access
Follow these steps to create an IAM Role that allows Ai12z to access your S3 bucket:
-
Log in to your AWS Console
Use an account with permissions to manage IAM roles. -
Navigate to IAM
In the AWS Console, search for and select IAM (Identity and Access Management). -
Select Roles
In the left sidebar under "Access management," click on Roles. -
Create Role
Click the Create role button. -
Select Trusted Entity Type
- Choose AWS account as the trusted entity type.
-
Specify Account ID
-
Click Next
Proceed to the next step to set permissions (you will attach policies in the following steps). -
Attach Permissions
- On the permissions page, search for and select the AmazonS3ReadOnlyAccess policy.
- Click Next to continue.
-
Review and Create Role
- Review the role details and permissions.
- Click Create role to finish.
Note: This role allows Ai12z to access your S3 bucket securely with read‑only permissions. When finished, copy the newly created Role ARN—you'll need it in Step 4.
Step 4: Fill Out the AWS S3 Connector Form in Ai12z Portal
-
Open Connectors from the left navigation.
-
In the connector list, click AWS S3.
-
Finish the connector configuration as follows:
- Private Bucket:
Check this box if your bucket is privately accessible. - Role ARN:
Enter the Role ARN you created in Step 3 (e.g.,arn:aws:iam::<AWS_YOUR_ACCOUNT_ID>:role/<ROLE_ARN>).
- Private Bucket:
-
Click Save to complete the connector setup.