Magnolia
Ai12z Magnolia Module Installation and Setup Guide
Add Connector
- Log in to the ai12z portal.
- Open Connectors from the left navigation and click Add Connectors.
- Select Magnolia and submit.
Step 2: Configure Connector
- Open Connectors and click the row action on Magnolia to edit.
- In the Connector Configuration screen, fill out the following fields:
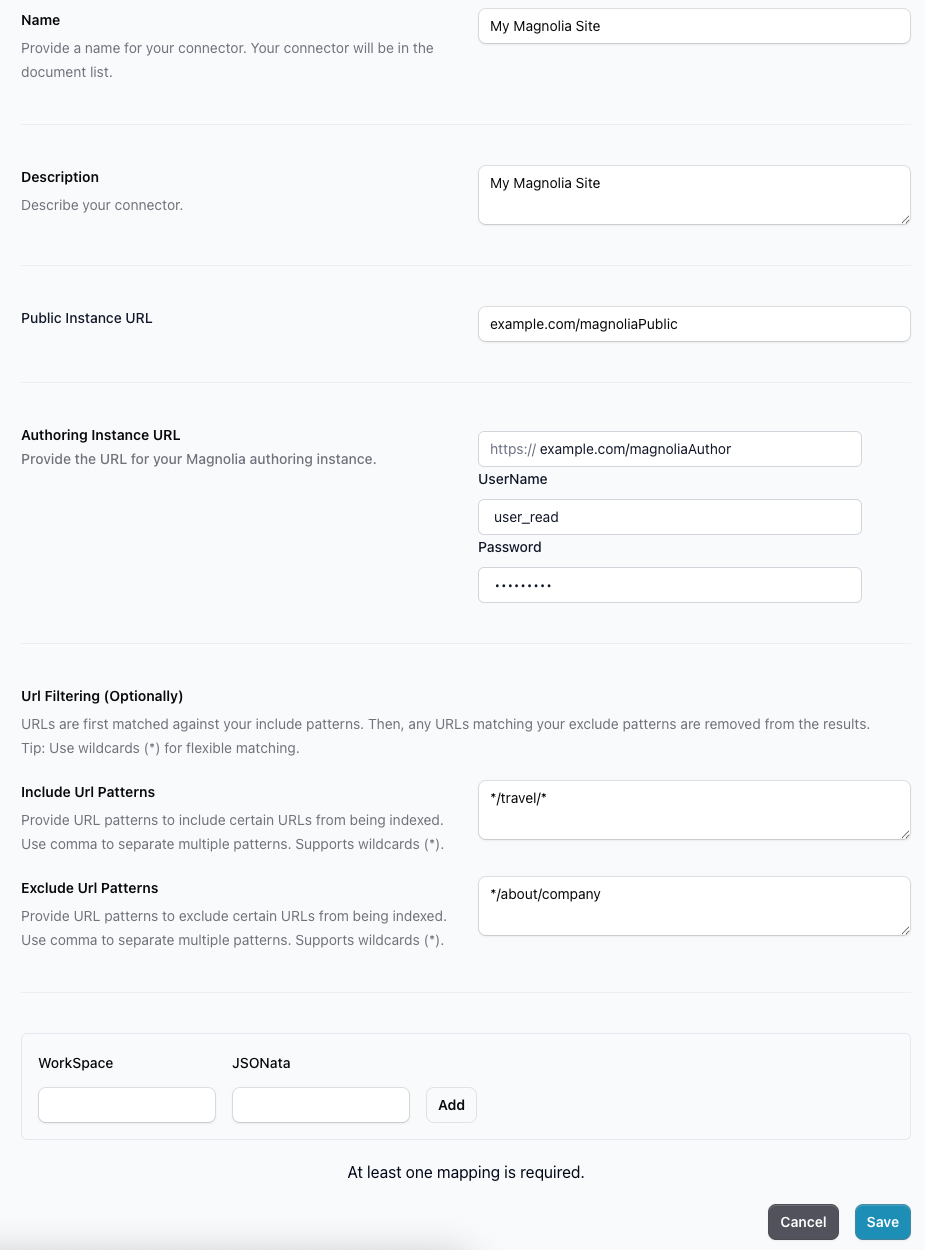
- Name: Provide a name for your connector. This will appear in your document list. (e.g., "My Magnolia Site")
- Description: Describe your connector. (e.g., "My Magnolia Site")
- Public Instance URL: Enter the public Magnolia site URL (e.g.,
exaample.com/magnoliaPublic). - Authoring Instance URL: Enter the authoring Magnolia site URL (e.g.,
https://example.com/magnoliaAuthor).- UserName: Enter your Magnolia authoring username (e.g.,
user_read). - Password: Enter your Magnolia authoring password.
- UserName: Enter your Magnolia authoring username (e.g.,
- URL Filtering (Optional):
- Include URL Patterns: Provide patterns to include URLs for indexing (e.g.,
*/travel/*). Use commas to separate multiple patterns. Supports wildcards (*). - Exclude URL Patterns: Provide patterns to exclude URLs from indexing (e.g.,
*/about/company). Use commas to separate multiple patterns. Supports wildcards (*).
- Include URL Patterns: Provide patterns to include URLs for indexing (e.g.,
- Mapping:
- Add at least one Workspace and JSONata mapping. Click Add after entering values.
- Click Save to complete connector setup. You can also click Cancel to exit without saving.
JSONATA Expression
It's important to parse the content from the data returned from Magnolia REST API.
{ "content": $.*.**.freeText }
The above expression selects all freeText from Magnolia object.
{
  "content": [
    "<p>Sample content</p>",
    "<p>Sample content</p>",
    "<p>Sample content</p>"
  ]
}
Optionally, you can map "id", "title", "description", "url" just like "content".
- Download
Webhook Configuration.
Step 3: Magnolia Module Setup
Set Up the Module for Different Installations
Configuration for Magnolia ZIP Bundle Installation
- Go to where the Magnolia ZIP bundle is installed, then place the
ai12zmodule in the following directory:C:\magnolia\magnolia-dx-core-demo-XXXX\apache-tomcat-XXXX\webapps\magnoliaAuthor\modules
Configuration for Magnolia CLI Installation
- Go to where the Magnolia CLI is installed, then place the
ai12zmodule in the following directory:C:\magnolia\light-modules
Note:
- Magnolia webhooks are only available with the DX Core feature and have been supported since the 6.2.22 Magnolia release.
- Always restart the server whenever you make any changes in Magnolia CMS.