Embedding a HubSpot v4 Form via Iframe
User story: As a support team, when a visitor tells the copilot they need help with a product, we want the actual HubSpot form to render inline in the chat, not a link out to it, so the submission goes straight into our existing HubSpot form pipeline without the visitor ever leaving the conversation.
ai12z has an older approach that injects HubSpot's script directly into the chat bubble's Shadow DOM (see Embedding a HubSpot Form via Custom Integrations), but it only works with HubSpot's older v2 embed script. HubSpot's newer v4 embed forms load additional scripts and stylesheets that assume they're running against the top-level page, not a fragment relocated inside a Shadow Root, so that technique does not reliably work for them. If your form uses HubSpot's v4 embed code, this guide is the one to use.
Instead of injecting anything into the Shadow DOM, you host a small standalone page that loads HubSpot's v4 embed script, then point a Template (HTML) integration at that page with a plain <iframe>. Because the form lives on its own page in its own document, there's no Shadow DOM to reach into and nothing to relocate: HubSpot's v4 script, its stylesheets, and any supporting scripts it loads all run inside the iframe's own document, exactly as HubSpot intends.
Prerequisites
- A form already built in HubSpot Forms, with its Portal ID, Form ID, and region (e.g.
na1) from the form's v4 embed code in HubSpot - Somewhere public to host a static HTML page per form (your website, a CDN, GitHub Pages, S3, etc.)
- Access to your agent's Integrations tab in ai12z
Step 1: Host a Page for the Form
For each HubSpot form you want to embed, create and publish a small standalone HTML page. This example uses hubspotform-v4.html:
<!DOCTYPE html>
<html>
  <head>
    <title>Bot</title>
    <meta charset="UTF-8" />
    <meta name="viewport" content="width=device-width, initial-scale=1.0" />
    <script
      type="text/javascript"
      src="https://js.hsforms.net/forms/embed/developer/YOUR_HUBSPOT_PORTAL_ID.js"
      defer
    ></script>
  </head>
  <body>
    <div
      class="hs-form-html"
      data-portal-id="YOUR_HUBSPOT_PORTAL_ID"
      data-form-id="YOUR_HUBSPOT_FORM_ID"
      data-region="na1"
    ></div>
  </body>
</html>
Replace YOUR_HUBSPOT_PORTAL_ID, YOUR_HUBSPOT_FORM_ID, and the data-region value with the ones from that specific form's own v4 embed code in HubSpot. Publish this page to a public URL: it's what the iframe in Step 4 will load.
The page's URL has to be publicly reachable. A localhost or local dev-server URL (e.g. http://127.0.0.1:5500/...) works fine while you're building and testing on your own machine, but the bot runs in visitors' browsers, not yours, so it needs the real published URL before this goes live.
Step 2: Create the Custom Integration
Go to Integrations → Custom Integrations and click Create Integration. Set the properties:
| Field | Value in This Example | Why |
|---|---|---|
| Name | Hubspot V4 integration | Internal, human-readable identifier |
| Description | "Call this integration anytime someone says Test Hubspot V4" | This is the trigger condition, see below |
| Data Source | None | The widget doesn't fetch external data; it just loads the hosted page in an iframe |
| Handle Response | Template (HTML) | Renders a custom HTML widget in the chat instead of a plain LLM text reply |
| Custom Function | Unchecked | No Python post-processing needed for a static iframe |
Same rule as any custom integration: the Description is the trigger, not documentation. ai12z's Reasoning LLM reads it to decide whether and when to call the integration during a live conversation. The description used above ("Call this integration anytime someone says Test Hubspot V4") is a test-phase trigger, useful while you're building this. For production, write a specific, natural description of when a real visitor would need this form, e.g. "When a customer needs help with a product, we ask them to fill out this form", the same way Embedding a HubSpot Form via Custom Integrations documents it.
Click Next to move into the integration editor.
Step 3: Point the Template at the Hosted Page
The editor opens to the Template tab. Leave Styles and Scripts empty, and paste an iframe into HTML pointing at the page you published in Step 1:
<div class="frame-shell">
  <iframe
    id="contentFrame"
    width="100%"
    height="700px"
    title="Embedded content"
    loading="lazy"
    src="https://your-domain.com/hubspotform-v4.html"
  ></iframe>
</div>
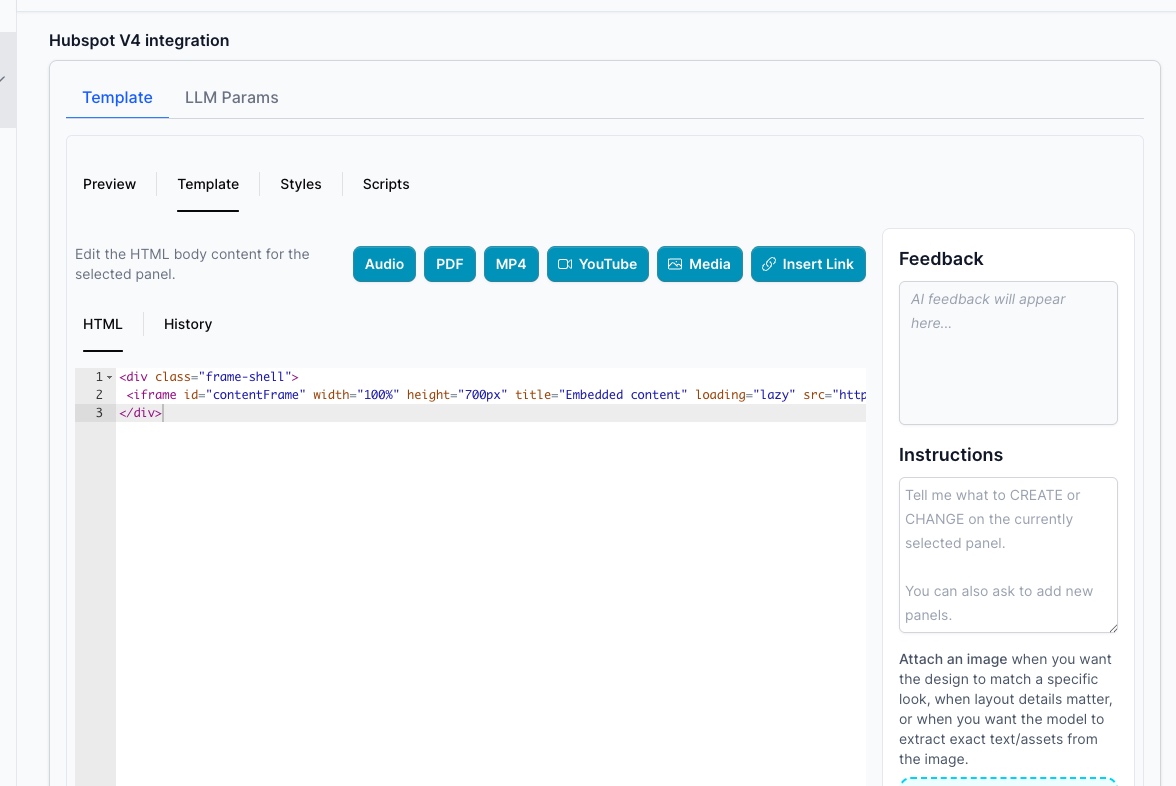
The frame-shell class is just a wrapper; it doesn't need any CSS since nothing in Styles references it. The one value worth tuning is height: set it to match the actual rendered height of the form on its hosted page, not an arbitrary guess. Open the published page directly in a browser, see how tall the form actually renders, and set height accordingly, otherwise the form either gets clipped or leaves extra empty space inside the chat bubble.
Step 4: Test It
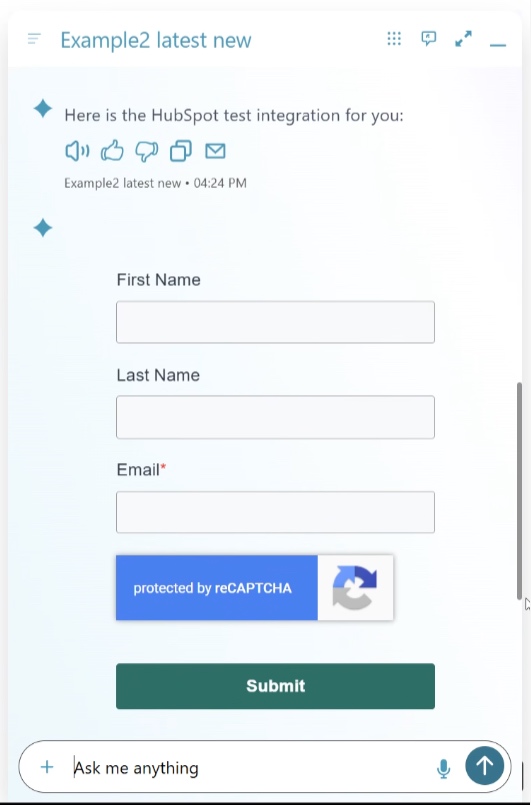
Click Preview in the Template tab. Unlike the script-based approach, Preview here renders the live HubSpot form directly, since the iframe just loads a real page. If it doesn't render, open the hosted page's URL directly in a browser tab first to confirm the page itself loads and the form appears there before troubleshooting the integration.
Then open Test Drive on the agent and type something that matches the Description's trigger condition:
User: "Test Hubspot V4"
Agent: (renders the embedded HubSpot form inline, instead of a text reply)
How This Differs from the Script-Based Embed
| This Guide (Iframe) | Script-Based Embed | |
|---|---|---|
| HubSpot embed version | v4 | v2 only |
| What renders | HubSpot's form inside an iframe, loaded from a page you host | HubSpot's form injected directly into the chat bubble's own DOM |
| Setup | Host one small static HTML page per form; paste an iframe tag | Paste a JavaScript block that reaches into the Shadow DOM and relocates nodes |
| Preview tab | Renders the live form directly | Shows nothing; it's a pure JavaScript template |
| Height | Fixed; set manually to match the form | Grows and shrinks with the actual form content |
| Best for | Any HubSpot v4 form. Also a good default for v2 forms if you'd rather not host a workaround script | v2 forms only, where you specifically want the form to feel fully native inside the chat bubble |
Check which embed version your form actually uses before picking a guide: HubSpot's v2 embed code calls hbspt.forms.create(...) from a script tag pointing at forms/embed/v2.js; v4's embed code is a script tag pointing at forms/embed/developer/<portal_id>.js alongside a <div class="hs-form-html" ...>, with no hbspt.forms.create() call. That's the code HubSpot gives you when you click Share or Embed on the form; if you're not sure, copy it from there rather than guessing.
Neither approach pushes data into HubSpot's CRM directly through ai12z; both just render HubSpot's own form, which still submits to HubSpot the normal way. For pushing conversation data into HubSpot's CRM without rendering a visible form at all, see HubSpot Contact Integration.
Related Documentation
- Embedding a HubSpot Form via Custom Integrations: The script-based alternative that renders the form directly inside the chat bubble
- HubSpot Contact Integration: Push conversation data into HubSpot CRM directly, without rendering a form
- Custom Integration Overview: How Integrations, data sources, and response handling fit together
- Property Dialog: Full reference for every field in the Name/Description/Data Source/Handle Response dialog
- Template (HTML Widget): Full reference for the Template (HTML) response type