Embedding a HubSpot Form via Custom Integrations (v2 Script)
User story: As a support team, when a visitor tells the copilot they need help with a product, we want the actual HubSpot form to render inline in the chat — not a link out to it — so the submission goes straight into our existing HubSpot form pipeline without the visitor ever leaving the conversation.
This is one of the clearest real-world uses of ai12z's Custom Integrations: a Template (HTML) widget that loads HubSpot's own embed script and renders a real HubSpot form inside the chat bubble, triggered automatically whenever the conversation matches the integration's description.
This guide relies on HubSpot's older v2 embed script (js.hsforms.net/forms/embed/v2.js) and hbspt.forms.create(), which renders synchronously into a target you control, so its DOM nodes can be relocated into ai12z's Shadow Root after the fact.
HubSpot's newer v4 embed forms don't work this way, and this technique does not reliably work for them. v4 pulls in additional scripts and stylesheets that HubSpot expects to run against the top-level page, not a fragment that's been moved inside a Shadow Root. Shadow DOM also encapsulates styles, so even if the form's markup gets relocated, any CSS v4 loads into the page's <head> doesn't cross into the shadow tree, and the form renders unstyled or broken.
If your form uses HubSpot's v4 embed code, use Embedding a HubSpot v4 Form via Iframe instead. An iframe is its own separate document, so v4's scripts and stylesheets load and run exactly as HubSpot intends, with nothing to relocate.
Prerequisites
- ai12z already embedded as a bot on your site (see below if it isn't yet)
- A form already built in HubSpot Forms, with its Portal ID and Form ID (found in the form's embed/share settings inside HubSpot)
- Your HubSpot account's region (e.g.
na1,na2,eu1) - Access to your agent's Integrations tab in ai12z
Step 1: Confirm ai12z Is Embedded on Your Site
Full reference: Chatbot Integration. In short, your site's <head> needs the library script and stylesheet:
<script
  type="module"
  src="https://cdn.ai12z.net/pkg/ai12z@latest/dist/esm/library.js"
></script>
<link
  rel="stylesheet"
  href="https://cdn.ai12z.net/pkg/ai12z@latest/dist/library/library.css"
/>
And the bot tag itself goes wherever you want it to render:
<ai12z-bot data-key="<API_KEY>"></ai12z-bot>
The data-key value is your agent's API key, found under Agent → Agent Settings:

This step matters beyond just getting the bot on the page — the HubSpot embed script below specifically reaches into ai12zBot's shadow root by ID, so the bot has to actually be present and initialized on the page for it to work.
Step 2: Create the Custom Integration
Go to Integrations → Custom Integrations. This is the same list where any existing form or REST integrations already live — in this example, Contact Us Form and Customer Service Form are two prior integrations, both Published.
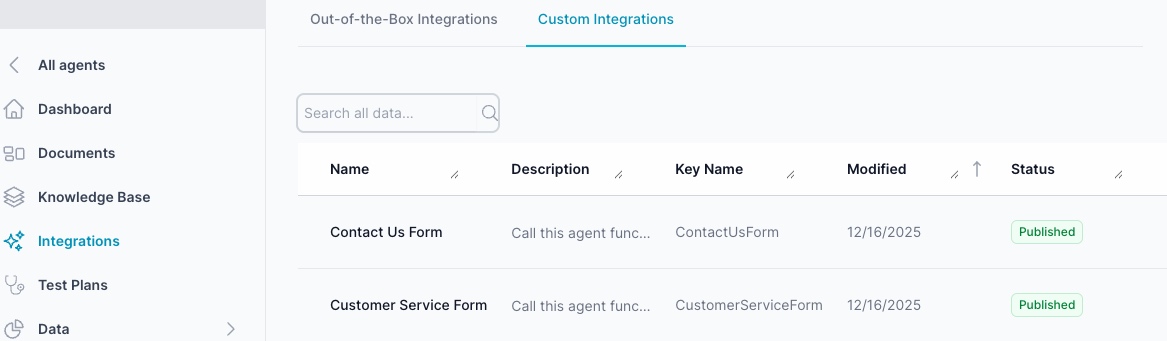
Click Create Integration to start a new one.
Step 3: Set the Properties — the Description Is What Makes This Work
This is the step to get right. The Property Dialog sets the integration's Name, Description, Data Source, and Handle Response:
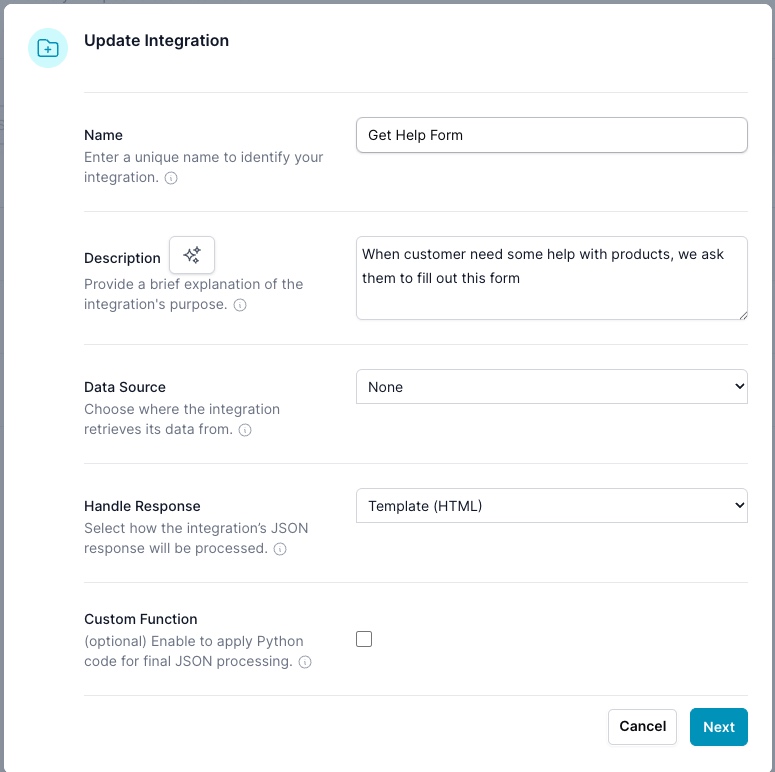
| Field | Value in This Example | Why |
|---|---|---|
| Name | Get Help Form | Internal, human-readable identifier |
| Description | "When customer need some help with products, we ask them to fill out this form" | This is the trigger condition — see below |
| Data Source | None | The widget doesn't fetch external data before rendering; it just loads HubSpot's script |
| Handle Response | Template (HTML) | Renders a custom HTML/JS widget in the chat instead of a plain LLM text reply |
| Custom Function | Unchecked | No Python post-processing needed for a static widget |
The Description field is not documentation — it's the trigger. ai12z's Reasoning LLM reads every integration's Description to decide whether and when to call it during a live conversation. There's no separate "trigger phrase" or keyword list configured anywhere else — the Description is the mechanism. A vague description ("Contact form") risks the form firing at the wrong moment or never firing at all. A specific one — like "When customer need some help with products, we ask them to fill out this form" — gives the LLM a concrete condition to match against what the visitor actually says (e.g. "I need help with your product" or "Can someone assist me?").
Click Next to move into the full integration editor.
Step 4: Build the HTML Template
The integration editor opens to the Template tab, with sub-tabs for Preview, Template, Styles, and Scripts:
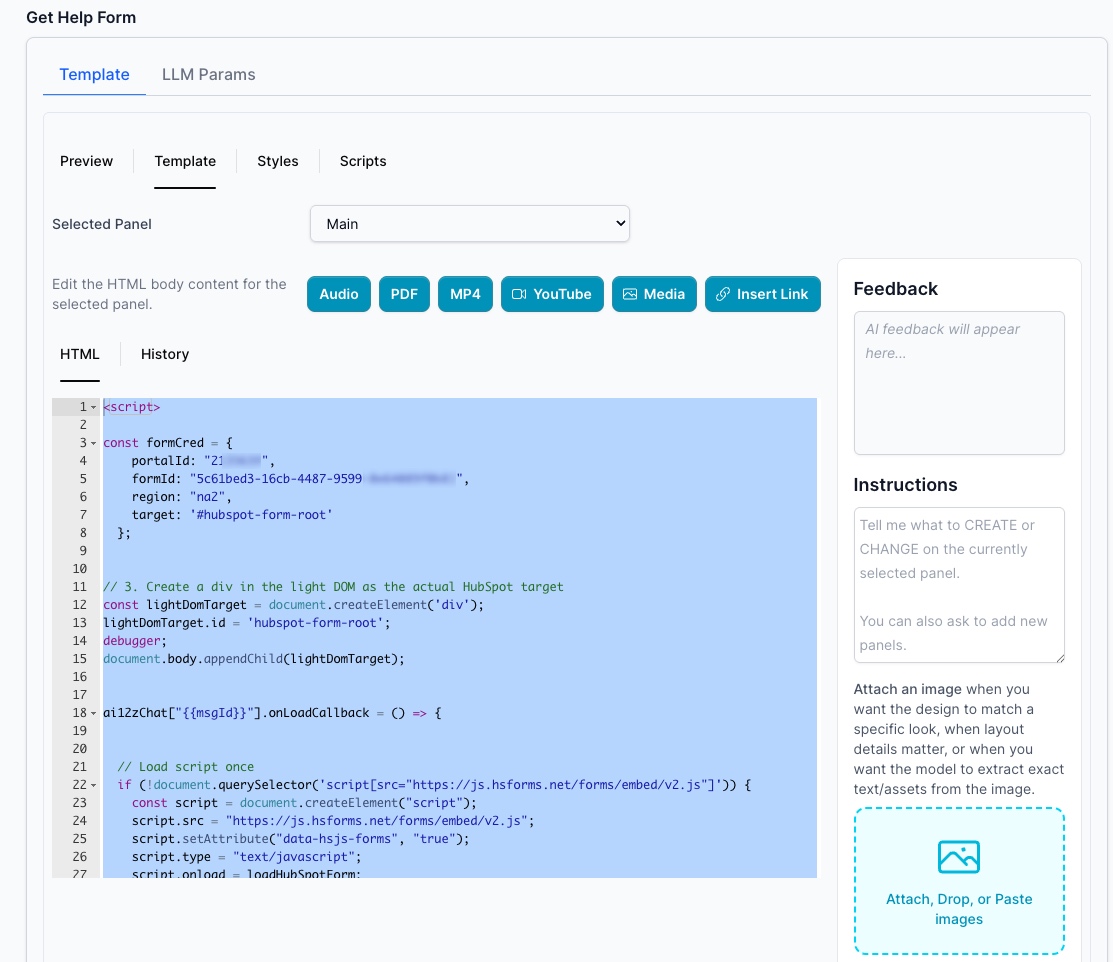
Since this integration is pure JavaScript DOM manipulation rather than static markup, Preview won't show anything — that's expected, not a sign something is broken. Leave Styles and Scripts empty and paste the full script into HTML, replacing the portal and form IDs with your own from HubSpot:
<script>
  const formCred = {
    portalId: "YOUR_HUBSPOT_PORTAL_ID",
    formId: "YOUR_HUBSPOT_FORM_ID",
    region: "na2",
    target: "#hubspot-form-root",
  }

  // Create a div in the light DOM as the actual HubSpot target
  const lightDomTarget = document.createElement("div")
  lightDomTarget.id = "hubspot-form-root"
  document.body.appendChild(lightDomTarget)

  ai12zChat[`{{msgId}}`].onLoadCallback = () => {
    // Load the HubSpot embed script once
    if (
      !document.querySelector(
        'script[src="https://js.hsforms.net/forms/embed/v2.js"]'
      )
    ) {
      const script = document.createElement("script")
      script.src = "https://js.hsforms.net/forms/embed/v2.js"
      script.setAttribute("data-hsjs-forms", "true")
      script.type = "text/javascript"
      script.onload = loadHubSpotForm
      document.head.appendChild(script)
    } else {
      loadHubSpotForm()
    }
  }

  function loadHubSpotForm() {
    const msgId = "{{msgId}}"

    // Wait for the HubSpot embed script to finish initializing
    if (!window.hbspt || !window.hbspt.forms) {
      return setTimeout(loadHubSpotForm, 50)
    }

    // Wait for this specific chat bubble to exist inside the bot's shadow root
    const formHost = ai12zBot.shadowRoot.querySelector(`#${msgId}`)
    if (!formHost) {
      return setTimeout(loadHubSpotForm, 50)
    }

    // HubSpot can only render into the light DOM, not into a shadow root
    hbspt.forms.create(formCred)

    // Once HubSpot injects the form, move its nodes into the real chat bubble
    const observer = new MutationObserver(() => {
      const formElement = document.getElementById("hubspot-form-root")
      if (formElement && formElement.children.length > 0) {
        while (formElement.firstChild) {
          formHost.appendChild(formElement.firstChild)
        }
        formElement.remove()
        observer.disconnect()
      }
    })

    observer.observe(lightDomTarget, { childList: true, subtree: true })
  }
</script>
Why This Script Looks the Way It Does
The core problem this script solves: HubSpot's embed script can only render into the regular light DOM — it has no way to reach inside ai12z's Shadow Root, which is where the actual chat bubble lives (ai12z uses a Shadow Root so the widget's styles and scripts never collide with the host page's, or vice versa). So the script works around it in four stages:
- Render off to the side first. A plain
<div id="hubspot-form-root">is created ondocument.body— outside the shadow boundary — because that's the only kind of element HubSpot's script can target at all. - Wait for both sides to be ready.
loadHubSpotForm()polls every 50ms twice: once untilwindow.hbspt.formsexists (the external script finishing its own async init afteronloadfires isn't instant), and once until the specific chat bubble (#{{msgId}}) actually exists insideai12zBot.shadowRoot— you can't move a form into a bubble that hasn't rendered yet. - Let HubSpot do its thing.
hbspt.forms.create(formCred)renders the real HubSpot form — but into that light-DOM div, not into the chat. - Physically relocate the result. Since
hbspt.forms.create()injects its markup asynchronously, aMutationObserverwatches the light-DOM div until HubSpot's form nodes actually appear, then moves every child node — not a copy, the actual elements — intoformHost, the real bubble inside the shadow root. The now-empty light-DOM container is removed and the observer disconnects once the move is done.
The querySelector guard on the embed script itself is a separate, simpler safeguard: it stops the same <script src="...forms/embed/v2.js"> tag from being injected twice if the visitor triggers this integration again later in the same session.
This whole approach only holds together because HubSpot's v2 script renders synchronously into a single container element (target: "#hubspot-form-root") that you name yourself, giving the MutationObserver one predictable place to watch. HubSpot's v4 embed forms don't expose an equivalent single render target, and load their own supporting scripts and stylesheets dynamically, so there's nothing clean to relocate and no guarantee the styles would apply once inside the Shadow Root even if there were. That's a v4-specific limitation, not a bug in this script; use the iframe-based guide for v4 forms instead.
You can also describe changes in plain English using the Instructions panel on the right instead of hand-editing the HTML — the same AI-assisted template editor documented in Template (HTML Widget). You can attach a screenshot of the form's desired look and ask the model to match it.
Step 5: Test It
Open Test Drive on the agent and type something that matches the Description's trigger condition:
User: "I'm having trouble with your product, can someone help me?"
Agent: (renders the embedded HubSpot form inline, instead of a text reply)
If the form doesn't appear, check in order: whether the Description is specific enough for the LLM to match the visitor's phrasing, the browser console for HubSpot script errors, and that the Portal ID, Form ID, and region are correct for the form you built in HubSpot.
How This Differs from HubSpot Contact Integration
ai12z has a separate guide for pushing data into HubSpot's CRM directly via its REST API — see HubSpot Contact Integration. The two solve different problems:
| This Guide | HubSpot Contact Integration | |
|---|---|---|
| What renders | HubSpot's actual form, embedded inline | Nothing visual — a conversational exchange |
| Data Source | None | REST API |
| Handle Response | Template (HTML) | LLM to process data |
| Best for | Forms you've already built in HubSpot and want reused as-is | Capturing structured contact data purely through conversation, with no visible form at all |
Related Documentation
- Chatbot Integration — Embedding the ai12z bot itself on your site
- Embedding a HubSpot v4 Form via Iframe — Use this instead if your form uses HubSpot's v4 embed code
- Custom Integration Overview — How Integrations, data sources, and response handling fit together
- Property Dialog — Full reference for every field in the Name/Description/Data Source/Handle Response dialog
- Template (HTML Widget) — Full reference for the Template (HTML) response type, including the AI-assisted "Vibe Coding" editor
- HubSpot Contact Integration — Push conversation data into HubSpot CRM directly, without rendering a form