Kentico
ai12z Kentico Xperience Module Installation and Setup Guide
Prerequisites
- Xperience by Kentico 31.0+
- .NET 8+
- Admin access to both the ai12z portal and the Kentico admin
Step 1: Add Connector
- Log in to the ai12z portal.
- Open Connectors from the left navigation and click Add Connectors.
- Select Kentico and submit.
Step 2: Configure Connector
-
Open Connectors and click the row action on Kentico to edit.
-
Fill out the following fields:
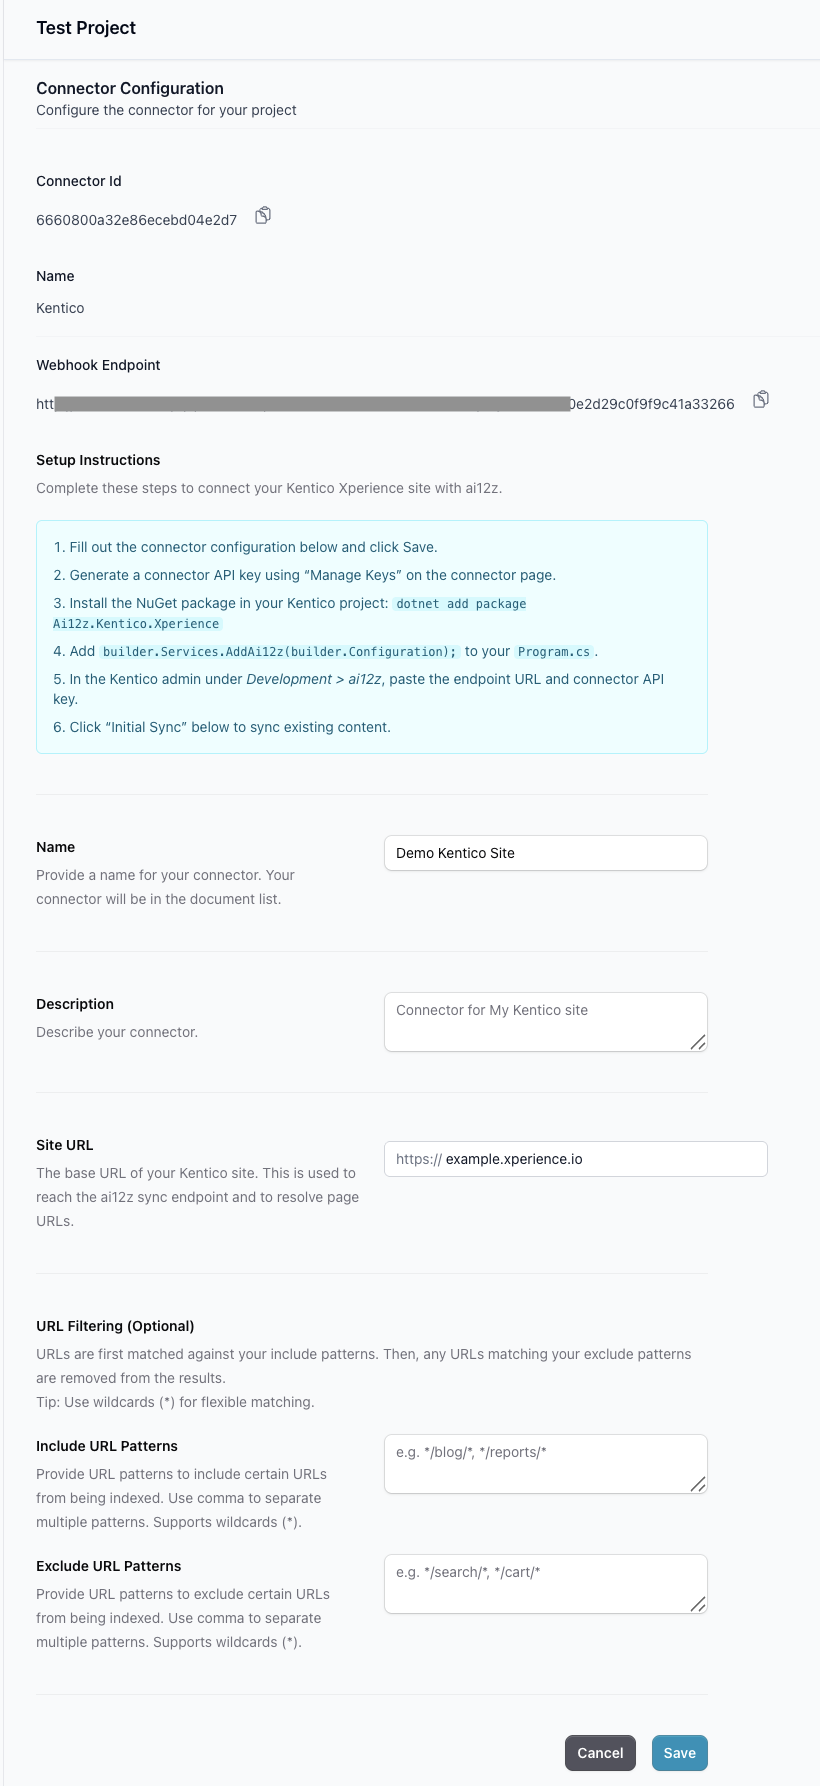
- Name: Display name for the connector (e.g., "My Kentico Site").
- Description: Describe the connector (e.g., "Corporate website").
- Site URL: Public Kentico site URL (e.g.,
https://example.com). - URL Filtering (Optional):
- Include URL Patterns: Patterns to include URLs for indexing (e.g.,
*/blog/*). Supports wildcards (*). Comma-separated. - Exclude URL Patterns: Patterns to exclude URLs from indexing (e.g.,
*/admin/*). Supports wildcards (*). Comma-separated.
- Include URL Patterns: Patterns to include URLs for indexing (e.g.,
-
Copy the Webhook Endpoint URL shown at the top of the page — you'll paste it into the Kentico admin in Step 4.
-
Click Manage Keys and generate a connector API key. Copy the key — you'll need it in Step 4.
-
Click Save.
Step 3: Install NuGet Package
Install the ai12z NuGet package in your Kentico Web (Site) project:
dotnet add package Ai12z.Kentico.Xperience
Add the following to Program.cs:
// Add ai12z services (after builder.Services.AddKentico())
builder.Services.AddAi12z(builder.Configuration);
Optionally, add the bulk sync endpoint for initial content sync:
// After app.UseKentico()
app.MapAi12zSyncEndpoint();
No other code changes are needed. No layout changes, no _ViewImports.cshtml edits, no Tag Helpers.
Step 4: Configure in Kentico Admin
-
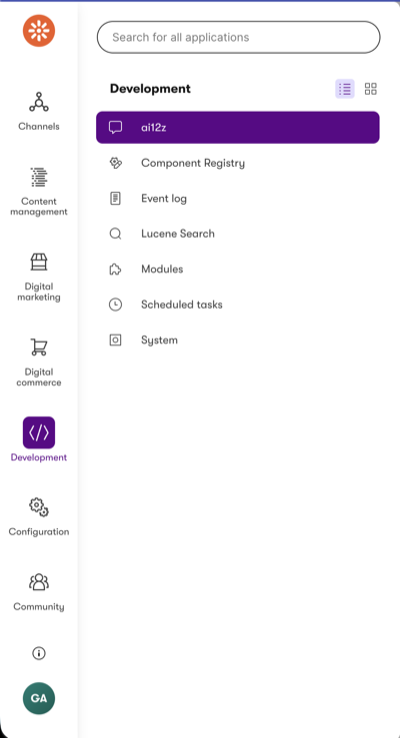
Open the Kentico admin panel and navigate to Development > ai12z in the sidebar.
-
Fill out the configuration form:
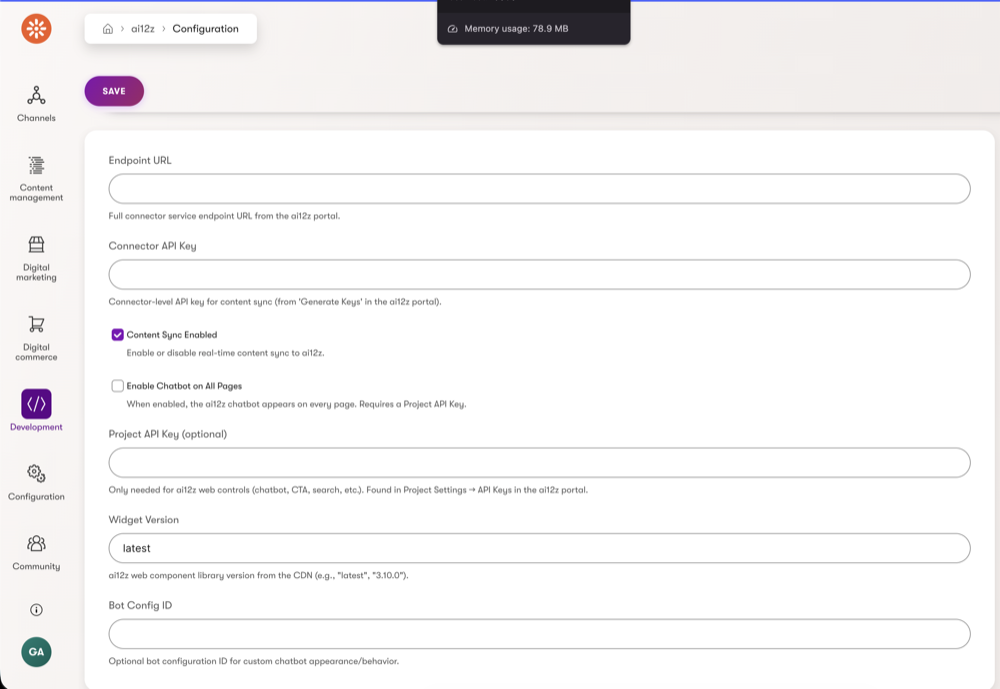
Content Sync
- Endpoint URL: Paste the Webhook Endpoint URL copied from the ai12z portal in Step 2.
- Connector API Key: The key generated in Step 2.
- Content Sync Enabled: Check to enable real-time content sync.
Web Controls (optional)
- Enable Chatbot on All Pages: Toggle to show the ai12z chatbot on every page site-wide. Requires a Project API Key.
- Project API Key: Found in the ai12z portal under Project Settings > API Keys. Only needed if using web controls.
- Widget Version: CDN version for the ai12z web component library (default:
latest). - Bot Config ID: Optional. Custom bot configuration ID from the ai12z portal.
-
Click Save.
All settings changes — content sync and web controls — take effect immediately on the next page load or publish event. No application restart needed.
Step 5: Initial Content Sync
After configuration, sync all existing content to ai12z so the bot has content to answer from.
- In the ai12z portal, open the Kentico connector page.
- Click the Initial Sync button.
- A toast notification appears in the bottom-right corner showing sync progress. This notification persists across page navigation — you can continue working in the portal while the sync runs.
Initial sync deletes all existing indexed content for this connector before re-indexing. This ensures a clean slate with no orphaned entries.
Alternatively, you can trigger the sync via the API:
curl -X POST https://your-kentico-site.com/ai12z/sync \
  -H "x-api-key: YOUR_CONNECTOR_API_KEY"
The response shows the sync result:
{
  "totalItems": 42,
  "succeeded": 42,
  "failed": 0,
  "errors": []
}
After the initial sync, content is synced automatically whenever pages are published, unpublished, or deleted.
Step 6: Web Controls (Optional)
The NuGet package includes Page Builder widgets for all ai12z web controls. These require a Project API Key configured in Step 4.
Chatbot
Toggle "Enable Chatbot on All Pages" in the admin settings. The chatbot automatically appears on every page — no code or layout changes needed.
To place the chatbot on specific pages instead, disable the global toggle and drag the ai12z Chatbot widget onto individual pages in the Page Builder. The per-page widget automatically suppresses the global chatbot on that page.
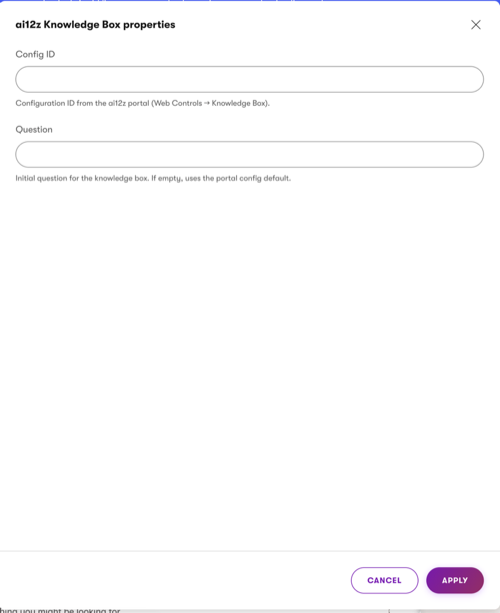
Page Builder Widgets
Open any page in the Kentico Page Builder and click the + button to add a widget. The following ai12z widgets are available:

| Widget | Description | Required Property |
|---|---|---|
| ai12z Chatbot | Floating chatbot on a specific page | Bot Config ID (optional) |
| ai12z CTA Search | Inline search dialog | Config ID |
| ai12z Knowledge Box | Answers a specific question inline | Config ID |
| ai12z Search Results | Full search results page | Config ID |
| ai12z Form | Contact, lead capture, support forms | Key Name |
| ai12z Container | Carousels, listings, calculators | Key Name |
Config IDs and Key Names are created in the ai12z portal under Web Controls.
Step 7: Verify
- Publish a page in Kentico and check Documents in the ai12z portal. The page should appear with status "Ingested successfully".
- If the chatbot is enabled, visit any page on the site — the bot should appear.
- Open Test Drive in the ai12z portal and ask a question about your content.
Sync Error Responses
The sync endpoint returns detailed error information when items fail:
Partial failure — some items succeeded, some failed:
{
  "totalItems": 50,
  "succeeded": 47,
  "failed": 3,
  "skipped": 0,
  "errors": [
    "ArticlePage ID=12: Connection refused",
    "BlogPost ID=34: Request timeout after 10s"
  ]
}
Authentication failure — HTTP 401:
Unauthorized. The connector API key does not match the value configured on your Kentico site.
Endpoint not found — HTTP 404:
Sync endpoint not found. Upgrade the Ai12z.Kentico.Xperience NuGet package to the latest version.
Integration disabled — HTTP 400:
Returned when Content Sync Enabled is unchecked in the Kentico admin settings.
URL filtering — items that don't match include patterns or match exclude patterns are counted in skipped, not failed:
{
  "totalItems": 100,
  "succeeded": 60,
  "failed": 0,
  "skipped": 40,
  "errors": []
}
Troubleshooting
| Issue | Cause | Fix |
|---|---|---|
| Initial sync shows "Sync endpoint not found" | NuGet package not installed or MapAi12zSyncEndpoint() not called | Verify Step 3 — ensure both AddAi12z() and MapAi12zSyncEndpoint() are in Program.cs |
| Initial sync returns 401 Unauthorized | Connector API key mismatch between portal and Kentico | Re-generate the key in the portal (Step 2) and update it in the Kentico admin (Step 4) |
| Publish events not syncing | Content sync not enabled or config missing | Check that Content Sync Enabled is checked in Kentico admin and the Endpoint URL and API Key are set |
| Content appears empty in ai12z | Content type has no text fields, or fields use unsupported types | Check Kentico event log for ai12z entries — the extractor logs which fields it discovers |
| Publish changes not reflecting immediately | Database transaction timing | The module waits up to 1.5s for the publish transaction to commit before reading the new content. Large pages may need slightly longer. |
| Sync times out on large sites | Many pages across multiple channels and languages | The sync processes items with 50ms throttling. Sites with thousands of pages may take several minutes. The portal shows progress via the toast notification. |
| Chatbot not appearing after enabling | Config cached from before the change | Web control changes take effect on the next page load. If still not showing, verify the Project API Key is set in the Kentico admin. |
| Chatbot appears but shows no results | Initial sync not run, or content not indexed | Run the initial sync from the portal. Check Documents to verify content is indexed. |
| Widgets not available in Page Builder | NuGet package version too old | Update to Ai12z.Kentico.Xperience v0.4.0+. Widgets were added in v0.4.0. |
Multi-Language Support
The Kentico connector automatically handles multi-language content. Each language variant of a page is indexed as a separate document with a language-prefixed ID (e.g., en:page-guid, es:page-guid). Both initial sync and real-time publish events process all language variants across all channels.