Salesforce Knowledge
ai12z Salesforce Knowledge Connector Setup Guide
The ai12z Knowledge connector indexes content from your Salesforce Knowledge Article into ai12z so the chatbot and search can answer from it. On save, ai12z creates the initial sync button to ingest publish article from salesforce.
How Sync Works
The Salesforce Knowledge connector supports two synchronization methods:
- Initial Sync — Imports all existing published articles that match your selected visibility filters.
- Publish/Delete Sync — Sends article updates to ai12z whenever an article is published or deleted using the custom ai12z Publish and Delete actions configured later in this guide.
Real-time publish and delete synchronization is not enabled automatically when you create the connector. To enable ongoing synchronization, you must complete the Apex Class, Screen Flow, and List Button configuration described in the Custom Publish Button and Custom Delete Button sections of this guide.
What gets synced
| Source | Publish/Delete Sync* | Initial Sync |
|---|---|---|
| Published Knowledge Article | ✓ | ✓ |
| Visible to Public KB | ✓ | ✓ |
| Visible to Customer | ✓ | ✓ |
- Requires the custom Apex Class, Screen Flow, and List Button configuration described later in this guide.
Prerequisites
A Salesforce account with org and that account should have the below access.
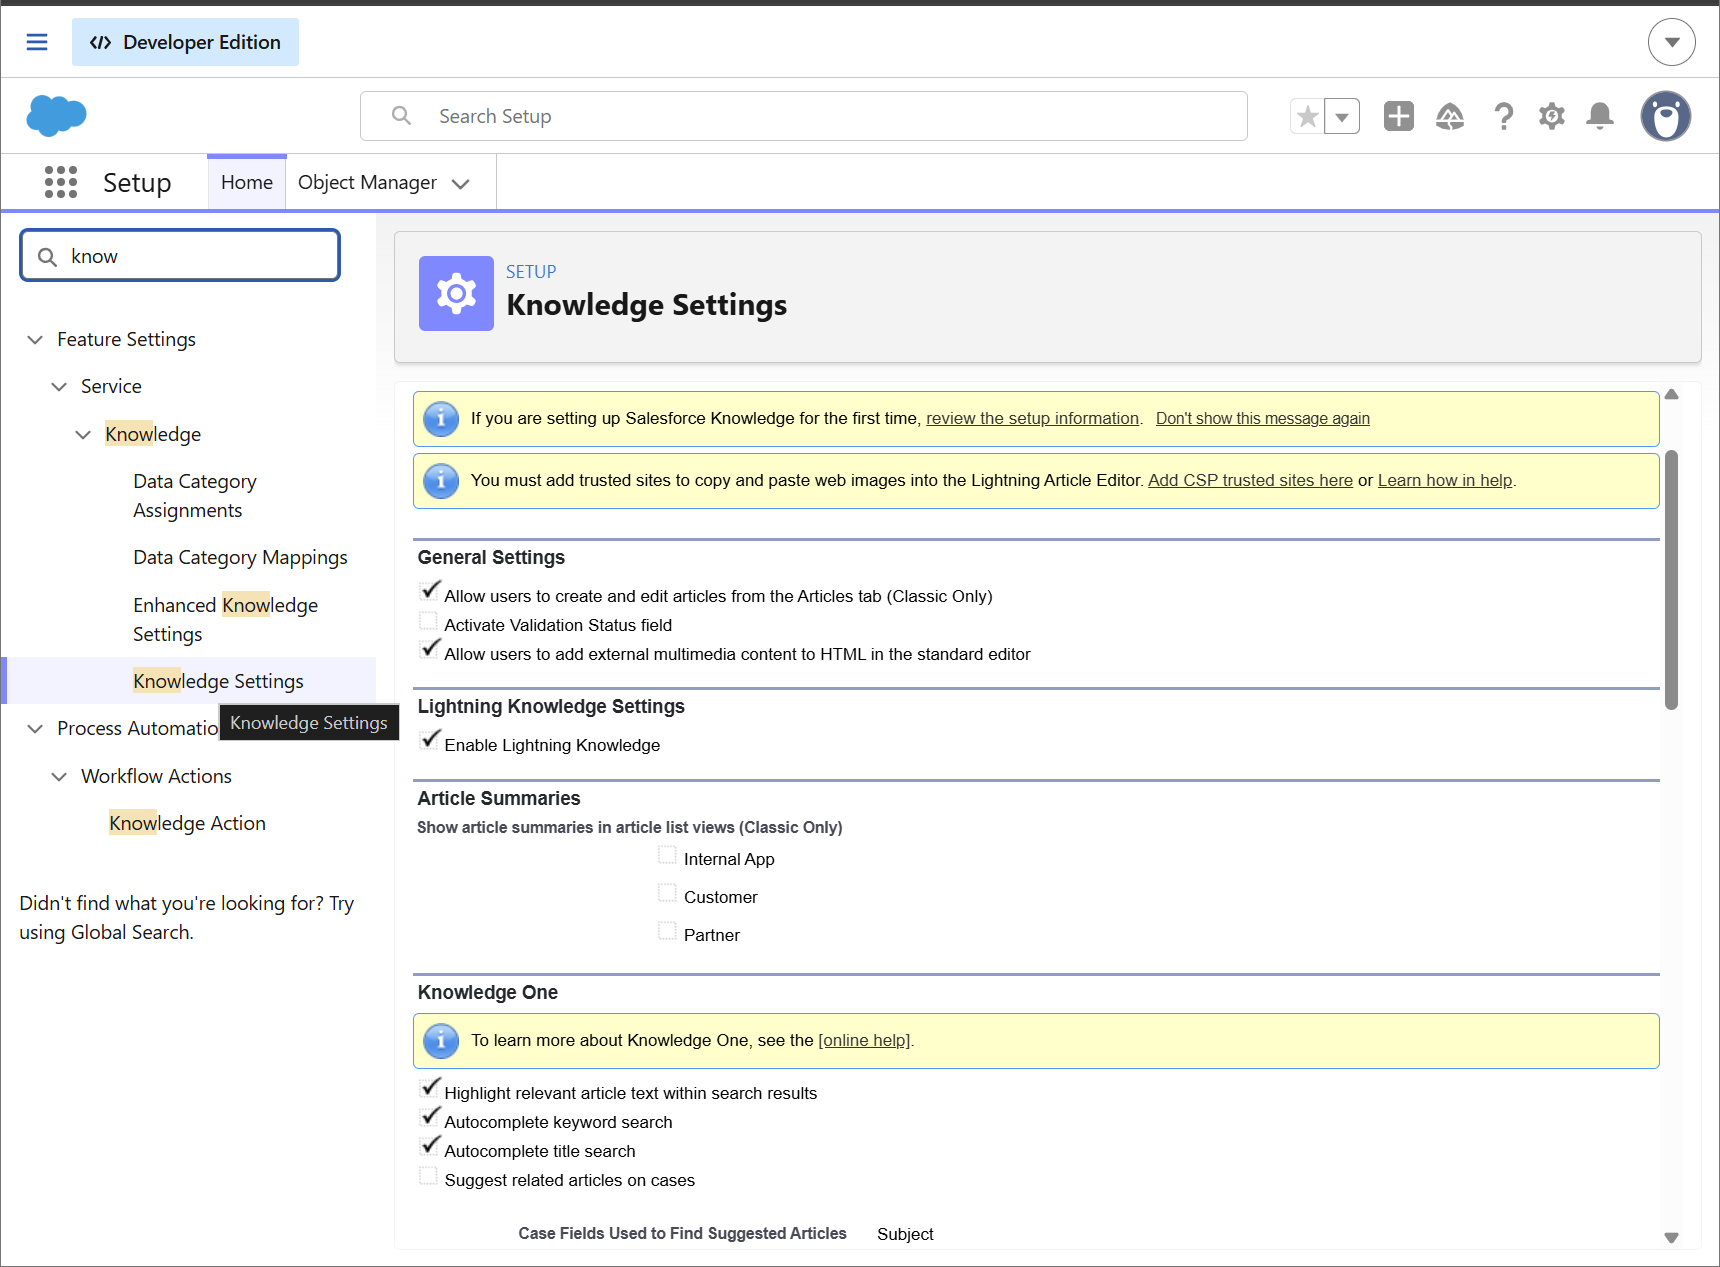
Lightning Knowledge Enabled: Your Salesforce org must have Lightning Knowledge active. (Note: Once enabled, it cannot be disabled).
Article Visibility & Channels: Knowledge articles utilize "Channels" to determine where they can be viewed. You must ensure that your relevant articles are configured for the Public channel (for anonymous external users) or the Customer channel (for authenticated portal users).
Article Status: Only articles in a Published status can be fetched by external systems via APIs.
STEP 1: API & Authentication Setup
An ai12z portal requires a secure bridge to fetch and display Salesforce content:
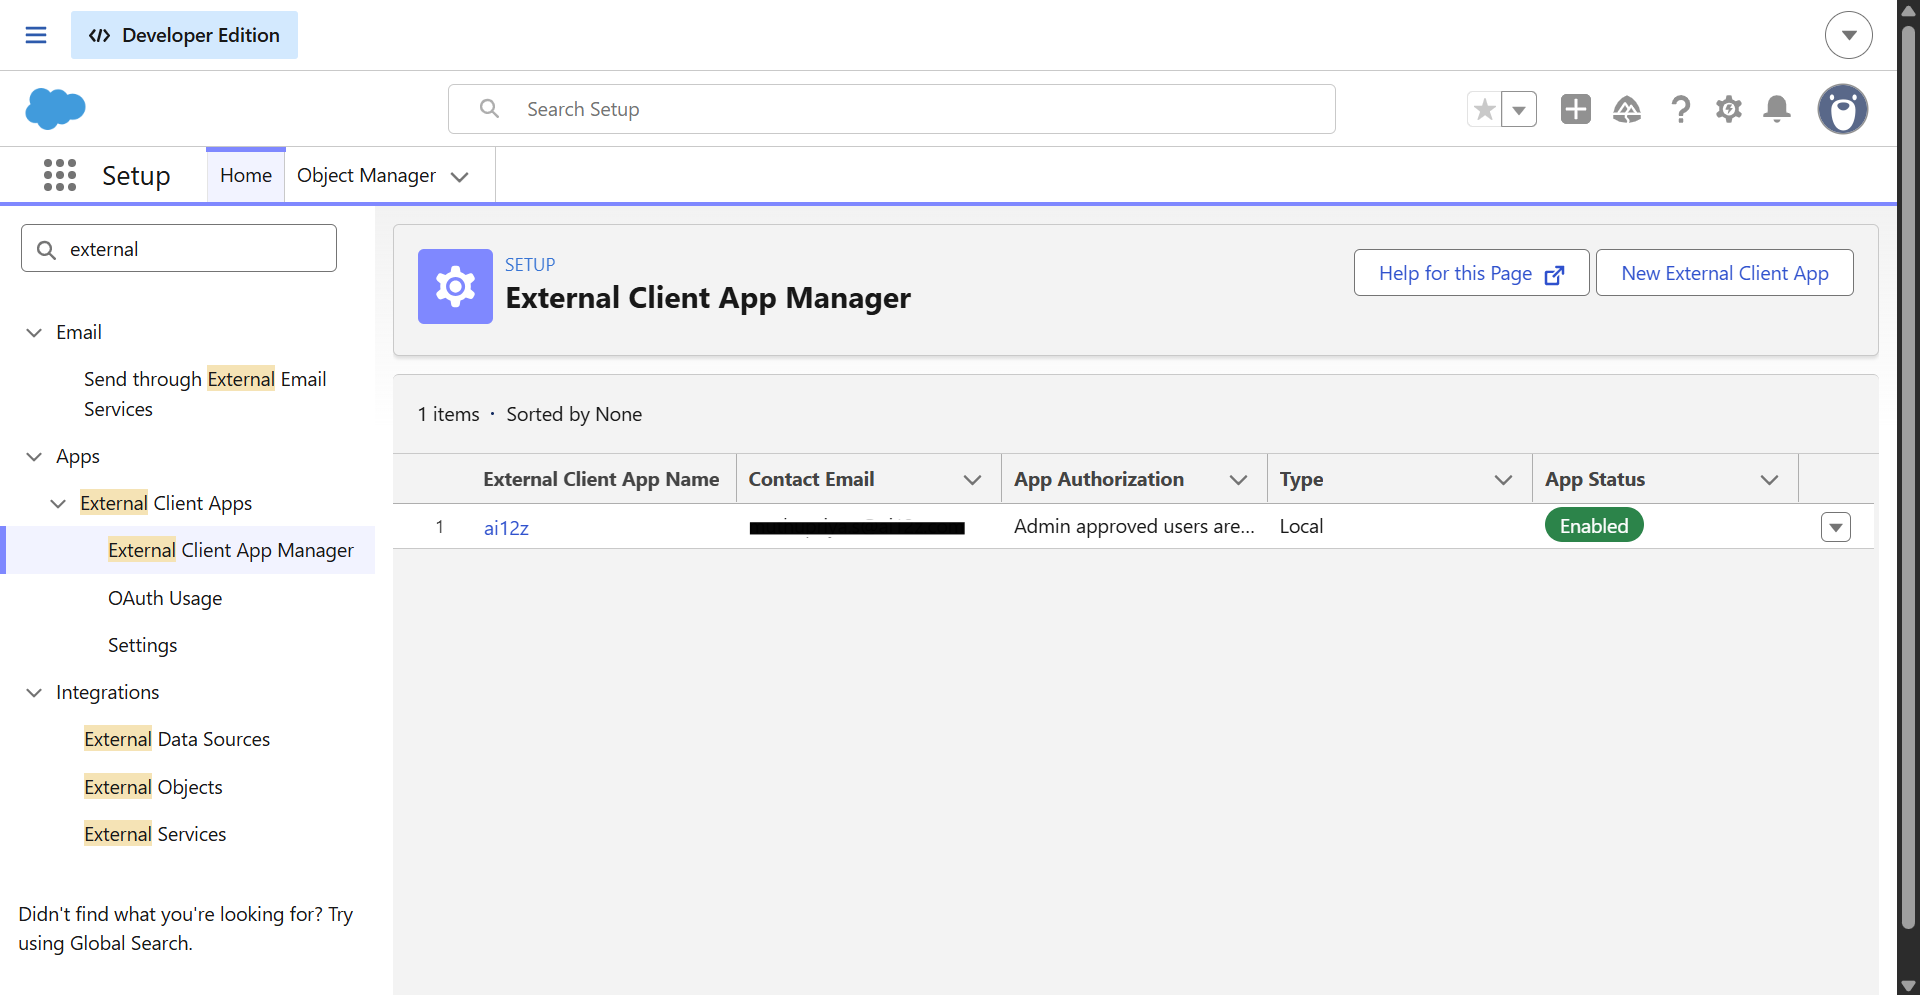
Connected App / External Client App: You must create a Connected App (or External Client App) in Salesforce to manage API integration.
OAuth Scopes: Ensure it has the necessary OAuth scopes configured (e.g., api or web).
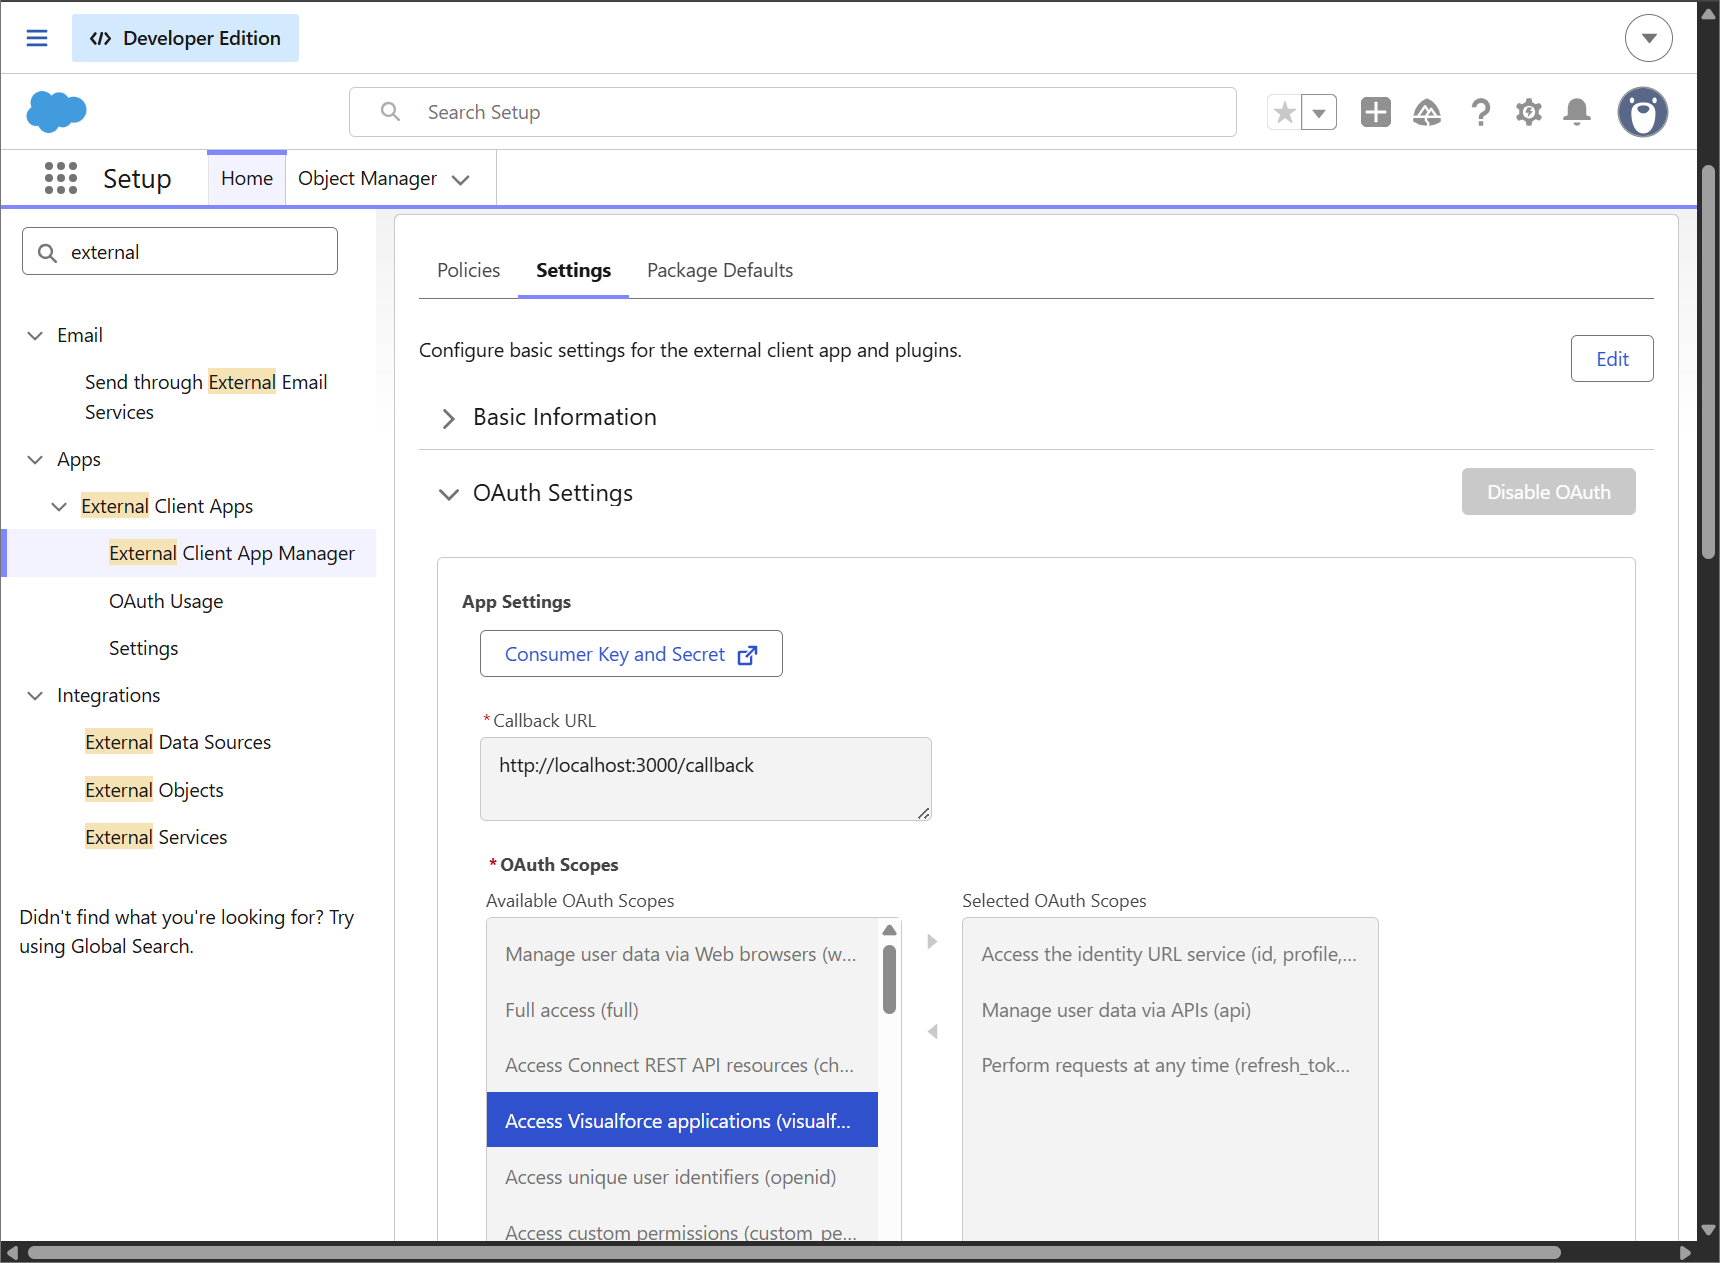
Grant Type: ai12z portal requires a Client Credentials flow for server-to-server middleware.
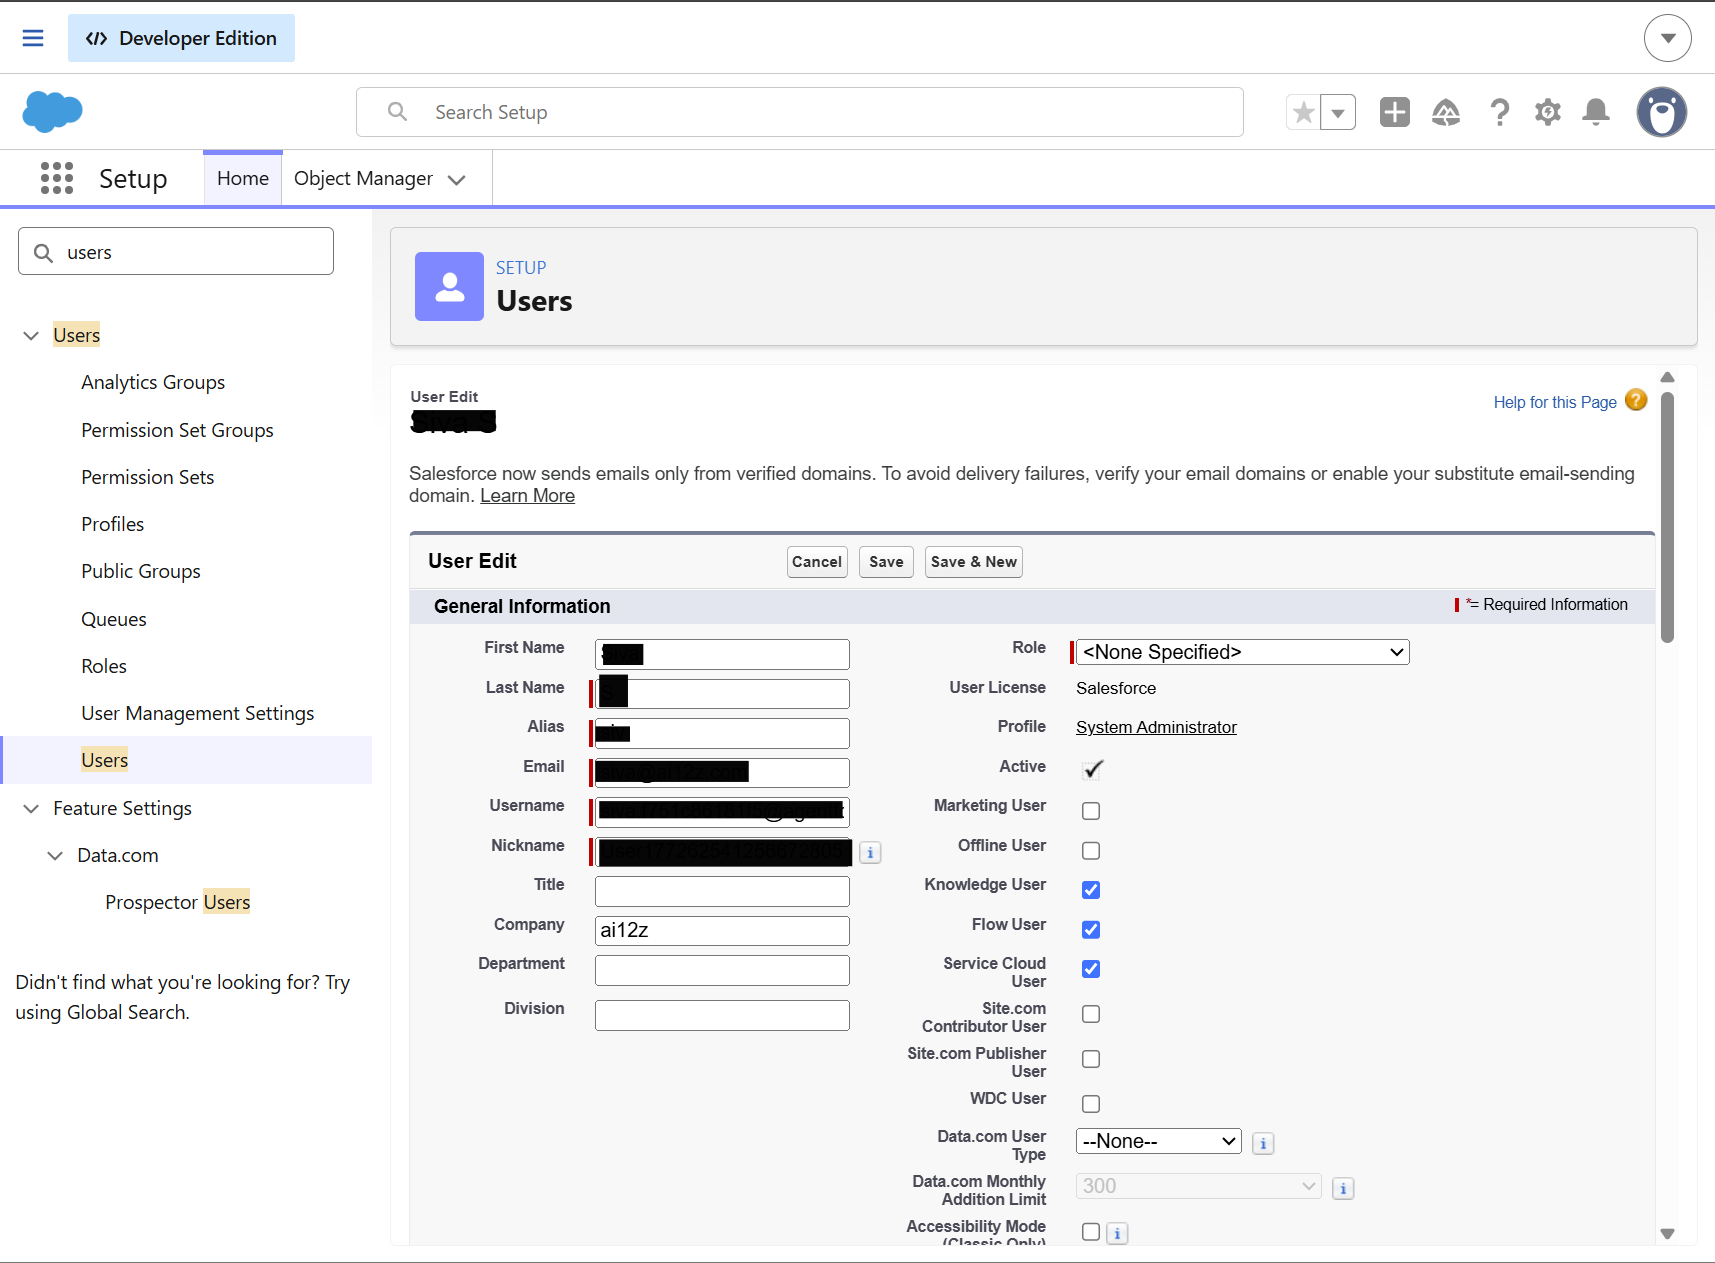
Integration User Permissions: The Salesforce user account associated with the API integration must have a Salesforce Knowledge license checkbox enabled and have "Read" permissions on the Knowledge object (Knowledge__kav) and its fields.
Step 2: Add the Connector in ai12z
-
Log in to the ai12z portal.
-
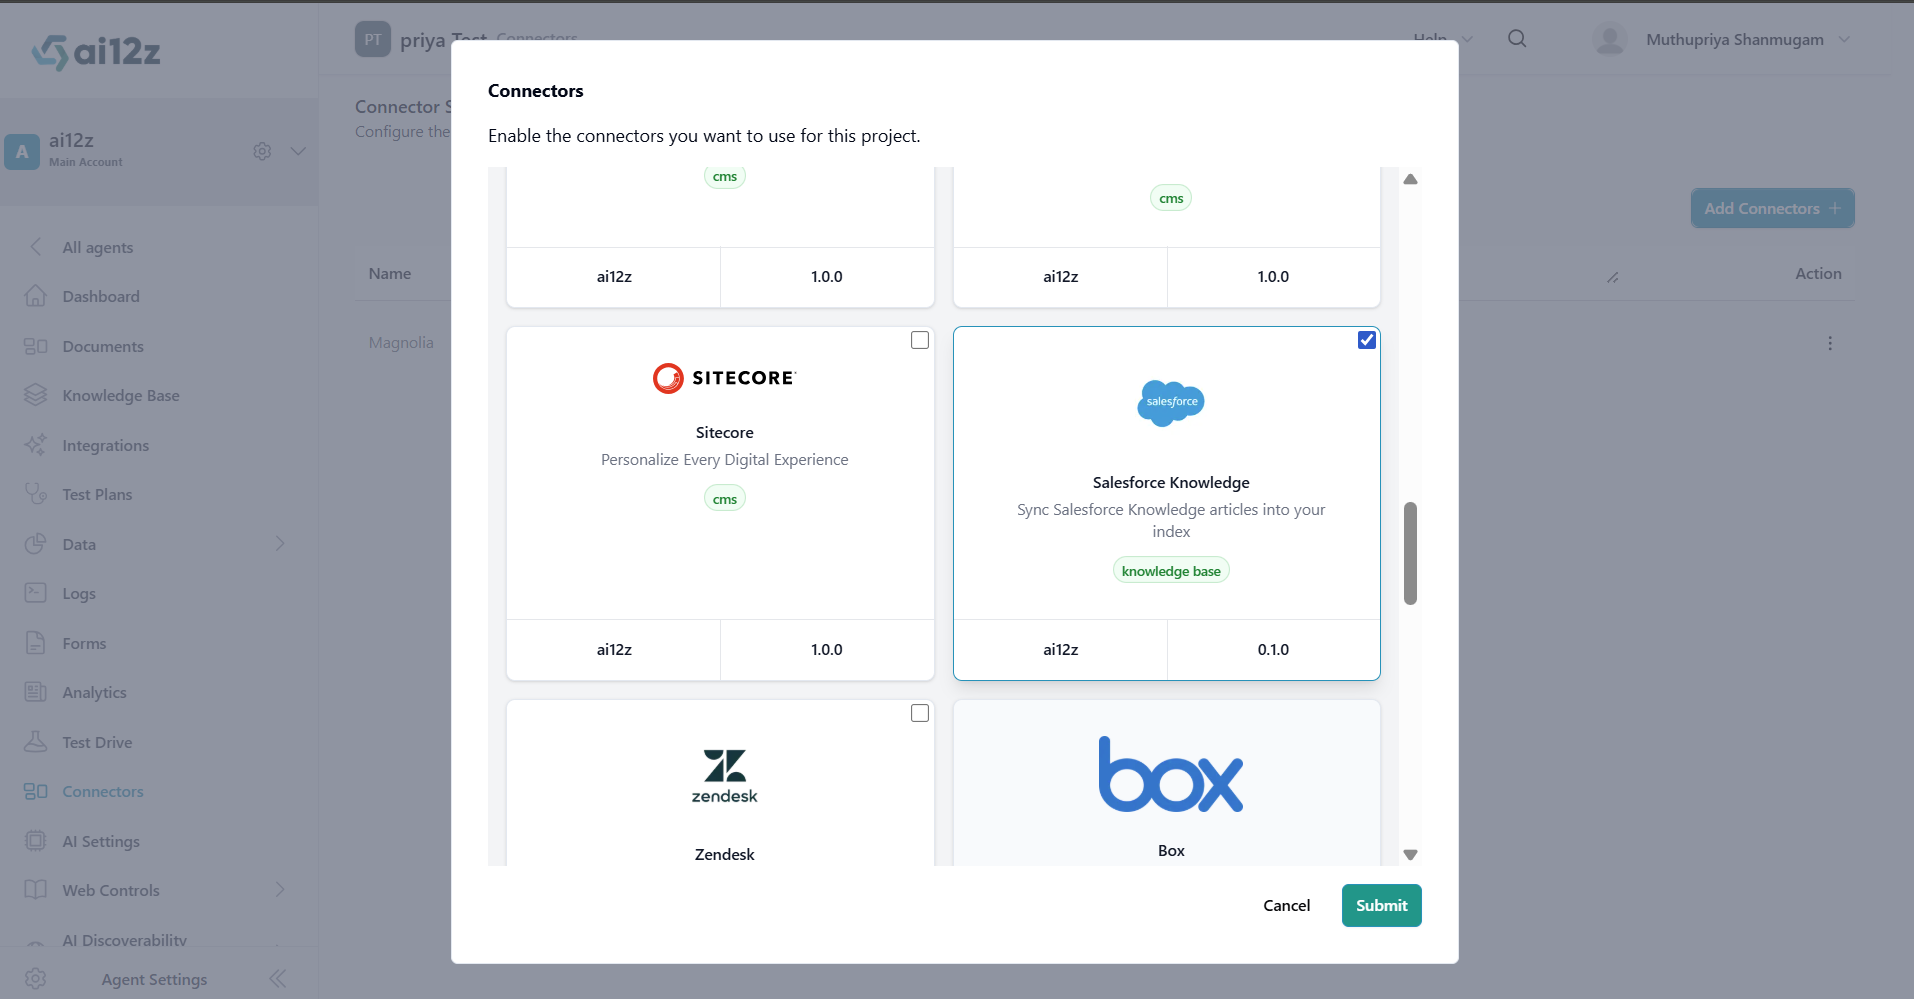
Open Connectors from the left navigation and click Add Connectors.
-
Select Salesforce Knowledge and submit.
Step 3: Configure the Connector
Open the Salesforce Knowledge connector page and fill out the configuration form.
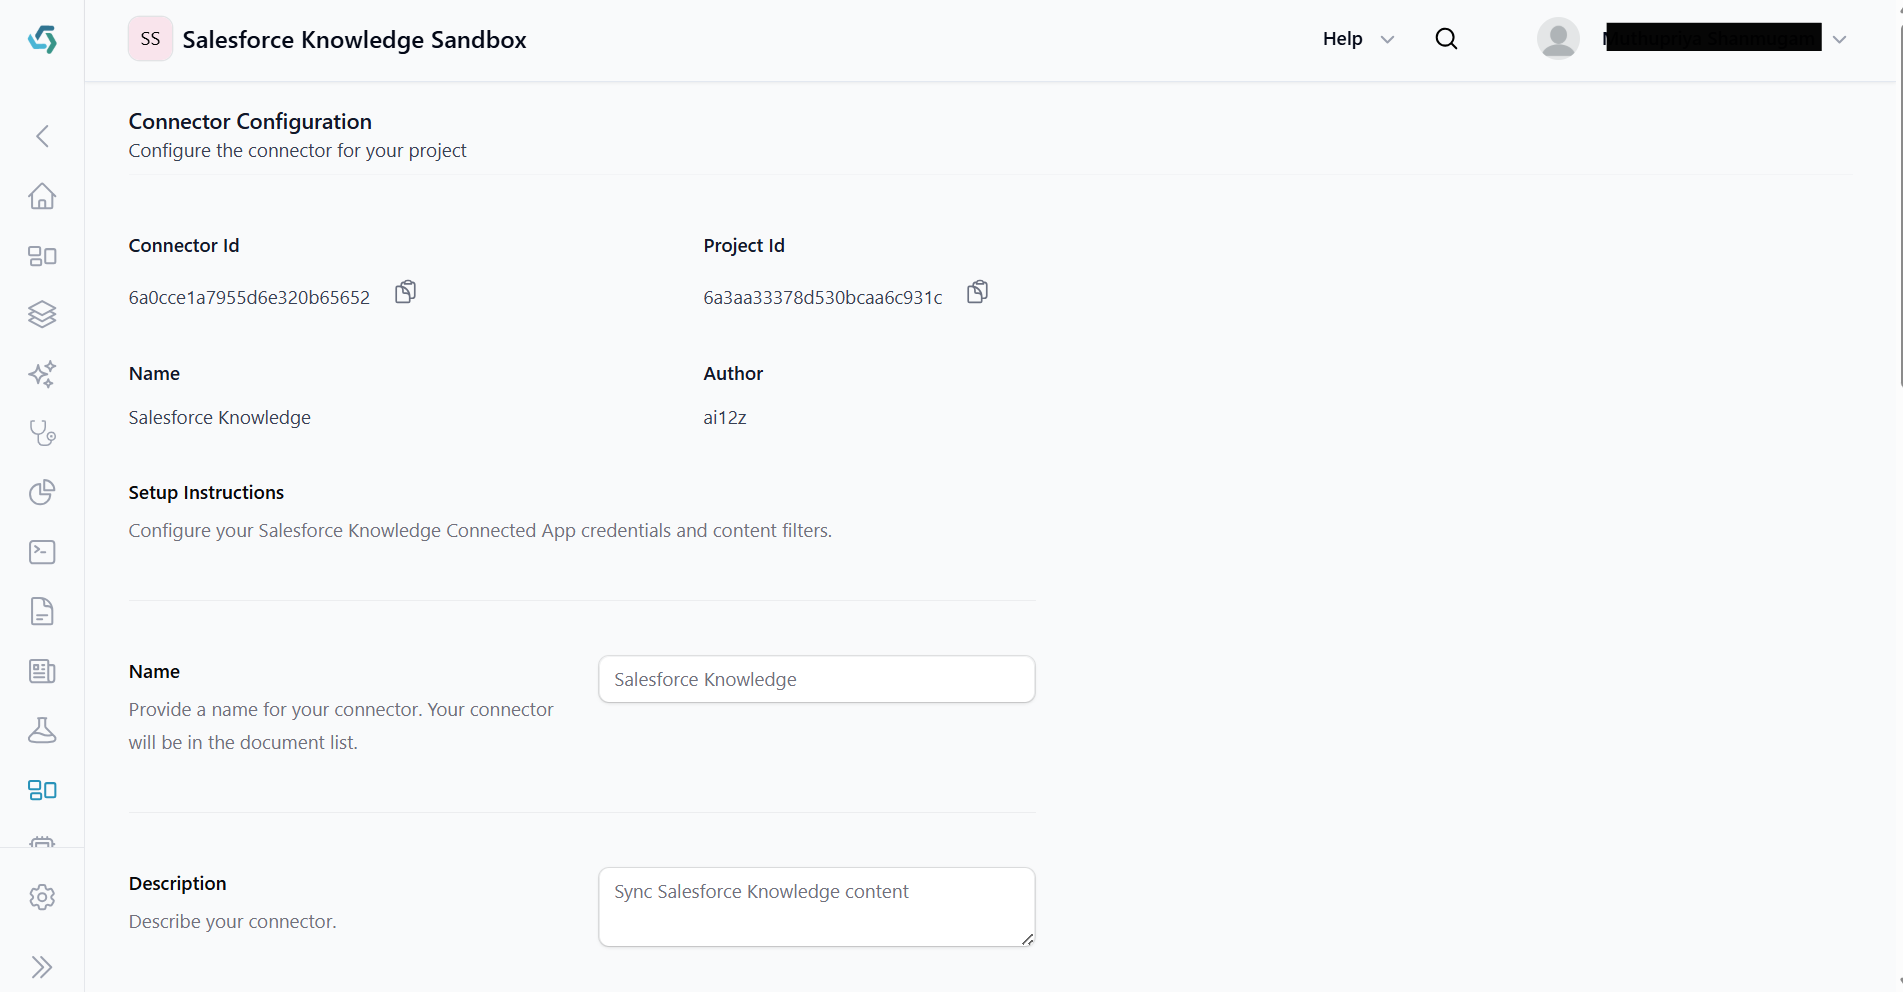
Connection
- Name: Display name for the connector. Appears in your document list.
- Description (optional): Free-text description of what this connector indexes.
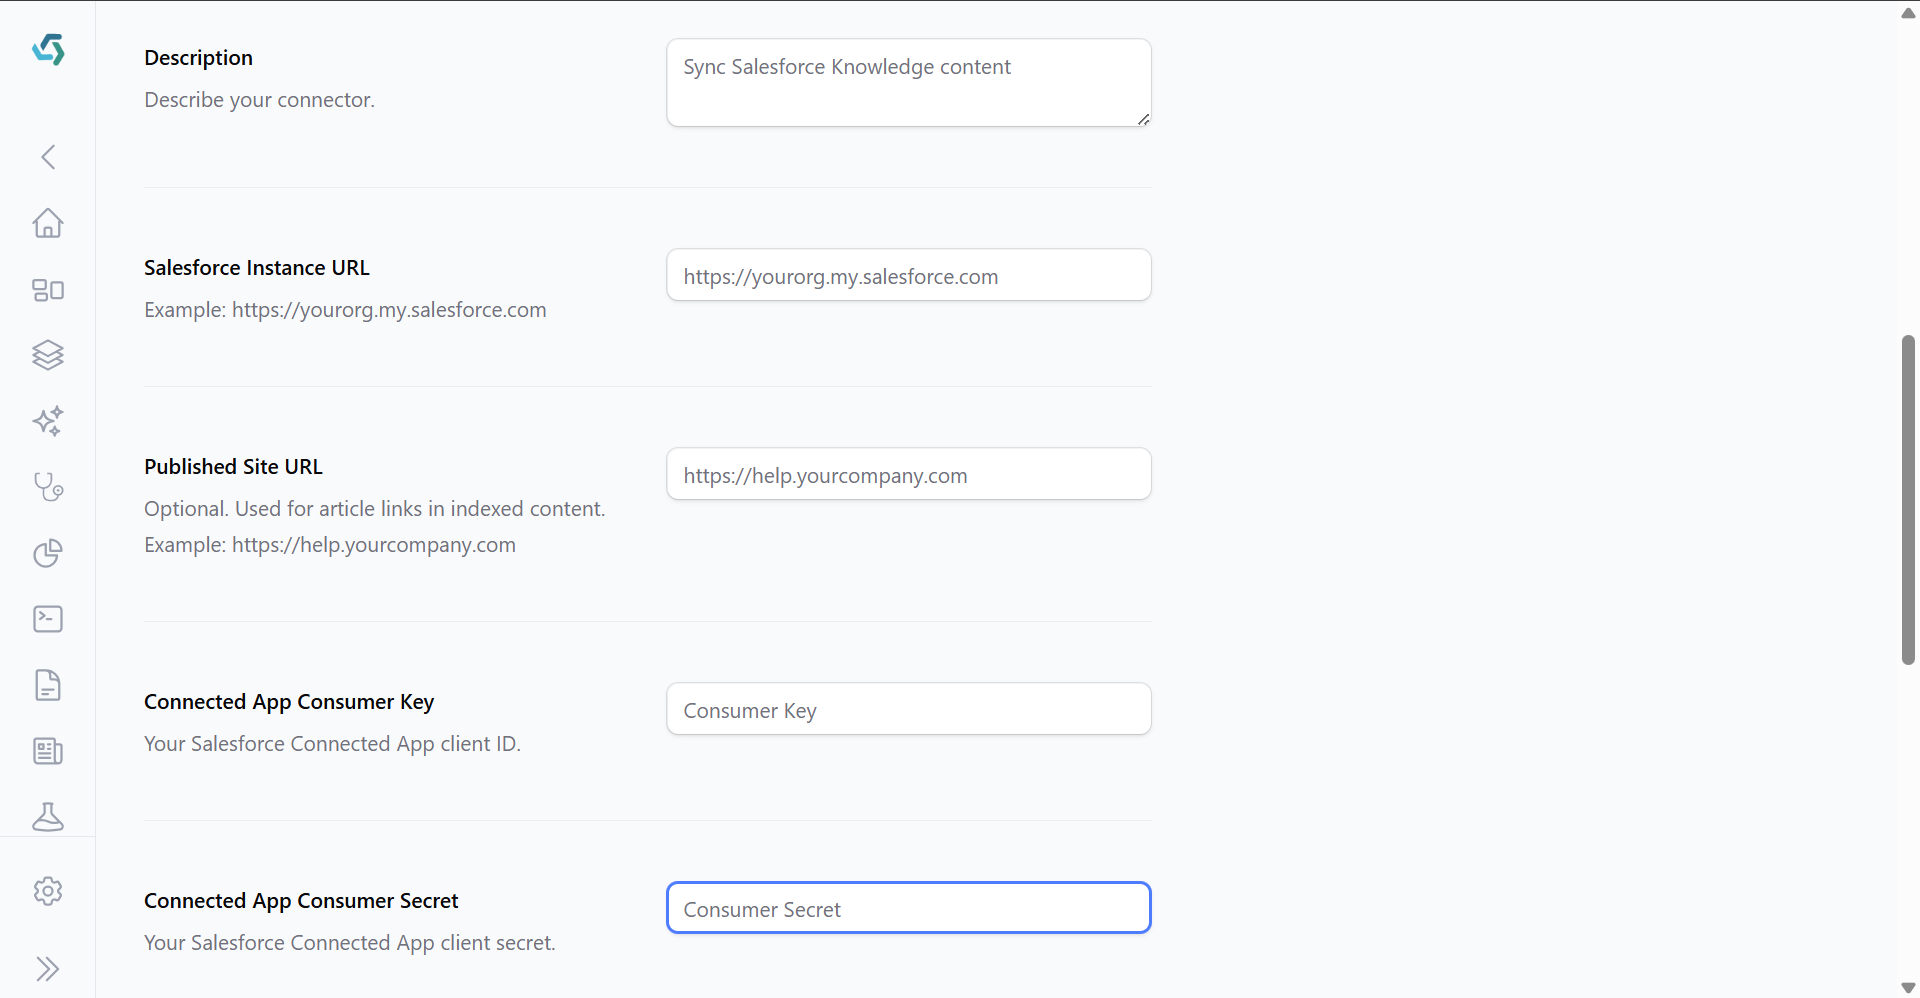
- Salesforce Instance URL: The base URL of your Salesforce organization. Format: https://[YourDomainName].my.salesforce.com (or https://[YourDomainName].sandbox.my.salesforce.com for testing environments).
- Salesforce Published Site URL: The public-facing URL of the Salesforce Experience Cloud site or public channel where your articles are hosted. Required to correctly resolve and construct external article links, public images, and asset paths.
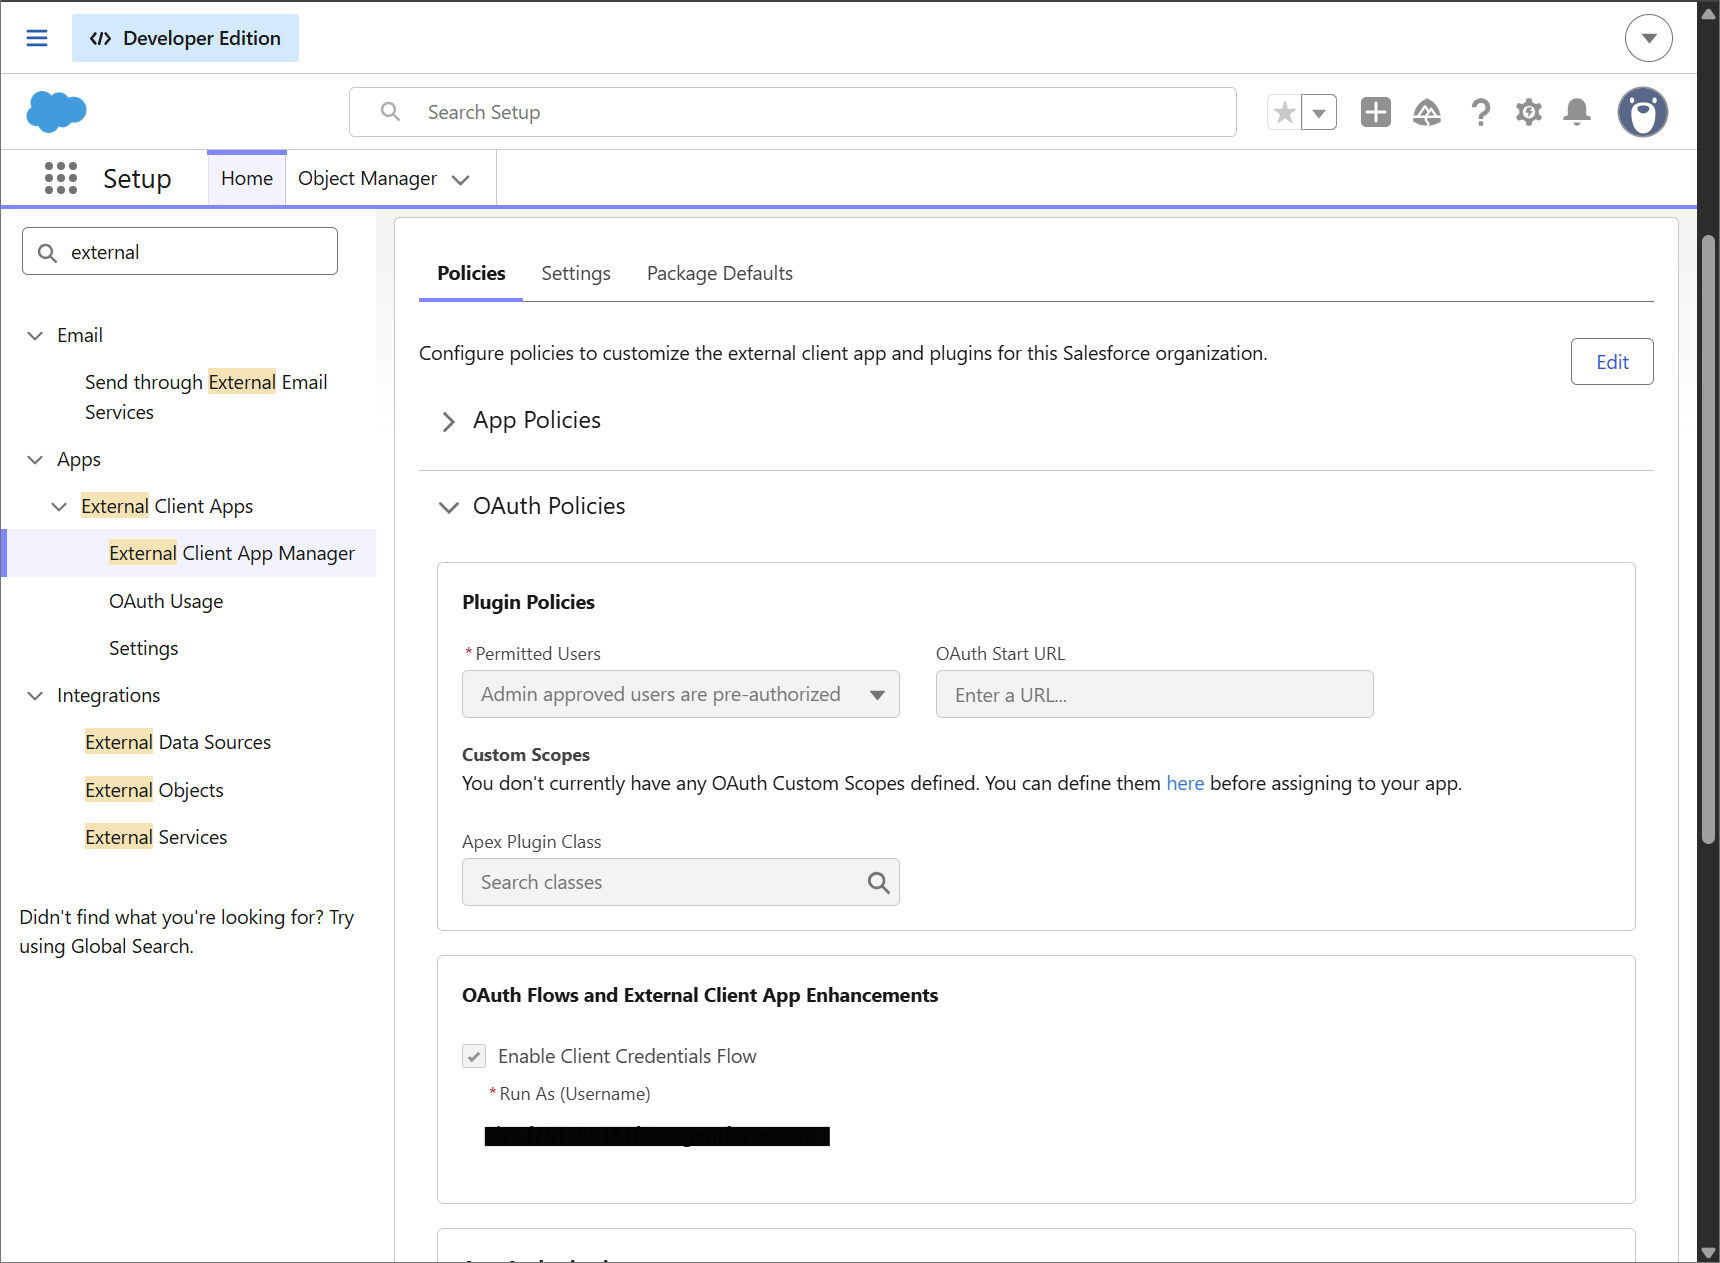
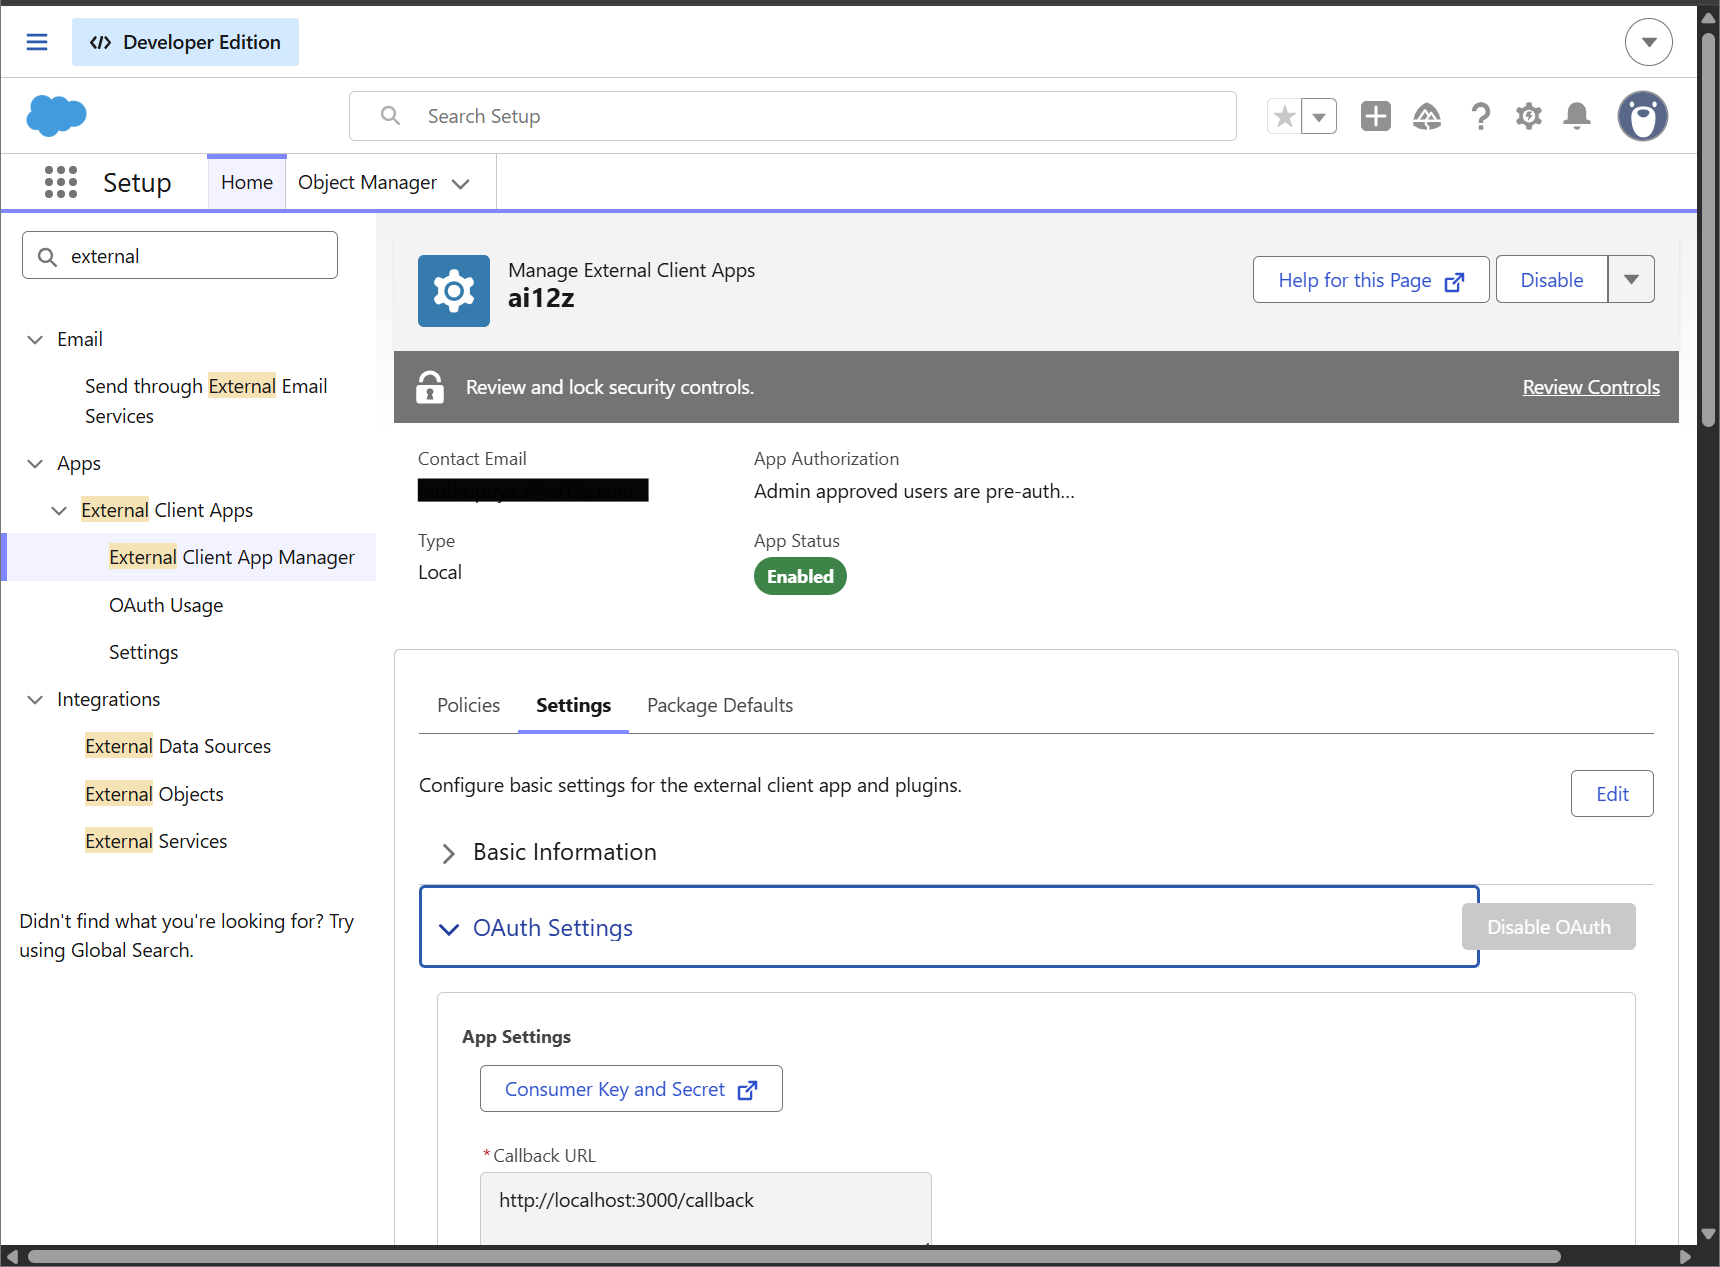
- Connected APP Consumer Key: The unique OAuth client ID generated by your Salesforce Connected App. In Salesforce, navigate to External Client App Manager > locate your Connected App > click View to copy the Consumer Key
- Connected APP Consumer Secret Key: The secret token used in tandem with the Consumer Key to authenticate your external application. Located right next to the Consumer Key in your Salesforce Connected App settings under "OAuth settings" (keep this value confidential).
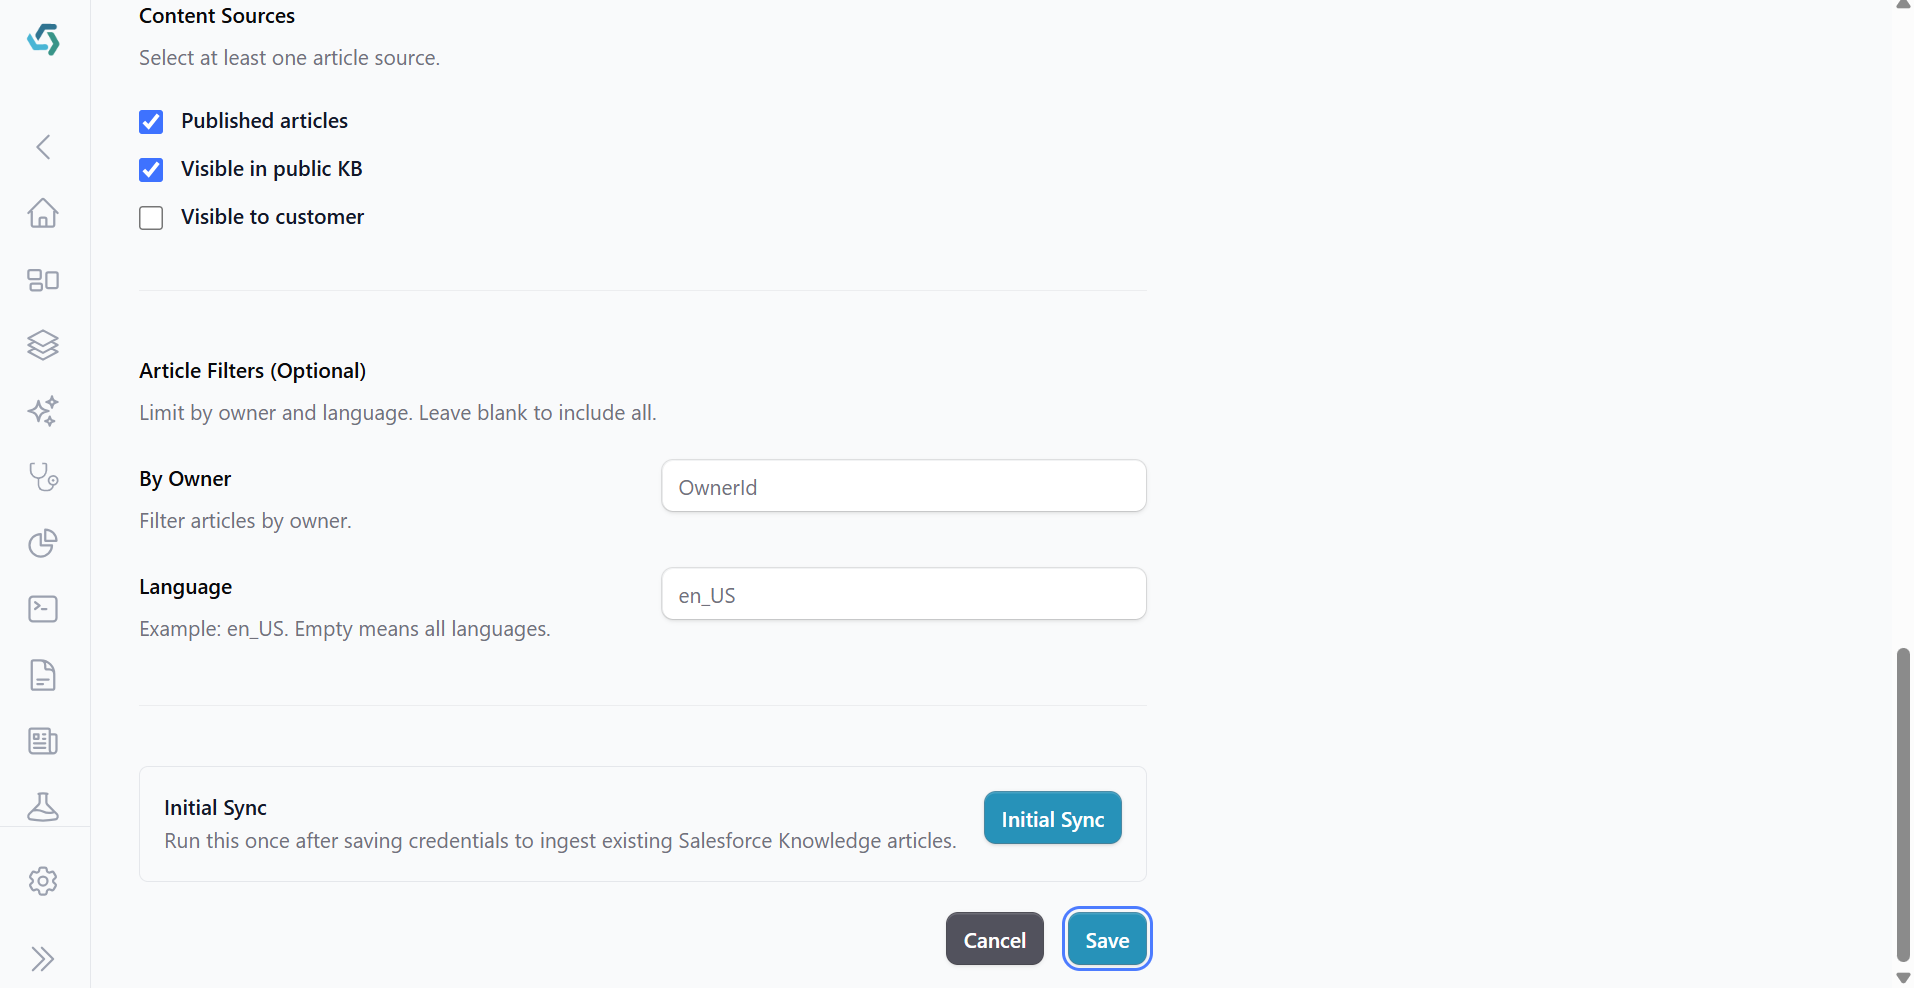
Content Sources
By default, Published Articles are always included in the sync and cannot be disabled. You can optionally include additional article visibility channels using the settings below.
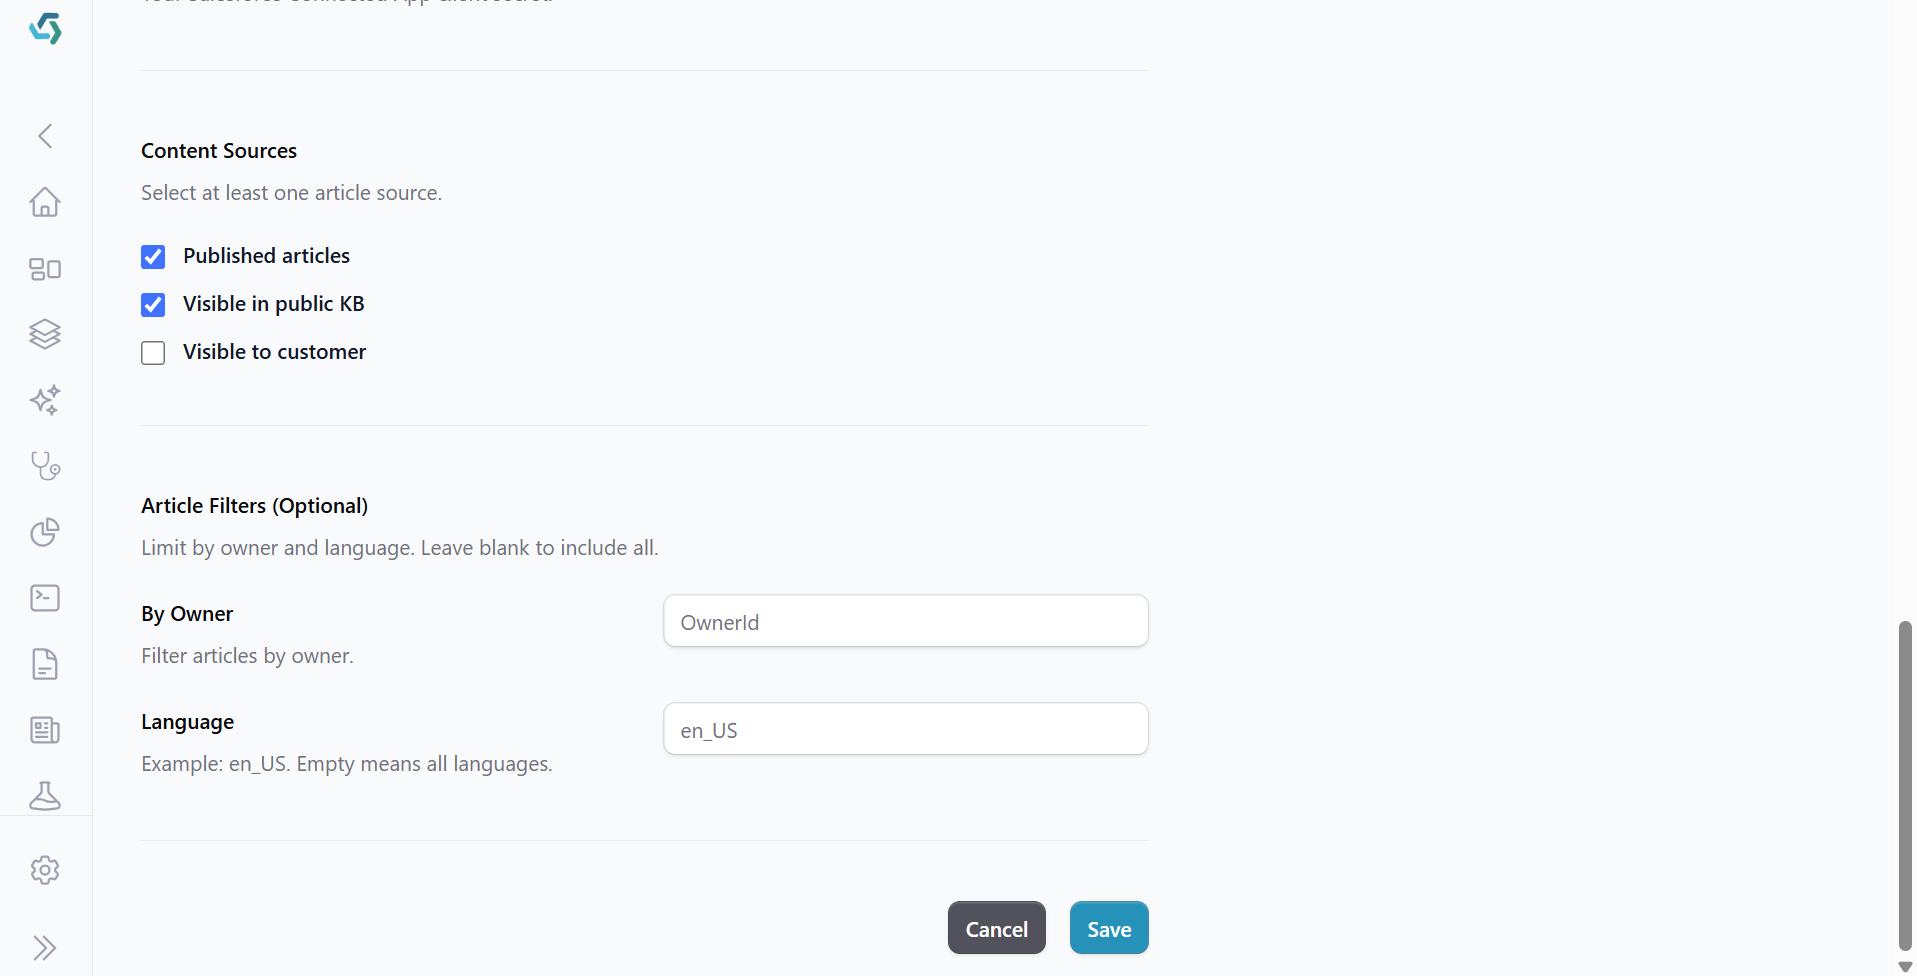
- Visible in Public KB — recommended. Public Knowledge Base content.
- Visible to Customers — We will set the tag to private for those customer specific articles.
Step 4: Run Initial Sync
After saving the connector, the Initial Sync button appears below the Content Sources section. Click it to index all existing content matching your filters.
This step imports your current Salesforce Knowledge content into ai12z. Ongoing publish/delete synchronization is configured separately through the Salesforce customization steps described later in this guide.
A toast notification appears in the bottom-right corner with progress. The notification persists across page navigation — you can continue working in the portal while the sync runs.
Initial sync re-indexes from scratch each time it runs. If you have already-indexed content and run it again, the existing entries are replaced.
After the initial sync completes, ai12z has indexed all existing articles that match your selected filters.
To keep content synchronized going forward, complete the Salesforce Publish and Delete integration setup described later in this guide. Once configured, publishing or deleting articles through the ai12z custom actions will automatically notify ai12z and update the index.
Step 5: Verify
- Publish a test article by our custom publish button in your Salesforce Knowledge article .
- Open Documents in the ai12z portal. The article should appear within a few seconds with status "Ingested successfully".
- Open Test Drive in the ai12z portal and ask a question that the article would answer.
Enable Publish/Delete Synchronization
The following Salesforce customization is required if you want article publishing and deletion events to automatically synchronize with ai12z.
This is a one-time setup that creates custom Publish and Delete actions in Salesforce Knowledge. These actions invoke Apex code that notifies ai12z whenever content is published or deleted.
How to trigger a webhook event by Custom Publish Button in KB article
STEP 1: Create an apex class for publish article.
This Apex class will do bulk publish with files included.
NOTE: It will publish in ai12z as well as in salesforce portal.
/**
* ――――――――――――――――――――――――――――――――――――��――――――――――――――――――――――――――――――――――――――――――――――
* Class Name : BulkKnowledgePublisher
* Author : <YourName>
* Created Date : Jun 16, 2026
* Last Modified By: <YourName>
* Last Modified On: Jun 16, 2026
* Description : This class implements for......
*
* Change History :
* Date │ Author │ Change
* ――――――――――――――――――――――――――――――――――――――――――――――――――――――――――――――――――――――――――――――――――
* Jun 16, 2026 │ <YourName> │ Initial version
* ―――――――――――――――――――――――――――――――――――――――――――――――――――――――――――――――�―――――――――――――――――――
*/
public with sharing class BulkKnowledgePublisher {
private static final String CONNECTOR_ENDPOINT =
'https://<YOUR_AI12Z_HOST>/api/connector/<CONNECTOR_ID>?projectId=<PROJECT_ID>';
@InvocableMethod(label='Publish Bulk Knowledge Articles' description='Publishes a list of Knowledge Articles.')
public static void publishArticles(List<List<Id>> bulkArticleIds) {
if (bulkArticleIds == null || bulkArticleIds.isEmpty()) {
return;
}
if (bulkArticleIds != null && !bulkArticleIds.isEmpty()) {
// Unpack the list of lists passed by the flow
List<Id> articleIds = bulkArticleIds[0];
List<Id> publishedArticleIds = new List<Id>();
// Query the Knowledge Article Versions in bulk
List<Knowledge__kav> kavList = [SELECT KnowledgeArticleId
FROM Knowledge__kav
WHERE Id IN :articleIds];
// Loop through and publish each article
for (Knowledge__kav kav : kavList) {
try {
// Second parameter 'true' publishes as a new version
KbManagement.PublishingService.publishArticle(kav.KnowledgeArticleId, true);
publishedArticleIds.add(kav.KnowledgeArticleId);
} catch(Exception e) {
System.debug('Error publishing article ' + kav.KnowledgeArticleId + ': ' + e.getMessage());
}
}
// 3. Enqueue the asynchronous Callout job to avoid "Uncommitted Work Pending" errors
if (!publishedArticleIds.isEmpty()) {
System.enqueueJob(new ExternalApiCalloutJob(publishedArticleIds));
}
}
}
// Queueable class to safely handle a SINGLE bulk HTTP Callout
public class ExternalApiCalloutJob implements Queueable, Database.AllowsCallouts {
private List<Id> kavIds;
public ExternalApiCalloutJob(List<Id> kavIds) {
this.kavIds = kavIds;
}
public void execute(QueueableContext context) {
// 1. Query the newly published 'Online' KAV records using the master IDs
List<Knowledge__kav> onlineArticles = [SELECT Id, Title, UrlName, Summary, KnowledgeArticleId
FROM Knowledge__kav
WHERE KnowledgeArticleId IN :kavIds];
System.debug(LoggingLevel.ERROR, '--- KNOWLEDGE TRIGGER: PUBLISH DETECTED ---');
if (onlineArticles.isEmpty()) {
return;
}
// Collect the exact Online Version IDs to look up their specific file attachments
List<Id> onlineKavIds = new List<Id>();
for (Knowledge__kav art : onlineArticles) {
onlineKavIds.add(art.Id);
}
// 2. Query ContentDocumentLink to get files explicitly attached to these Online Versions
List<ContentDocumentLink> fileLinks = [
SELECT LinkedEntityId, ContentDocumentId , Visibility, IsDeleted
FROM ContentDocumentLink
WHERE LinkedEntityId IN :onlineKavIds
ALL ROWS
];
// Safely compile all unique ContentDocumentIds needed to fetch ContentVersion (068) data
List<Id> targetDocumentIds = new List<Id>();
for (ContentDocumentLink link : fileLinks) {
targetDocumentIds.add(link.ContentDocumentId);
}
// 3. Query ContentVersion to pull the ID (068) and the explicit File Name details in bulk
Map<Id, ContentVersion> docToVersionMap = new Map<Id, ContentVersion>();
if (!targetDocumentIds.isEmpty()) {
for (ContentVersion cv : [
SELECT Id, ContentDocumentId, Title, FileExtension
FROM ContentVersion
WHERE ContentDocumentId IN :targetDocumentIds AND IsLatest = true
ALL ROWS
]) {
docToVersionMap.put(cv.ContentDocumentId, cv);
}
}
// 4. Map Online KAV ID to its list of structured File Maps
Map<Id, List<Map<String, Object>>> articleToFilesMap = new Map<Id, List<Map<String, Object>>>();
for (ContentDocumentLink link : fileLinks) {
if (!articleToFilesMap.containsKey(link.LinkedEntityId)) {
articleToFilesMap.put(link.LinkedEntityId, new List<Map<String, Object>>());
}
// Verify that the file content version exists
if (docToVersionMap.containsKey(link.ContentDocumentId)) {
ContentVersion version = docToVersionMap.get(link.ContentDocumentId);
Map<String, Object> fileInfo = new Map<String, Object>();
fileInfo.put('fileId', link.ContentDocumentId);
fileInfo.put('contentVersionId', version.Id); // The exact 068 ID for direct downloading
fileInfo.put('visibility', link.Visibility);
fileInfo.put('fileName', version.Title + '.' + version.FileExtension);
fileInfo.put('isDeleted', link.IsDeleted);
fileInfo.put('fileType', version.FileExtension);
articleToFilesMap.get(link.LinkedEntityId).add(fileInfo);
}
}
// 5. Build the final structured payload grouping each article with its respective files map
List<Map<String, Object>> articlePayloadList = new List<Map<String, Object>>();
for (Knowledge__kav art : onlineArticles) {
Map<String, Object> articleNode = new Map<String, Object>();
articleNode.put('knowledgeArticleId', art.KnowledgeArticleId);
articleNode.put('versionId', art.Id);
articleNode.put('title', art.Title);
// Nest the files list if present; otherwise, pass an empty array structure
if (articleToFilesMap.containsKey(art.Id)) {
articleNode.put('files', articleToFilesMap.get(art.Id));
} else {
articleNode.put('files', new List<Map<String, Object>>());
}
articlePayloadList.add(articleNode);
}
try {
Http http = new Http();
HttpRequest request = new HttpRequest();
// Configure request settings
request.setEndpoint(CONNECTOR_ENDPOINT);
request.setMethod('POST');
request.setHeader('Content-Type', 'application/json;charset=UTF-8');
Map<String, Object> payload = new Map<String, Object>{
'articles' => articlePayloadList,
'action' => 'publish'
};
request.setBody(JSON.serialize(payload));
// Execute the single bulk callout
HttpResponse response = http.send(request);
if (response.getStatusCode() != 200 && response.getStatusCode() != 201) {
System.debug('Bulk API Error: Status ' + response.getStatusCode() + ' - ' + response.getBody());
} else {
System.debug('Bulk API Success: ' + response.getBody());
}
} catch (Exception ex) {
System.debug('Bulk Callout Exception: ' + ex.getMessage());
}
}
}
}
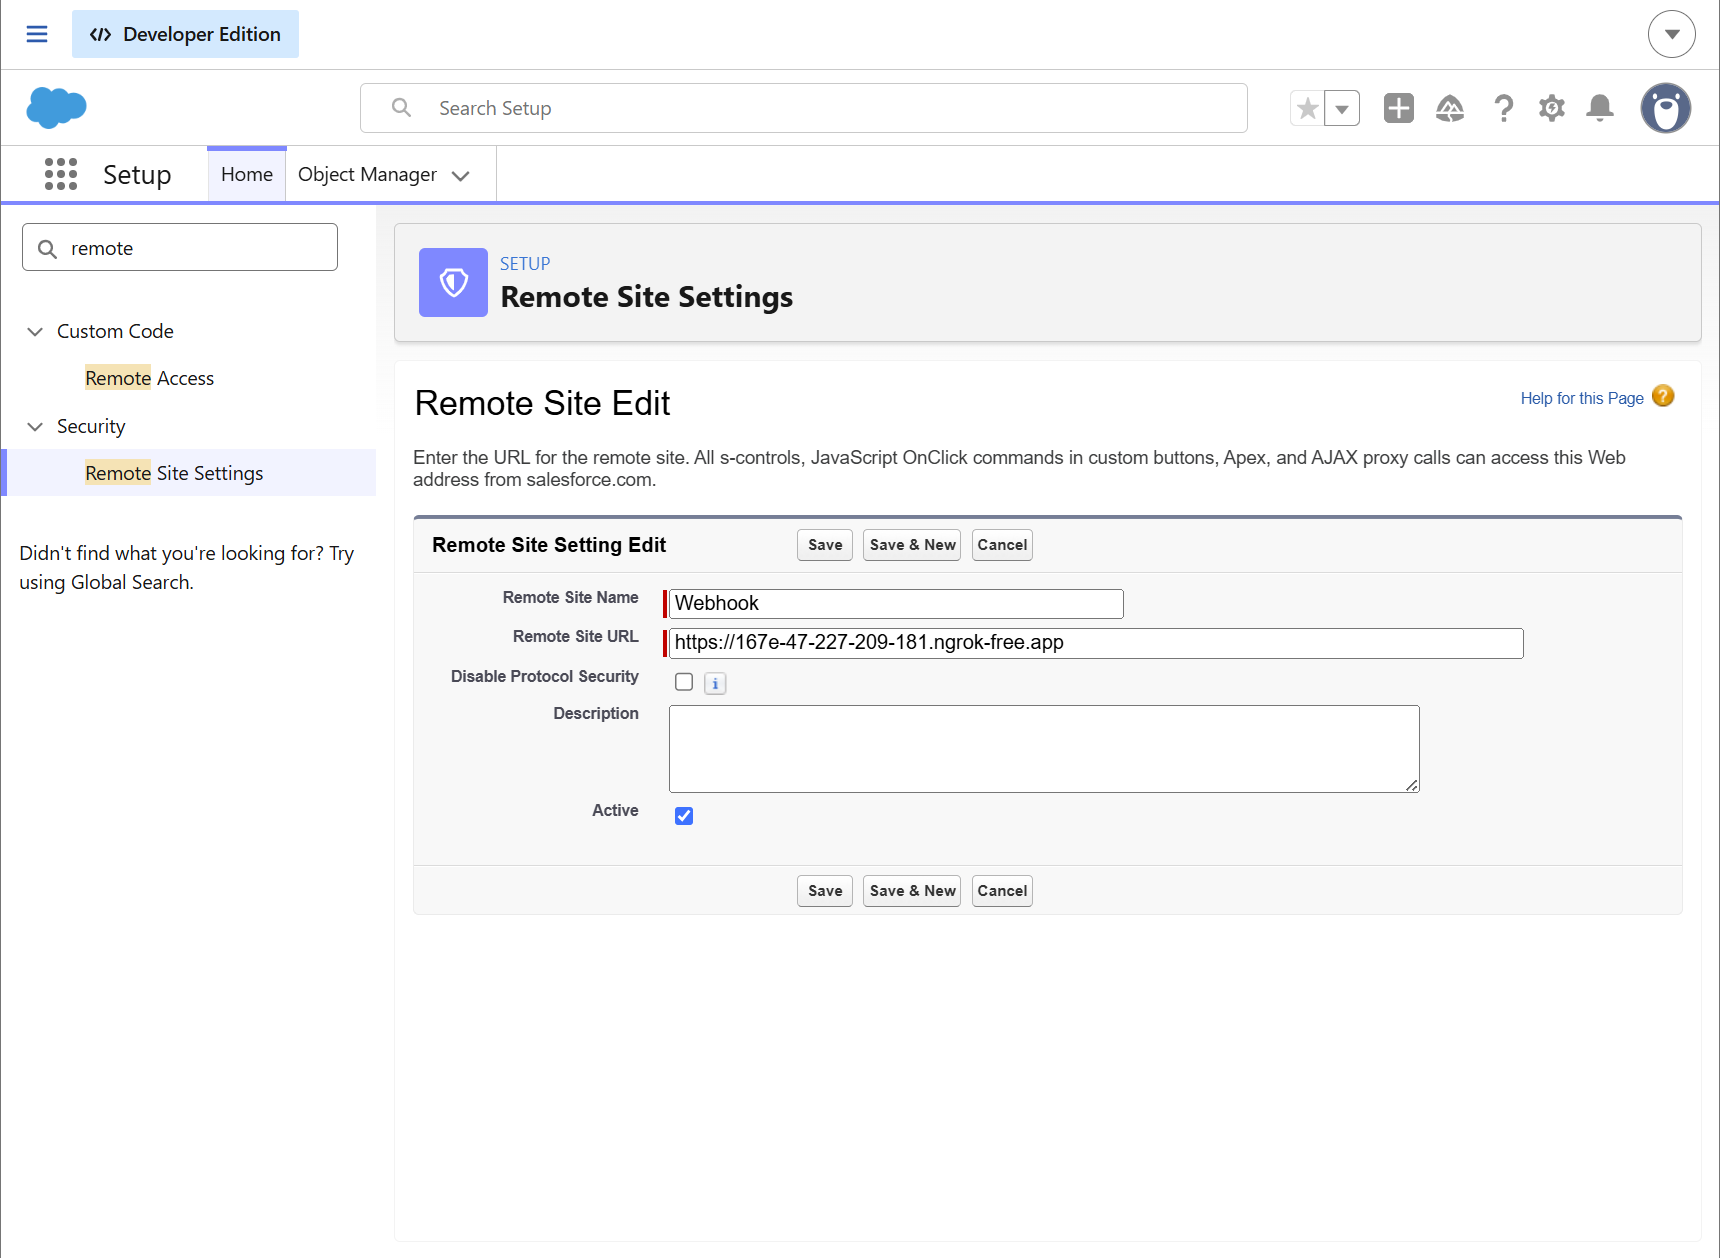
After creating a Apex class, kindly include ai12z host into remote site settings to avoid cross origin issue.
STEP 2: Create a screen flow
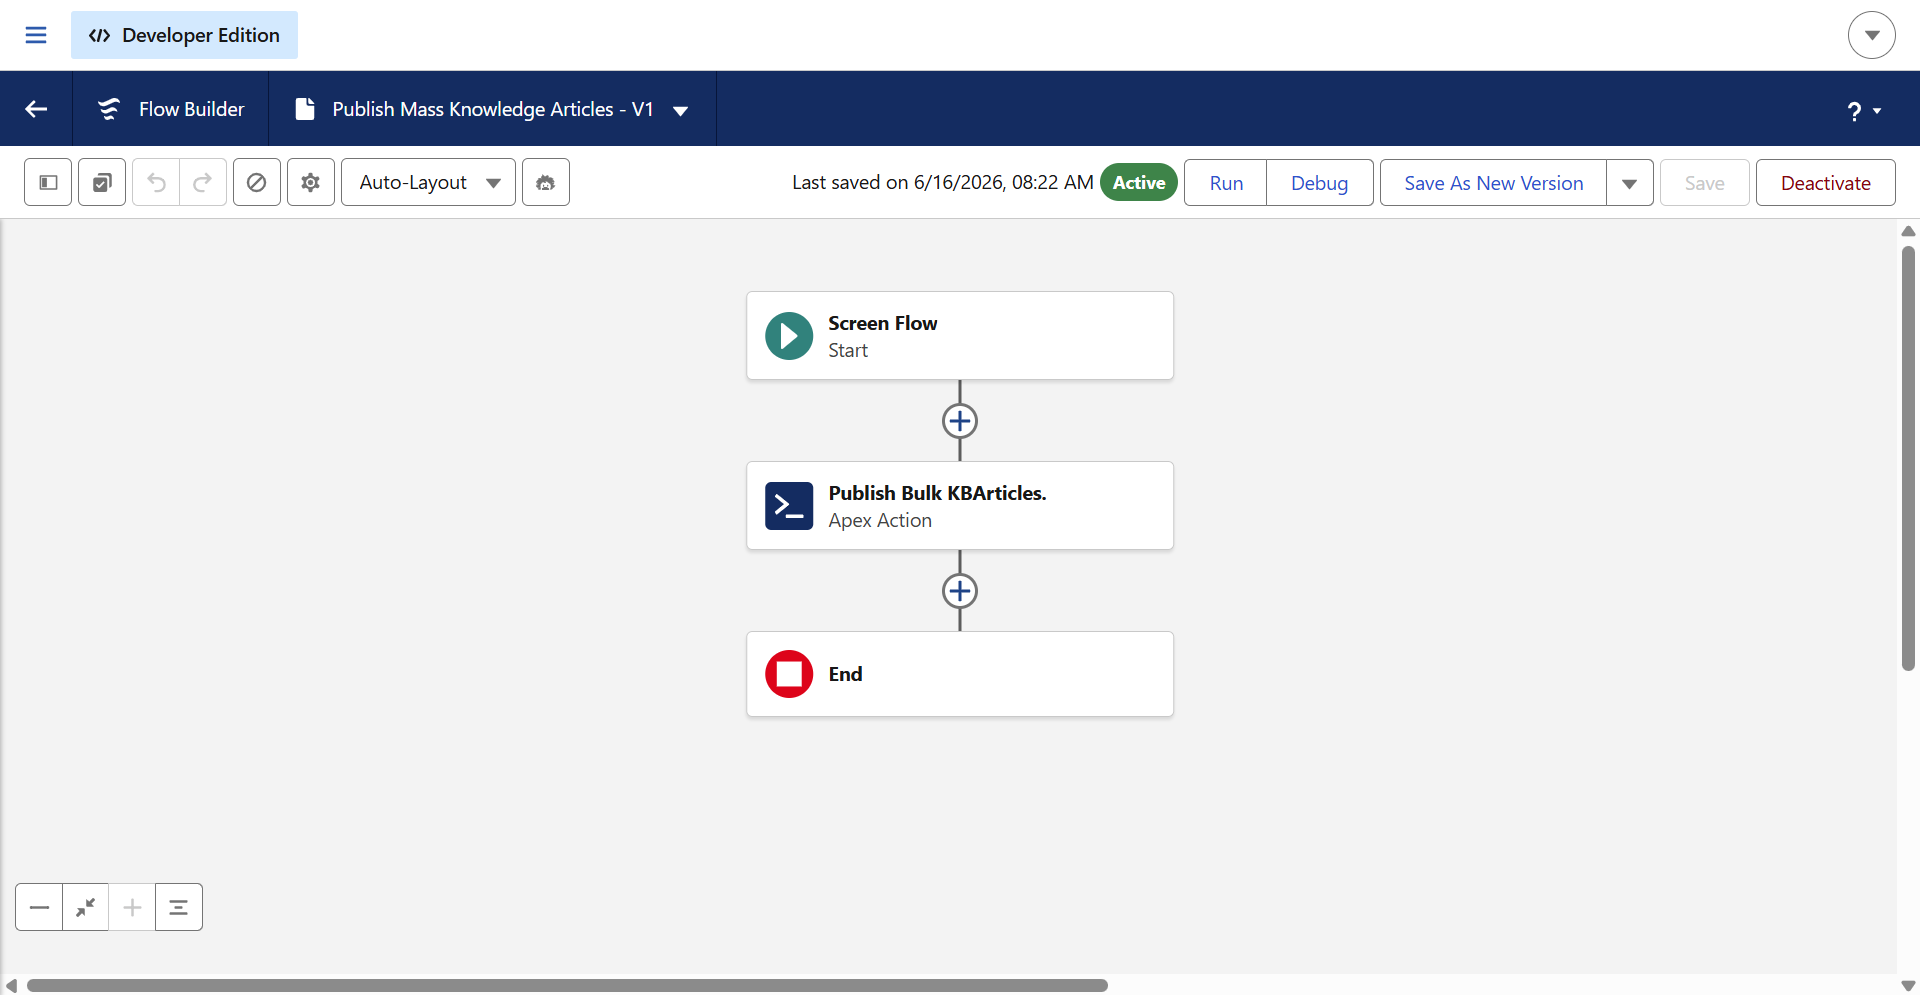
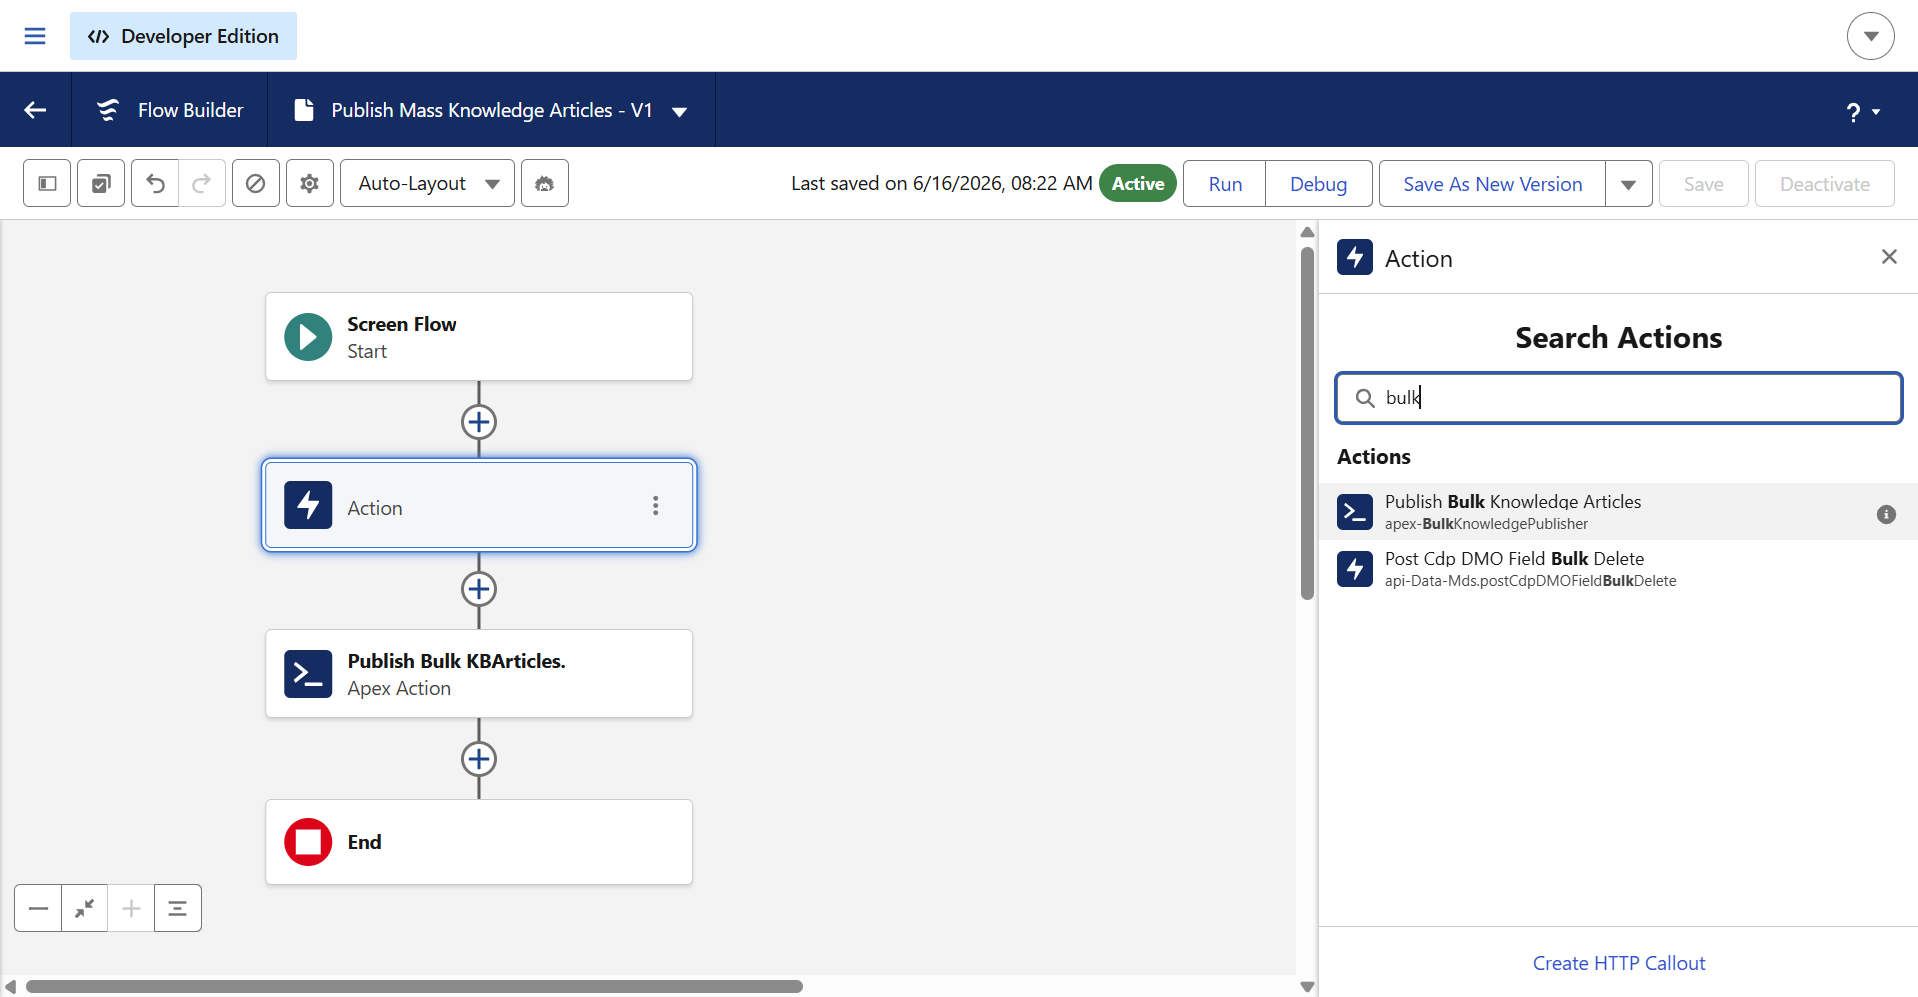
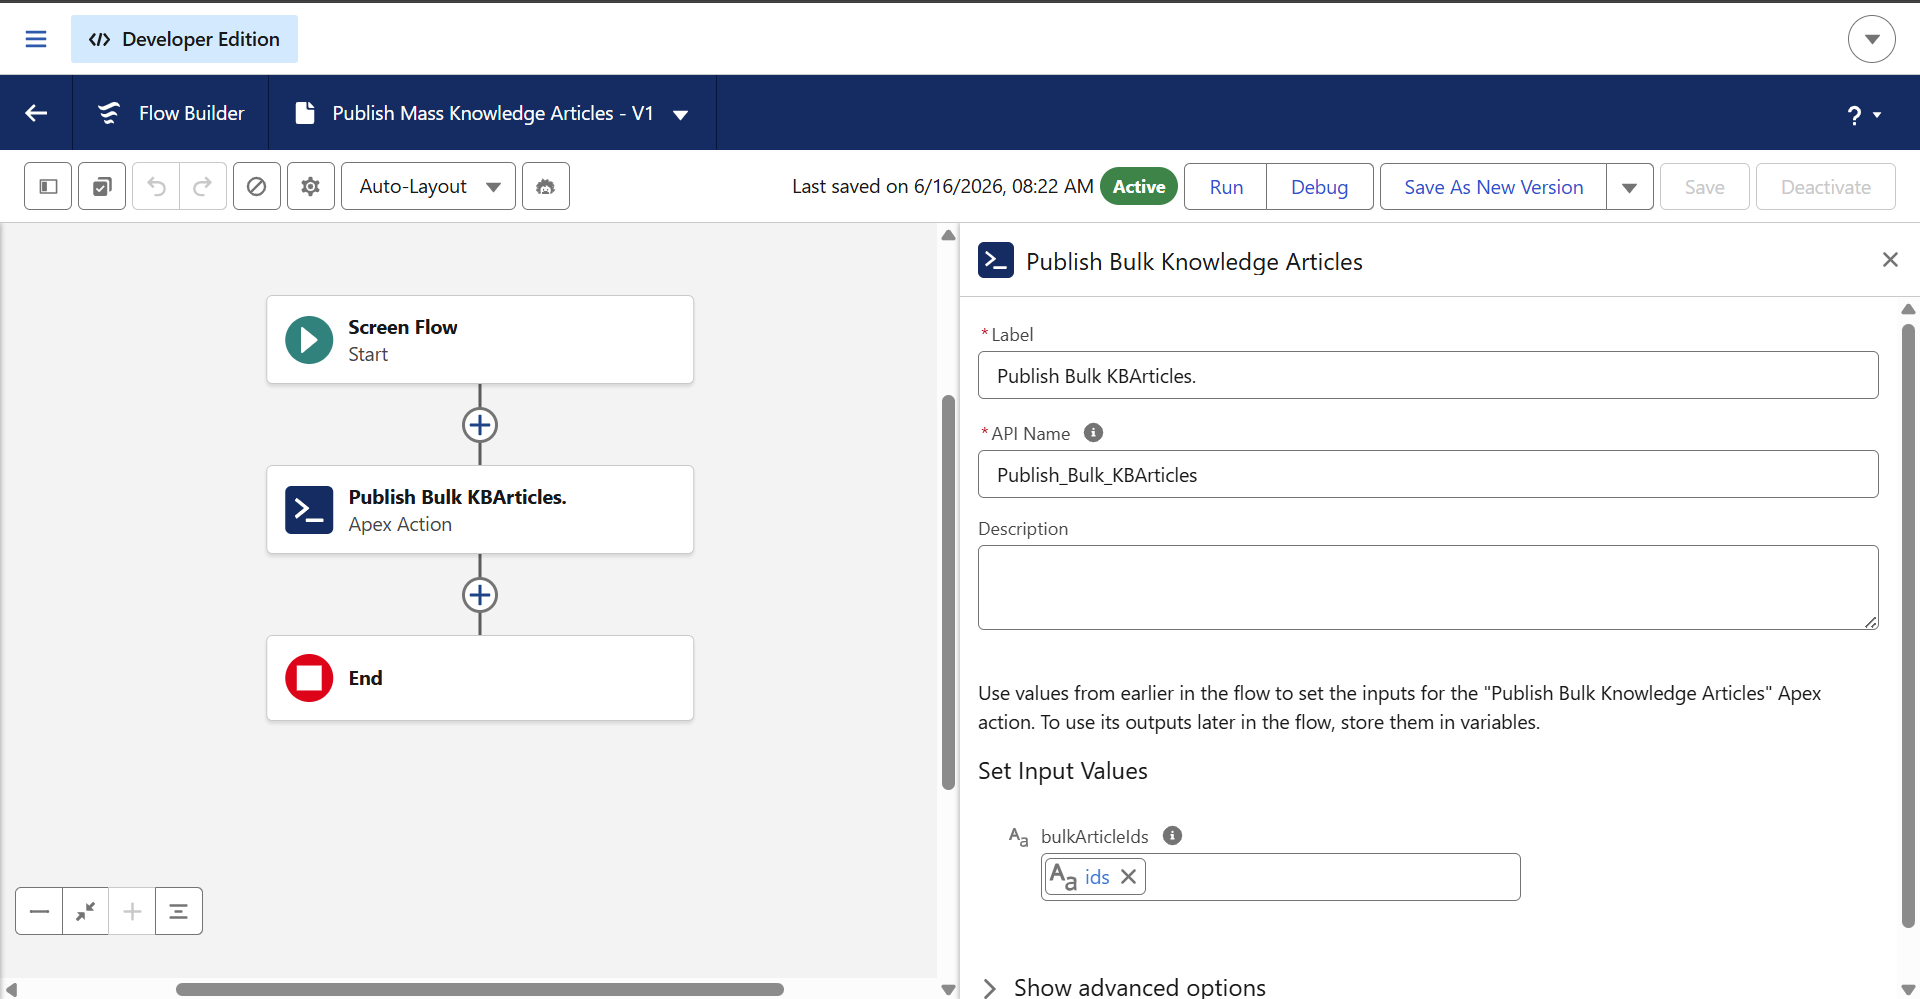
The first step is to add the Action element below the Screen element. Then we can search for ‘Bulk’, and the BulkKnowledgePublisher Apex class will be displayed.
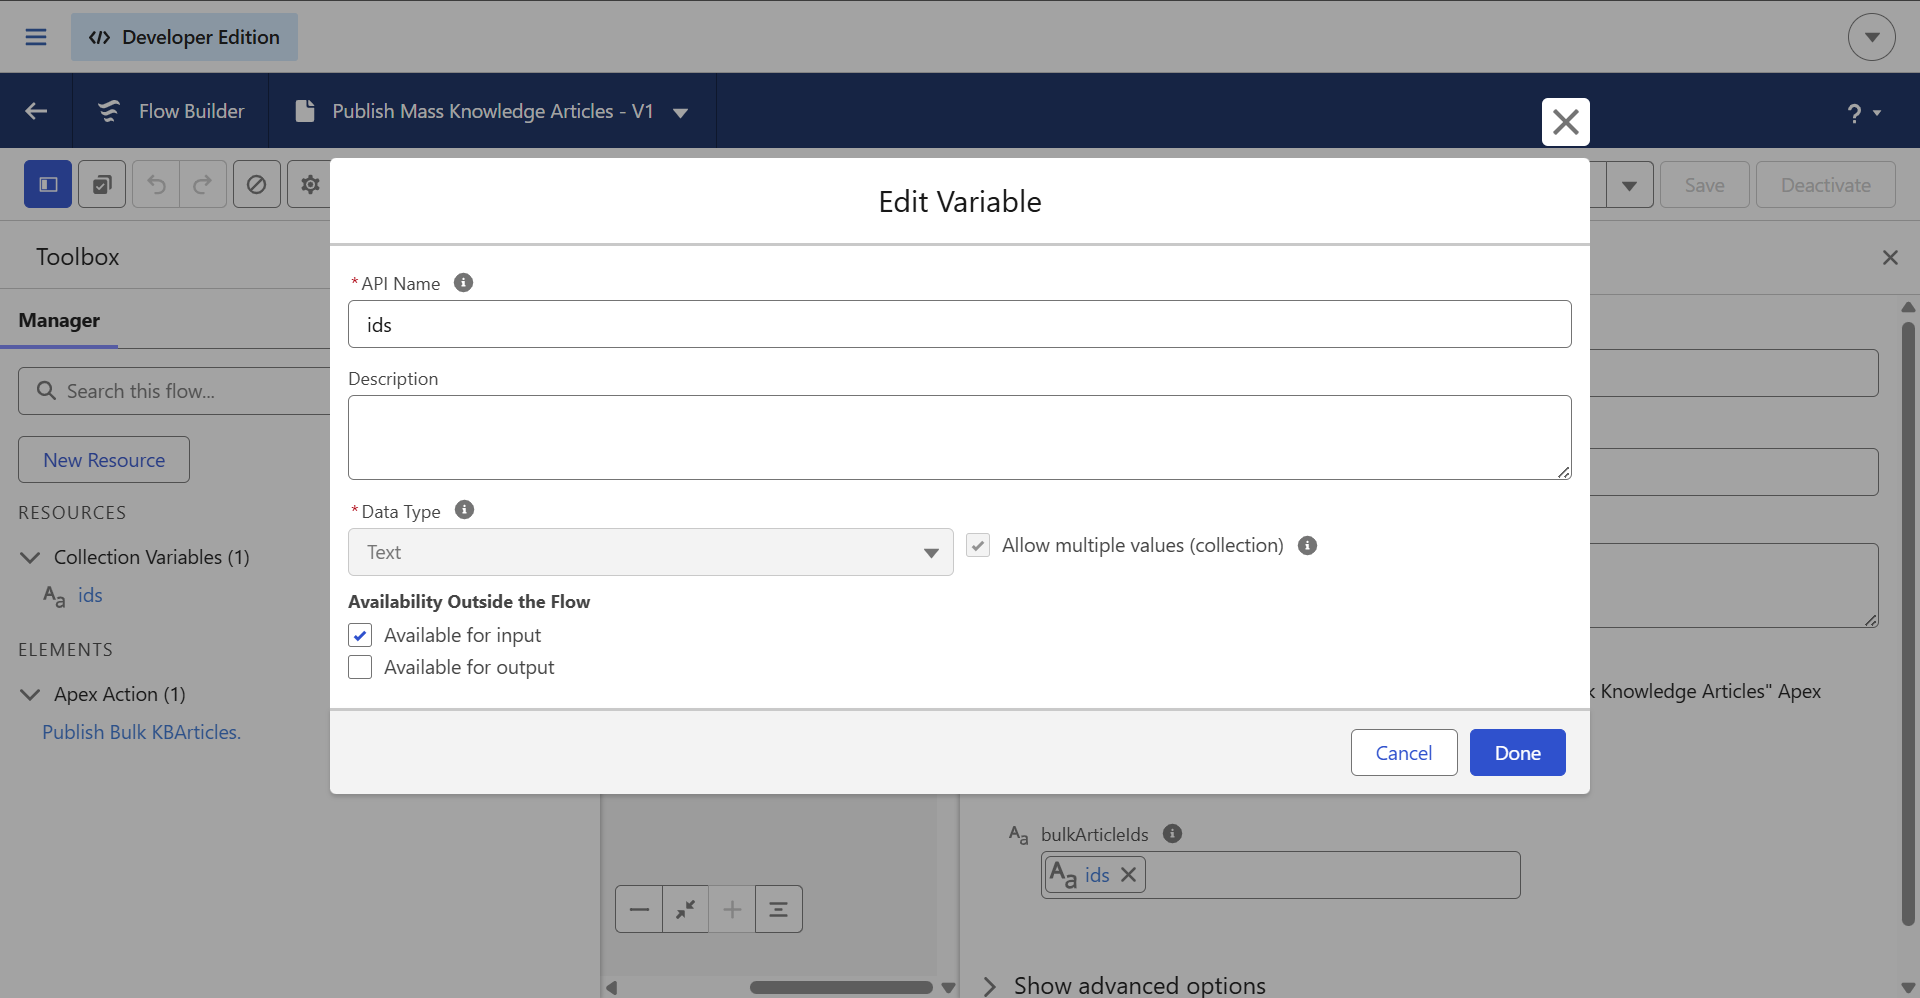
Next, create a resource as shown in the image below, using ‘ids’ as the variable name, and enable ‘Allow multiple values’
Next, map those variables in the Action element under the ‘Set Input Values’ section.
Next, Click on save and activate the flow.
STEP 3: Create a List Button and Map It to the Screen Flow
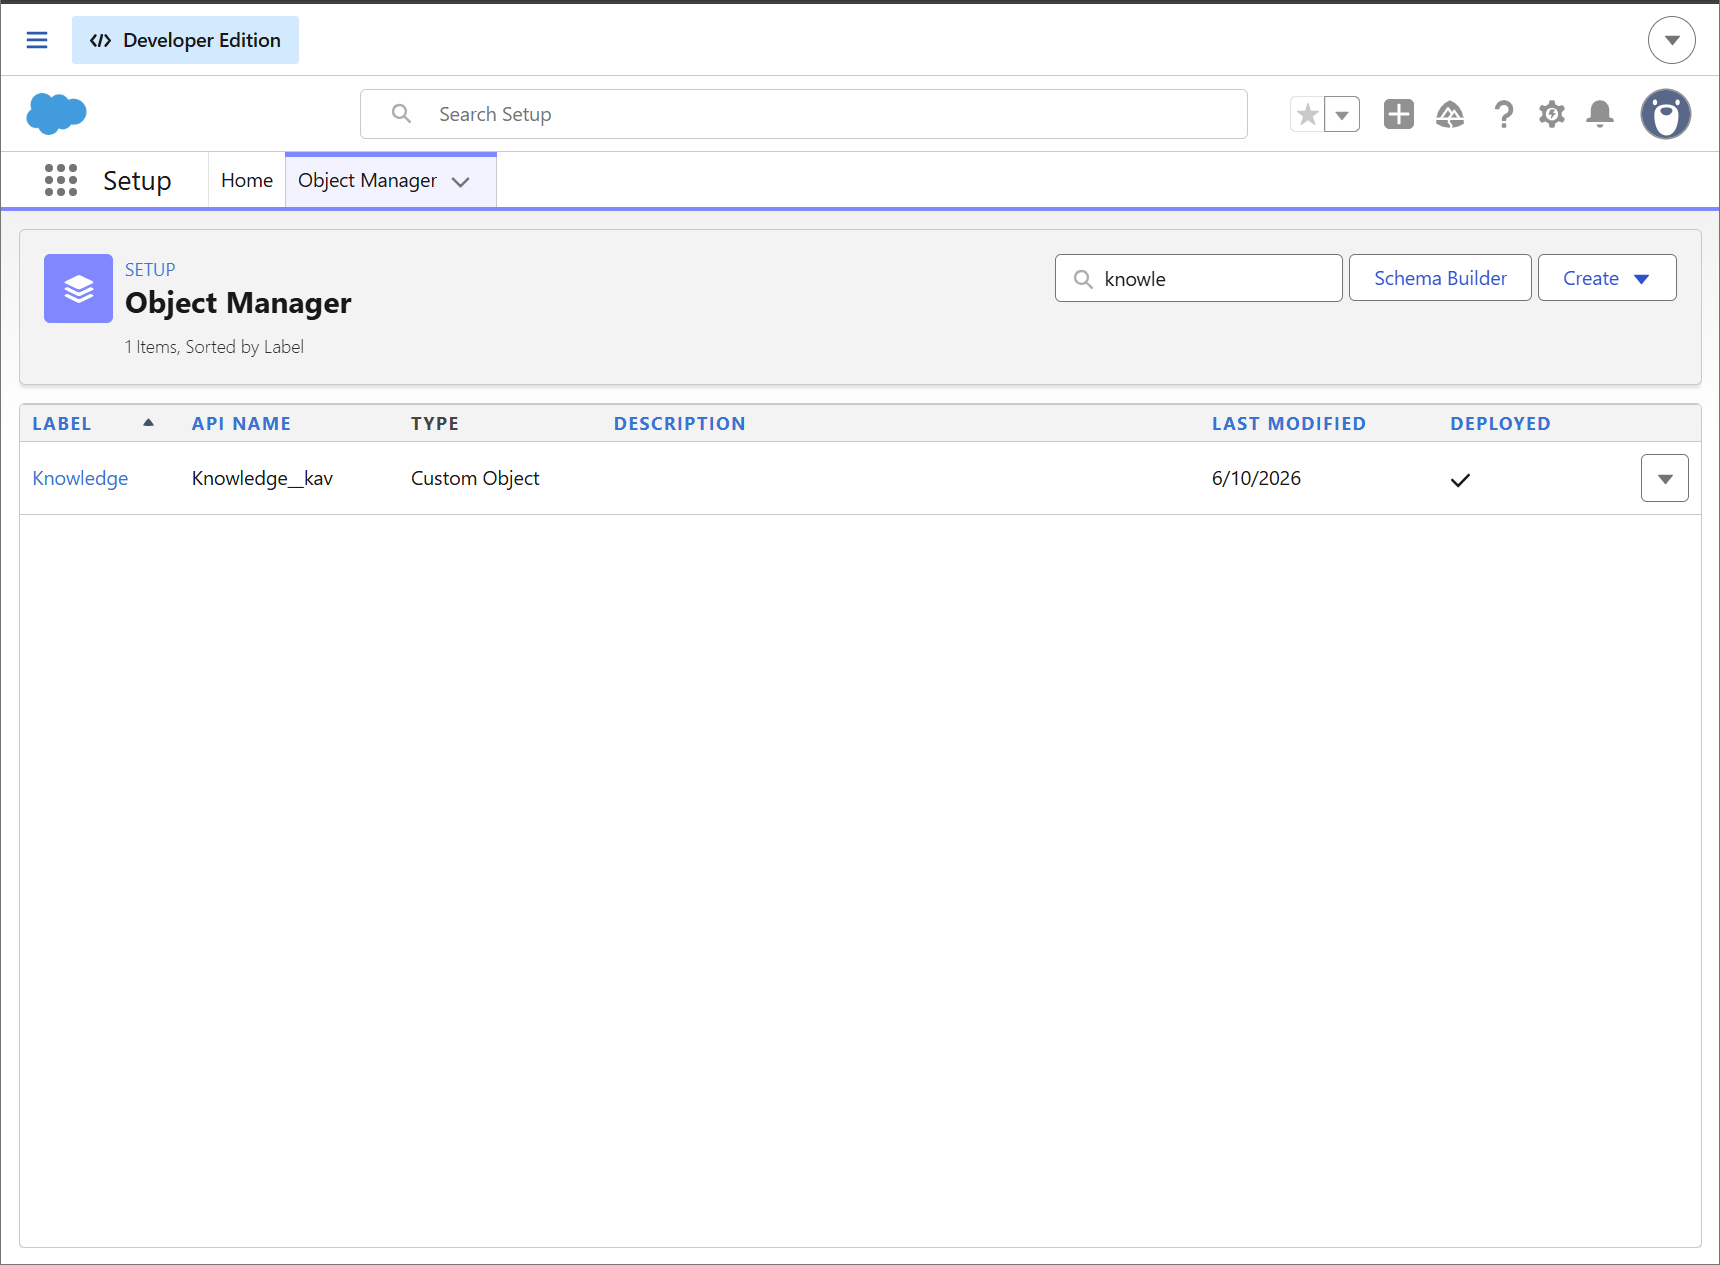
1. Go to Object Manager
- Navigate to Setup
- Search for Object Manager
- Open the Knowledge object (
Knowledge__kavor Knowledge object in your org)
2. Go to Buttons, Links, and Actions
- In the object menu, click Buttons, Links, and Actions
- Click New Button or Link
3. Create the List Button
Fill in the details:
- Label: e.g.,
Publish Article (ai12z) - Name: auto-generated
- Display Type: List Button
- Behavior: Display in existing window or new window
- Content Source: URL
4. Add Flow URL
Since this is a list button, you typically pass selected record IDs using recordIds.
Example URL:
/lightning/flow/Your_Flow_API_Name?recordIds={!GETRECORDIDS($ObjectType.Knowledge__kav)}
How to trigger a webhook event by Custom Delete Button in KB article
STEP 1: Create a apex class for delete article.
This Apex class will do bulk delete with files included.
NOTE: It will delete from ai12z as well as from salesforce portal.
public without sharing class KnowledgeDeleteHandler {

    private static final String CONNECTOR_ENDPOINT =
        'https://<YOUR_AI12Z_HOST>/api/connector/<CONNECTOR_ID>?projectId=<PROJECT_ID>';

    @InvocableMethod(label='Delete External Articles' description='Sends archived article IDs to external system and deletes them in Salesforce')
    public static void processArticleDeletion(List<List<Id>> articleIdLists) {
        // FIX: If the input list is null or empty, stop immediately to prevent NullPointerException
        if (articleIdLists == null || articleIdLists.isEmpty()) {
            return;
        }
		List<Id> articleIds = new List<Id>();
		 System.debug(LoggingLevel.ERROR, '--- KNOWLEDGE TRIGGER: DELETE DETECTED ---');
		 System.debug(LoggingLevel.ERROR, String.format('--- KNOWLEDGE TRIGGER: DELETE DETECTED ---{0}', new List<Object>{ articleIds }));
        for(List<Id> subList : articleIdLists) {
			// Safety check inside the sublist loop as well
            if (subList != null) {
            articleIds.addAll(subList);
			}
        }

        if(articleIds.isEmpty()) return;

        // Enqueue the async job
        System.enqueueJob(new AsyncDeleteQueueable(articleIds));
    }

   public without sharing class AsyncDeleteQueueable implements Queueable, Database.AllowsCallouts {
    private List<Id> idsToSend;

    public AsyncDeleteQueueable(List<Id> ids) {
        this.idsToSend = ids;
    }

    public void execute(QueueableContext context) {
        // 1. Query the Knowledge Articles
        List<Knowledge__kav> articles = [
            SELECT Id, KnowledgeArticleId, Title
            FROM Knowledge__kav
            WHERE Id IN :idsToSend
        ];

        // 2. Query related Files, including fields from the ContentDocument record
        List<ContentDocumentLink> cdLinks = [
            SELECT ContentDocumentId, LinkedEntityId,
                   ContentDocument.Title,
                   ContentDocument.LatestPublishedVersionId
            FROM ContentDocumentLink
            WHERE LinkedEntityId IN :idsToSend
        ];

        Set<Id> contentDocumentIds = new Set<Id>();

        // Map to group file objects by their parent Article Version ID
        Map<Id, List<Map<String, Object>>> articleIdToFileData = new Map<Id, List<Map<String, Object>>>();

        for (ContentDocumentLink cdl : cdLinks) {
            contentDocumentIds.add(cdl.ContentDocumentId);

            if (!articleIdToFileData.containsKey(cdl.LinkedEntityId)) {
                articleIdToFileData.put(cdl.LinkedEntityId, new List<Map<String, Object>>());
            }

            // Construct the file object node
            Map<String, Object> fileNode = new Map<String, Object>{
                'fileId' => cdl.ContentDocumentId,
                'fileName' => cdl.ContentDocument.Title,
                'versionId' => cdl.ContentDocument.LatestPublishedVersionId,
                'isdeleted' => true // Hardcoded to true since this is a deletion process
            };

            articleIdToFileData.get(cdl.LinkedEntityId).add(fileNode);
        }

        // 3. Construct the deeply nested JSON Payload
        List<Map<String, Object>> articlesPayloadList = new List<Map<String, Object>>();

        for (Knowledge__kav article : articles) {
            // Get the specific files for this article, or an empty list if none exist
            List<Map<String, Object>> relatedFiles = articleIdToFileData.containsKey(article.Id)
                                        ? articleIdToFileData.get(article.Id)
                                        : new List<Map<String, Object>>();

            // Build the individual article node
            Map<String, Object> articleNode = new Map<String, Object>{
                'knowledgeArticleId' => article.KnowledgeArticleId,
                'versionId' => article.Id,
                'title' => article.Title,
                'files' => relatedFiles
            };

            articlesPayloadList.add(articleNode);
        }

        // Build the outer payload
        Map<String, Object> payload = new Map<String, Object>{
            'action' => 'delete',
            'articles' => articlesPayloadList
        };

        // 4. Execute HTTP Callout
        Http http = new Http();
        HttpRequest request = new HttpRequest();
        request.setEndpoint(CONNECTOR_ENDPOINT);
        request.setMethod('POST');
        request.setHeader('Content-Type', 'application/json');

        // Serialize the payload
        String jsonBody = JSON.serialize(payload);
        request.setBody(jsonBody);
        System.debug('Payload being sent: ' + jsonBody); // Useful for debugging the exact structure

        HttpResponse response;
        try {
            response = http.send(request);
        } catch (Exception e) {
            System.debug('Callout failed: ' + e.getMessage());
            return;
        }

        // 5. Process Deletions if the Callout is Successful
        if (response.getStatusCode() == 200) {
            System.debug('External API successful. Proceeding with deletion.');

            // 5a. Delete the related Files (ContentDocuments)
            if (!contentDocumentIds.isEmpty()) {
                List<ContentDocument> docsToDelete = new List<ContentDocument>();
                for(Id docId : contentDocumentIds) {
                    docsToDelete.add(new ContentDocument(Id = docId));
                }

                try {
                    delete docsToDelete;
                    System.debug('Successfully deleted ' + docsToDelete.size() + ' related files.');
                } catch (Exception e) {
                    System.debug('Failed to delete related files: ' + e.getMessage());
                }
            }

            // 5b. Delete the Knowledge Articles via KbManagement
            for (Knowledge__kav article : articles) {
                try {
                    if (article.KnowledgeArticleId != null) {
                        KbManagement.PublishingService.deleteArchivedArticle(article.KnowledgeArticleId);
                        System.debug('Successfully deleted version via KbManagement: ' + article.KnowledgeArticleId);
                    }
                } catch (Exception e) {
                    System.debug('Failed to delete individual master article: ' + e.getMessage());
                }
            }
        } else {
            System.debug('External API returned an error status: ' + response.getStatusCode() + ' - ' + response.getBody());
        }
    }
}
}
After creating a Apex class, kindly include ai12z host into remote site settings to avoid cross origin issue.
STEP 2: create a screen flow for delete multiple article to configure into kb page

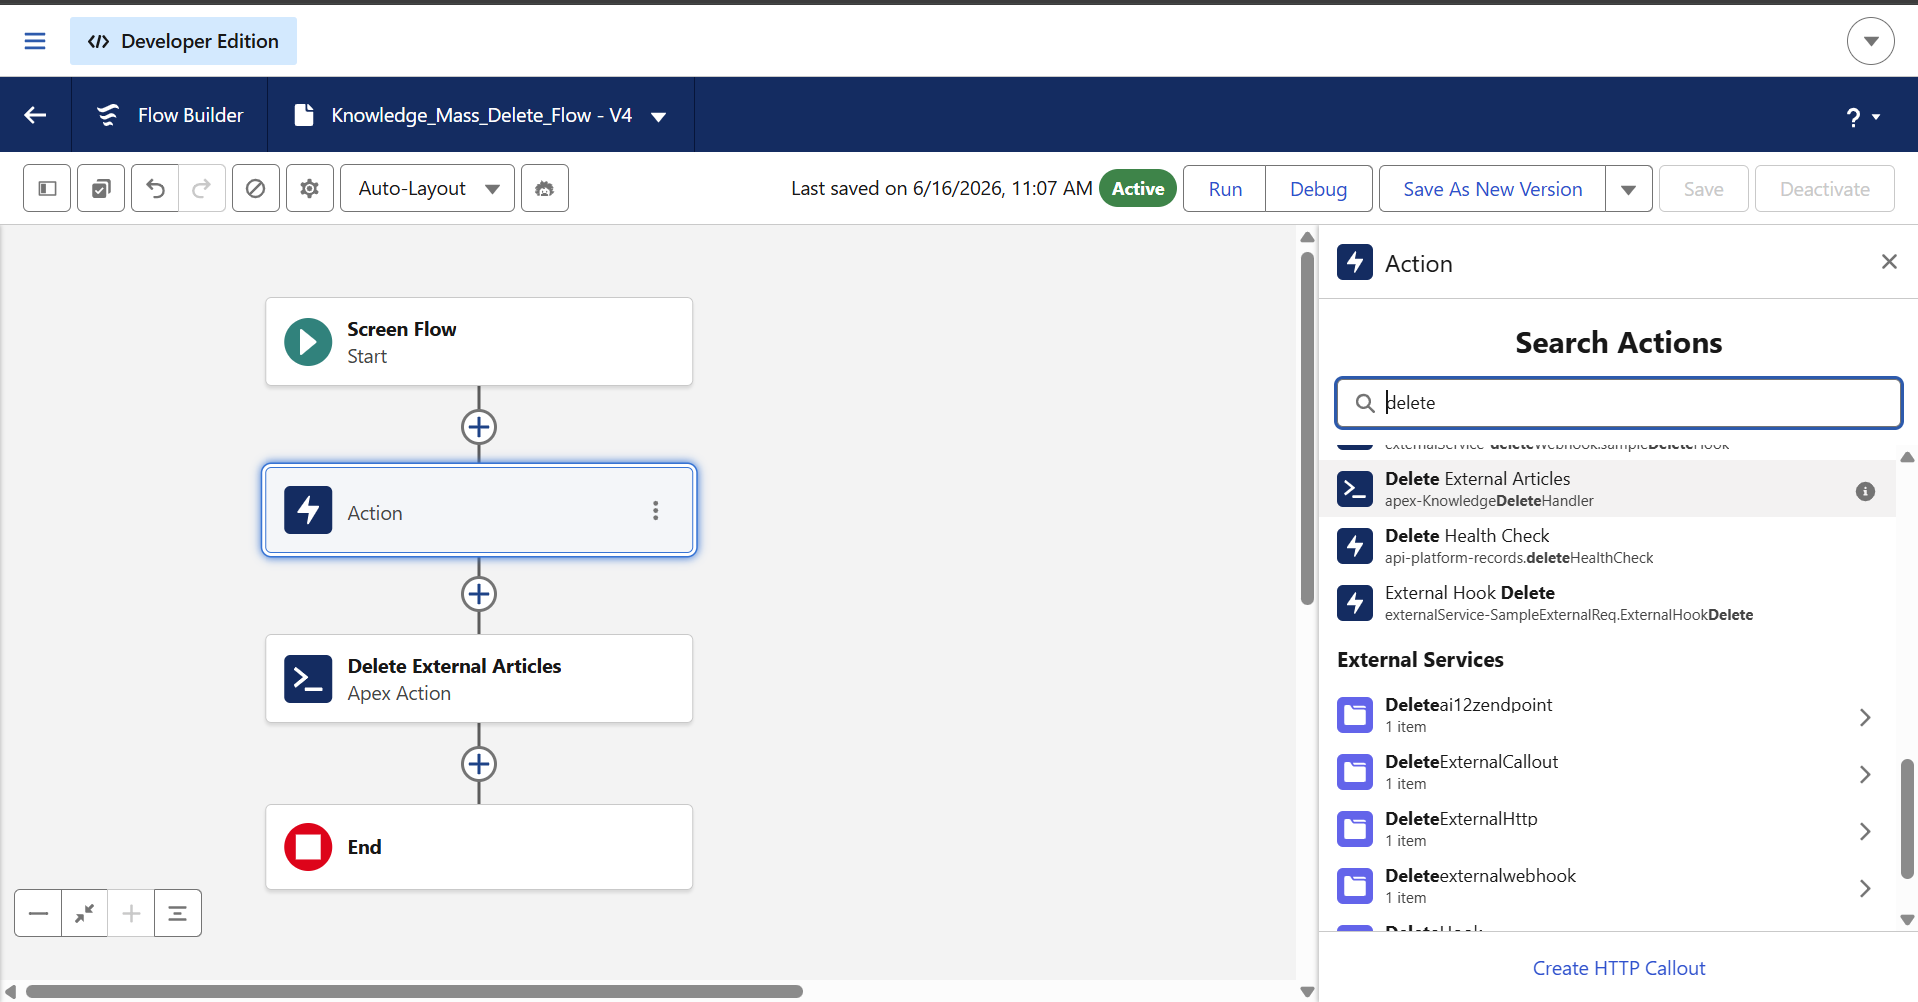
The first step is to add the Action element below the Screen element. Then we can search for Delete, and the Apex class will be displayed.
Next, create a resource as shown in the image below, using ‘ids’ as the variable name, and enable ‘Allow multiple values’
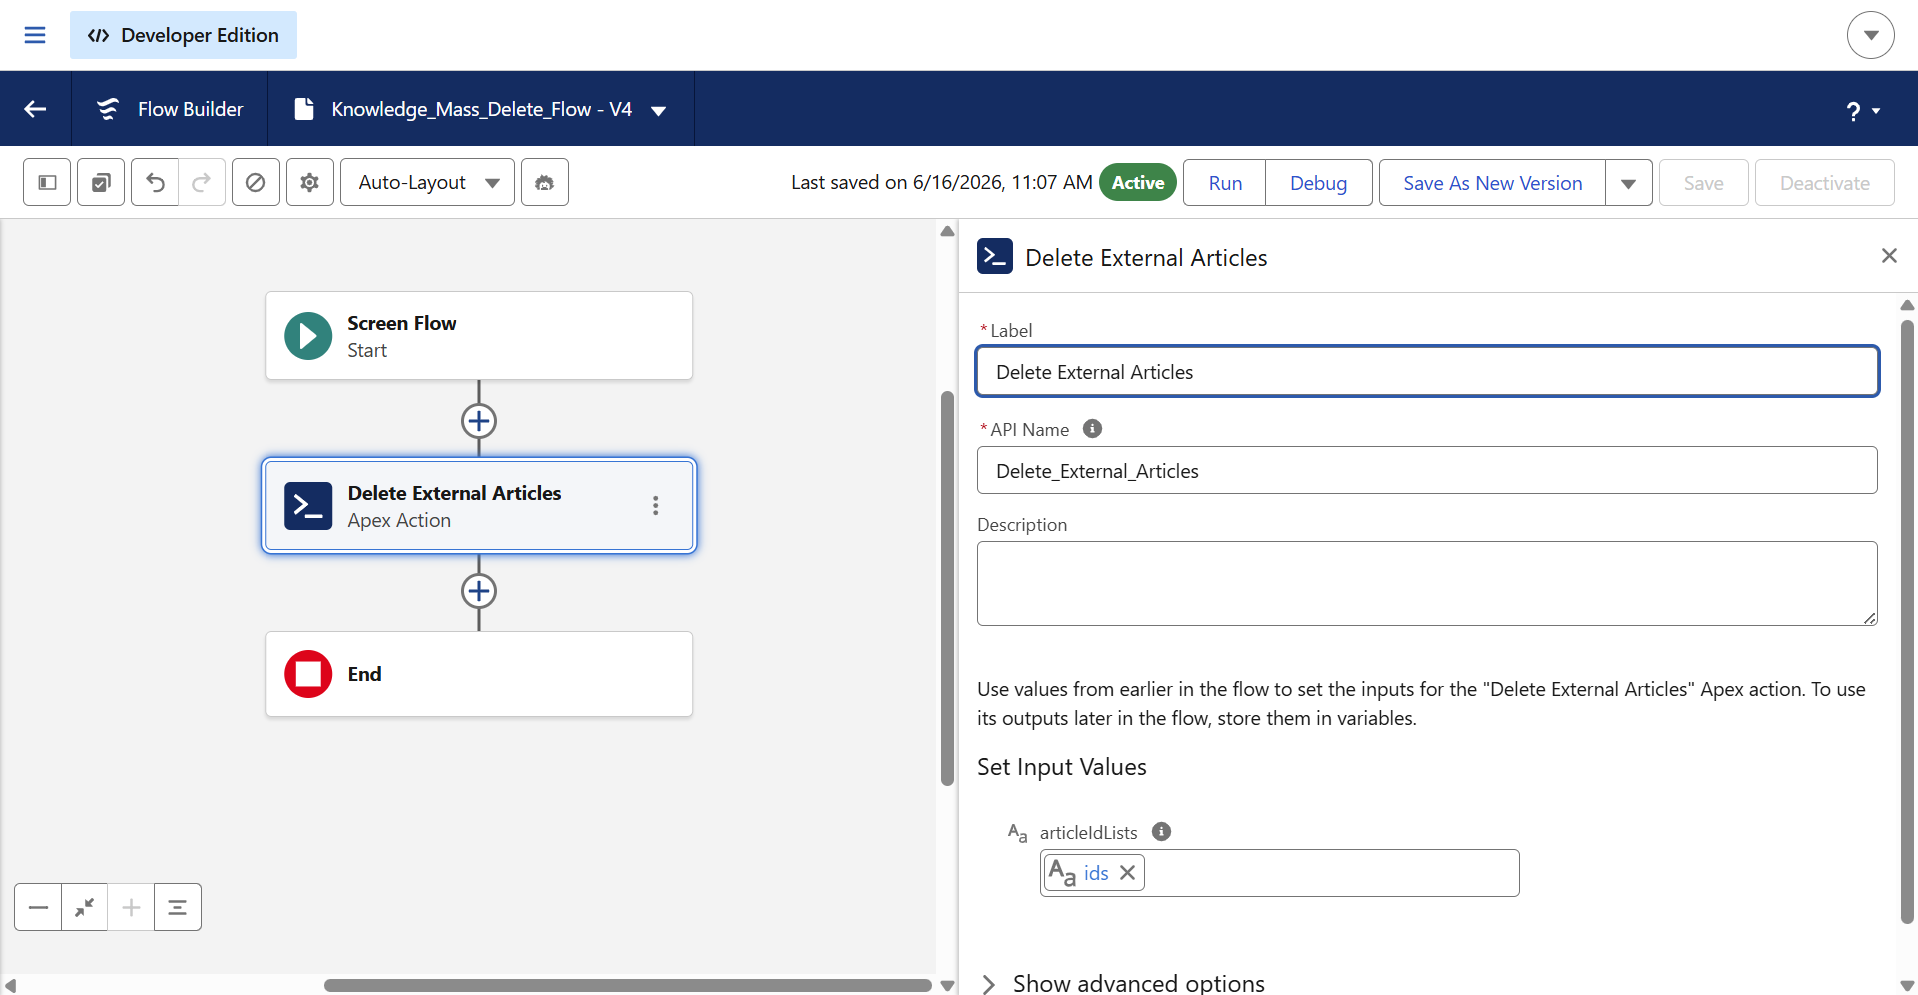
Next, map those variables in the Action element under the ‘Set Input Values’ section.
Next, Click on save and activate the flow.
STEP 3: Create a button with delete screen flow
Similar to the publish action, we need to create a new button with the label “Delete Article (ai12z)”
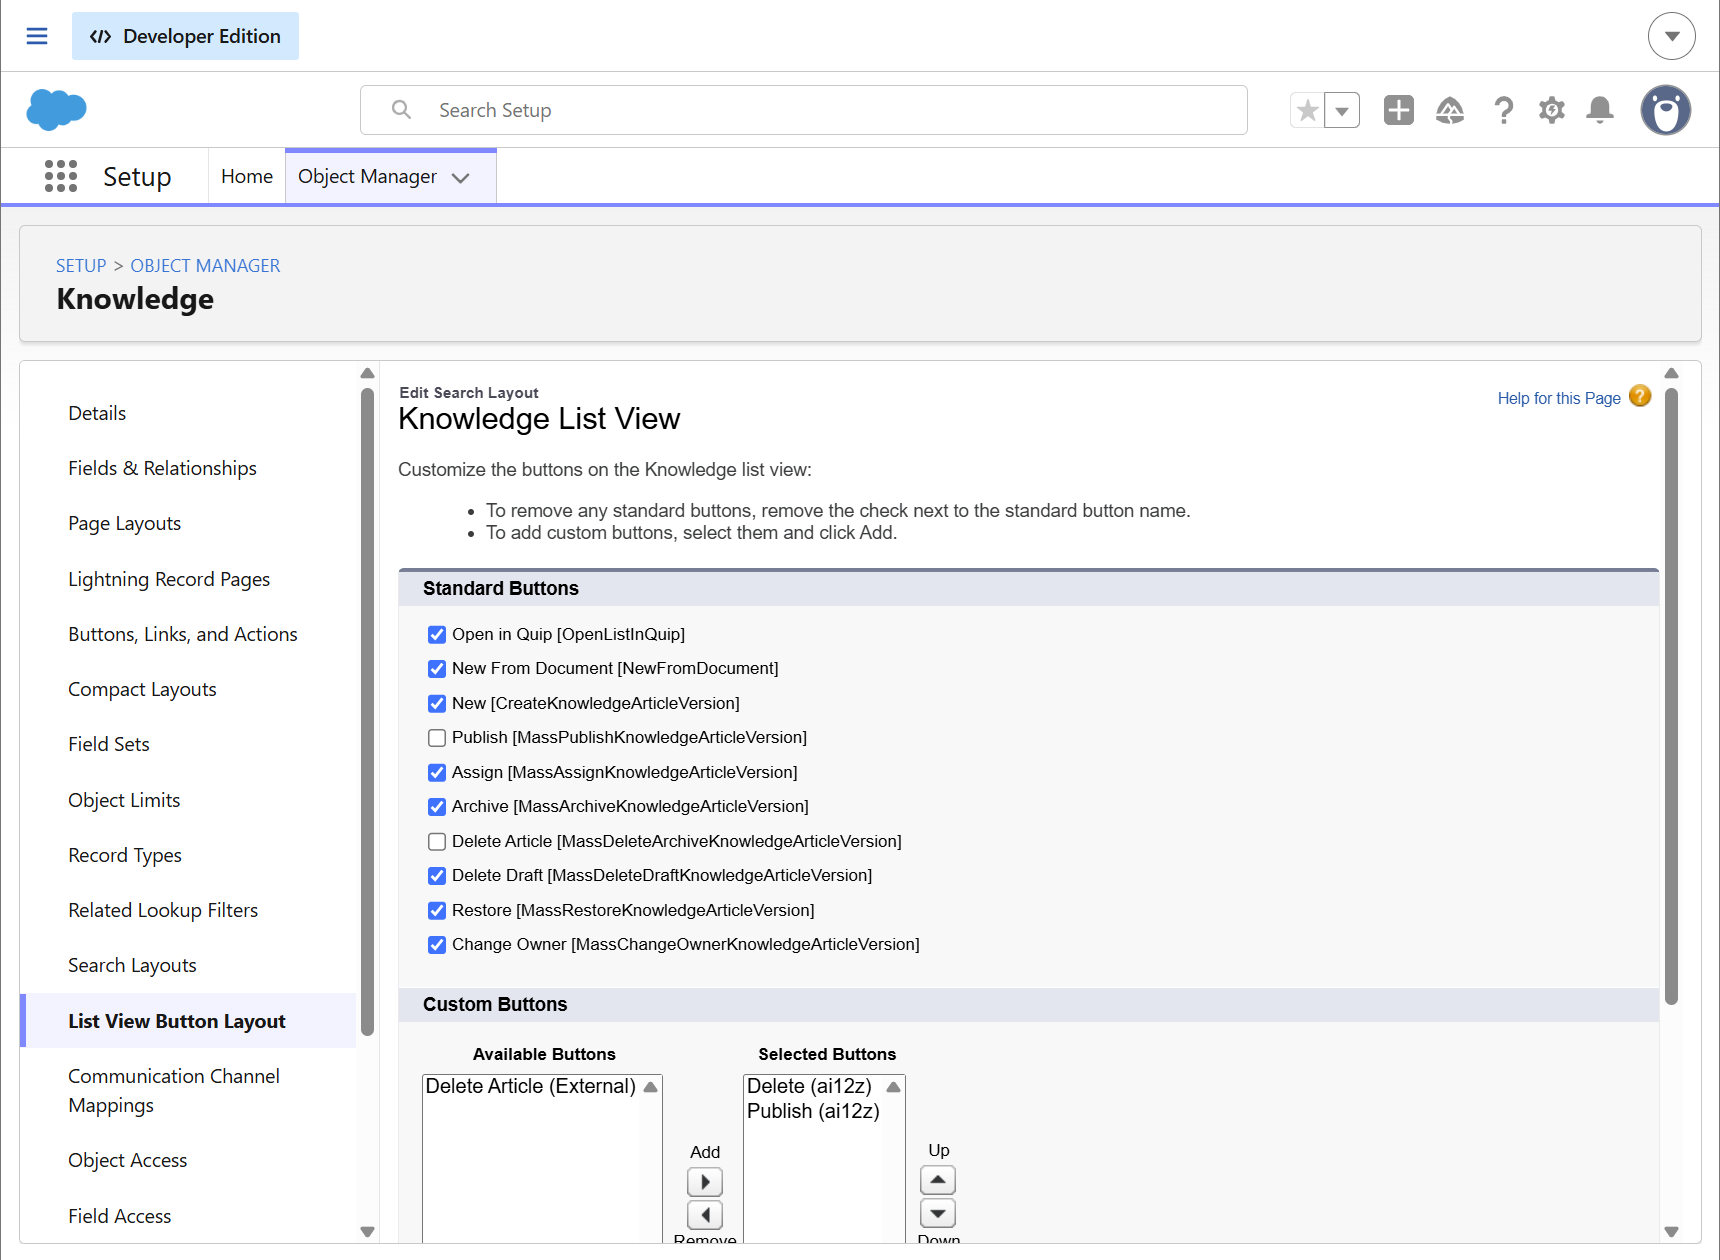
Configure those buttons to list view layout
Navigate to Object Manager and in knowledge menu, Click on list view button layout and then edit action will shown the below attached image.
Add those custom button under available buttons into Selected buttons.